SK-ACPe
InStAllAtIon & oPerAtIng MAnuAl
Recovery Procedure:
To clone the readers:
1. From the Explorer screen, right click on the Location Name.
2. Select New.
3. Select Readers.
4. Select Quick Find (with less than 20 readers), or Search if (with more than 20 readers).
5. SK-NET™ will find the original reader(s) as new ones.
6. Click OK to bring them into the system. Do not log in at this time.
7. Look under All Readers and you will notice that you now have duplicate reader(s) names. The old
one will still have the red X through the icon, and the new one will not.
8. Drag and drop the New reader(s) on to the old reader(s) with the same name. You will be asked
to Replace the reader, click Yes. This will clone the original reader settings in to the New reader.
9. Right click on All Readers and select Login. Now all the readers should have a green check next to
each reader.
1.9 Replacing an SK-ACPE
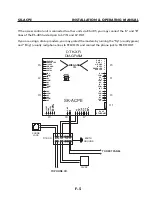
When replacing or adding an SK-ACPE to a system, it is recommended to perform a “2-beep” power reset
(See Sec. 1.8).
NOTE:
There are no changes required in SK-NET™ when replacing a card reader connected
to the SK-ACPE
While replacing the SK-ACPE it is recommended that you note the serial number of the board being replaced
along with the new board being used for the replacement. This will simplify the following steps used in this
procedure.
Note: DO NOT delete any readers from the Explorer screen!
After completing the replacement of the board you need to start SK-NET™, connect and login. Click on the +
next to All Readers and you will notice a red X through the reader(s) icon(s) which have been replaced.
1. Left click on All Readers, now it will be highlighted.
2. At the top of the Explorer screen click on Explorer.
3. Select View.
4. Select Details. Notice that on the right hand side of the Explorer screen all of the readers are listed
along with the Node ID, Logged In, Serial Number, Version, and Type.
5. Right click on All Readers.
6. Select New, Readers, Quick Find (for less than 20 readers) or Search (for more than 20 readers).
7. After SK-NET™ finds the new readers, click OK to add them to the system (note that under All Readers
the new readers found show the serial number as the name of the reader). Do not login.
8. Look at the serial number or name of the new reader(s) and drag and drop the new one over the
old one with the red X through the icon (be sure to include the “–1” or “–2” as part of the serial
number).
9. When asked ‘Do you wish to replace the reader?’ Answer YES. SK-NET™ now will use the data
files from the old reader and program them in to the new reader including sending cards.
10. Repeat steps 8 and 9 for all readers being replaced.
11. Test a card or two, the replacement is now complete.
E-5
Summary of Contents for SK-ACPE
Page 1: ...SK ACPE User Installation Manual...
Page 2: ...COPYRIGHT 2013...
Page 4: ......
Page 40: ...www SecuraKeyStore com 800 878 7829 sales securakeystore com...

