background image

www.securemme.it

info@securemme.it

CONDIZIONI DI GARANZIA

Questo prodotto è garantito contro malfunzionamen-
ti  dovuti a difetti di fabbricazione. Per aver diritto alla    
garanzia, rivolgersi presso il vostro rivenditore esibendo 
lo scontrino o documento fiscale che comprovi la data di 
acquisto. Per garanzia si intende la sostituzione o ripa-
razione gratuita delle parti riscontrate difettose per vizi 
di fabbricazione, escluse spese di trasporto.

Non sono coperti da garanzia:

- danni derivanti da una installazione non conforme alle 
istruzioni riportate su questo manuale;
- l’uso non corrispondente alle modalità di funziona-
mento qui illustrate;
- parti estetiche, elettriche ed elettroniche danneggiate 
per negligenza nell’uso, per manutenzione effettuata da 
personale non autorizzato, trasporto effettuato senza le 
dovute cautele, ed in generale per circostanze che non 
possono imputarsi a difetti di fabbricazione.
E’ escluso il risarcimento dei danni diretti ed indiretti 
causati a persone o a cose conseguenti alla sospensio-
ne o uso del sistema. Nel caso si rendesse necessario 
un intervento a domicilio, il cliente è tenuto a corrispon-
dere un diritto di chiamata per le spese di trasferimento 
del personale tecnico autorizzato.
In nessun caso Securemme Srl può essere ritenuta    
responsabile per qualsiasi danno conseguente alla non
idoneità del prodotto in relazione al tipo di impiego a cui
viene destinato. In particolare Securemme Srl non è te-
nuta a garantire:
- che il prodotto non sia manipolabile o danneggiabile in
particolare da malintenzionati;
- che il prodotto sia in grado di prevenire danni a cose o 
a persone in occasione di furti, rapine o altri atti dolosi.
Di conseguenza Securemme Srl non è soggetta a       
responsabilità alcuna, sia civile che penale, in caso di 
danni alle cose o alle persone contestabili sulla base 
dell’inefficacia del prodotto fornito.

WARRANTY CONDITIONS

This product is warranted against malfunctions due 
to  manufacturing  defects.  To  be  eligible  for  warranty,         
please contact your dealer and exhibit the receipt in 
order to prove the date of purchase. The warranty covers 
the replacement or the free repair of the defective parts 
found due to manufacturing defects, shipping fees 
excluded.

The warranty doesn’t cover:

- damage due to installation not in accordance with the 
instructions given in this manual;
- the use of the device not correspondant to the 
operatine mode illustrated here;
- ahestetic parts, electrical and electronic equipment 
damaged by negligent use, for unauthorized 
maintenance carried by staff, shipment without due 
care, and in general for all those circumstances that 
cannot be attribuited to manufacturing defects.
The compensation for direct and indirect damage 
caused to people or things resulting from the use or 
suspension of the system is excluded. In case you 
need technical assistance, the customer is required 
to pay this intervention for the cost of transferring the 
authorized technician.
In no case will Securemme Srl be held responsible for 
any damage which is a consequence of the unsuitability 
of  the  product  for  its  type  of  use.  In  particular,              
Securemme Srl is not held to guarantee:
- that the product cannot be manipulated or damaged 
by ill-intentioned people;
- that the product is able to prevent damage to things 
and people during burglaries, hold-ups or other criminal 
acts.
Consequently Securemme Srl will not be subject to any
responsibility, either civil or penal, in the case of damage 
to things or people which are questionable on the basis 
of the inefficacy of the product supplied.

20

IT

EN

Summary of Contents for DSMART

Page 1: ...SMART ...

Page 2: ...Technical features Avvertenze 4 Warnings Installazione 5 Installation Configurazione installatore 7 Installer set Configurazione proprietario 12 Owner configuration Collegamento rete elettrica 19 Power Grid Schedule Condizioni di garanzia 20 Warranty conditons Dima 21 Power Grid Schedule www securemme it info securemme it ...

Page 3: ...pz HANDLE cod 5000XXX 4 POMOLO PER CILINDRO cod 5032XXX 1 pz KNOB FOR CYLINDER cod 5032XXX 5 VITE FISSAGGIO PLACCA SUPPORTO BATTERIA cod VT80M3XZB25XX 1 pz FIXING SCREW FOR SUPPORT BATTERY PLATE cod VT80M3XZB25XX 6 BATTERIA RICARICABILE cod PP8000KXXXXBT 1 pz RECHARGEABLE BATTERY cod PP8000KXXXXBT 7 CARICABATTERIE cod CB8000XBKXXXX 1 pz CHARGER cod CB8000XBKXXXX 8 MAGNETE ADESIVO cod MG8000XXXXXPO...

Page 4: ...interspace handle key center 85 mm The device can be installed on all European cylinder with an 8 mm diameter removable knob Easy to install it doesn t require any connection with mains supply or battery Safe and encrypted Bluetooth technology OPENING OF THE DOOR WITH Smartphone download the D SMART application from the Apple Android and Windows Phone stores to manage the access and to configurate...

Page 5: ...o 0 accensione sistema R Sicurezza dopo 3 tentativi di apertura errati o impropri il dispositivo si blocca per 10 minuti www securemme it info securemme it TECHNICAL FEATURES Dimensions 230 mm x 65 mm x 25 mm Circuit board Bluetooth technology BT 4 1 Communication frequency 2 4 GHz Battery type Lithium ion rechargeable battery Li Ion Battery features 3 7 V 3700mAh use only Securemme battery and ch...

Page 6: ...lla sinistra È possibile portare le batterie ricarica bili esaurite gratuitamente presso un centro di smaltimento autorizzato nella propria zona In questo modo si rispettano le disposizioni legali e si contribuisce alla tutela dell ambiente WARNINGS Failing to comply what is written in this instructions manual may affect the proper functioning and the subsequent lost of the warranty Any other use ...

Page 7: ...o nella zona di rotazione 4 Montare il cilindro sulla serratura e fissarlo www securemme it info securemme it INSTALLATION Before you proceed fully recharge the battery until the led on the charger becomes green 1 Make a cut in the inner panel as shown in fig 1 having dimensions of 50 x 105 mm to housing the motor unit Cut out the paper template available on page 21 and place it on the inner door ...

Page 8: ...supporto batteria 10 Inserire la batteria fino in battuta e provare a fare la prima manovra cliccando il tasto di apertura e chiusura 5 Install the housing motor on the stem of the cylinder until it stops ensuring the alignment of the flat surface of the stem with the housing motor 6 Fix the housing motor by tightening the screw with a 8 mm hex wrench 7 Place the battery support plate on the panel...

Page 9: ... Phone ed aprirla 14 Aggiungere un nuovo dispositivo cliccando su Associa altre serrature www securemme it info securemme it D SMART CONFIGURATION Installer 11 Turn the smartphone bluetooth on and scan for new devices 12 Connect it with the device having the default name Securemme 13 Download the specific smartphone application by typing Dsmart or Securemme into the Ios Android and Windows Phone s...

Page 10: ...atura 18 Cliccare data e ora e salvare per sincronizzare l ora con il dispositivo 15 Click on Scan to find the Securemme device with its relative address 16 Click on Securemme and connect the device with the smartphone 17 Click on the logo settings to get access to the lock detail 18 Click on date and time and save to synchronize the time with the device IT EN www securemme it info securemme it 8 ...

Page 11: ...hiusura automatica della serratura ad ogni chiusura della porta è necessario applicare il magnete 19 Insert the administrator code master 20 Click on Advanced options for the configuration of the door 21 Set the motor power the power is set on a standard default value it is possibile to increase this value of 15 in case of more friction Please note that an increase of the power corresponds to an i...

Page 12: ...i ricorda di verificare che i valori acquisiti con la porta chiusa siano differenti rispetto ai valori con porta aperta 23 Closing sensor use the default magnetometer affix the magnet on the door frame 24 Opening direction set right or left according to the door orientation 25 Calibrate magnometer Apply the magnet on the frame by placing it in the moddle of it in line with the handle see Fig 11 cl...

Page 13: ...ME MAGNETE ADESIVO posizionare in centro al telaio in linea d asse con la maniglia ADHESIVE MAGNET put it in the middle of the frame in line with the handle axis PORTA DOOR fig 11 www securemme it info securemme it 11 ...

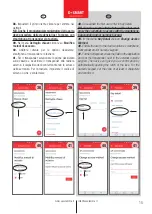
Page 14: ...droid Windows Phone ed aprirla 29 Aggiungere un nuovo dispositivo cliccando su D SMART CONFIGURATION User 26 Activate the smartphone bluetooth and scan for new devices 27 Connect it with the device having the default name Securemme 28 Download the specific smartphone application by typing Dsmart or Securemme into the Ios Android and Windows Phone store then open it 29 Add a new device by clicking ...

Page 15: ...sword di fabbrica master con una nuova password che deve essere compresa tra 6 e 10 caratteri e deve contenere almeno una lettera e un numero 30 Click on Scan to find the Securemme device with its relative address 31 Connect the device with the smartphone 32 Click on the logo settings to get access to the lock detail 33 Click on CHANGE ADMINISTRATOR CODE 34 Attention for the safety of the device c...

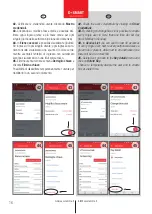
Page 16: ...ssword la password deve essere compresa tra 6 e 10 caratteri e deve contenere almeno una lettera e un numero con fermare la password creata e salvare il nuovo utente Click on Update administrator code It is recommended to write down and to keep in a safe place the new personal password If the password is lost it won t be possibile to recover it and the intervention of the technical assistance will...

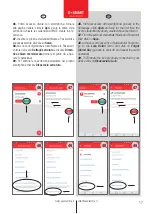
Page 17: ... tirando lo scrocco della serratura Per la tastiera impostare il codice di almeno 4 cifre e confermare 38 Once added the first user enter in Key detail N B Also the owner administrator of the door must know the credentials to access with the smartphone transponder and or numeric keypad 39 In the menu Key Detail click on Change Access Method 40 Enable the user to the desired options smartphone tran...

Page 18: ... 45 Elimina utente tornare al menù Dettaglio chiave e cliccare Elimina chiave Possibilità di disabilitare temporaneamente l utente per riabilitarlo in un secondo momento 42 Check the user s credentials by clicking on Show Credentials 43 By clicking on change time slot is possible to enable every single user to more than one time slot per day from Monday to Sunday 44 In Access List you can see the ...

Page 19: ...are al punto 46 e ripe tere l operazione 49 Per eliminare la serratura accreditata nel proprio smartphone cliccare Disassocia serratura 46 First user access with smartphone go back to the homepage click Open and only for the first time the user s credential previously created should be filled in 47 Fill in the personal credentials Name and Password then click on Save 48 In the case of faulty entry...

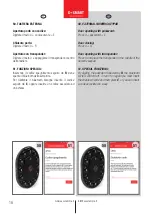
Page 20: ...rratura Per riattivare il bluetooth bisogna inserire il codice seguito da E oppure inserire un codice associato ad una chiave 50 EXTERNAL NUMERIC KEYPAD Door opening with password Press 0 password E Door closing Press 0 R Door opening with transponder Press 0 and place the transponder in the middle of the numeric keypad 51 SPECIAL FUNCTIONS By digiting the password followed by R the bluetooth syst...

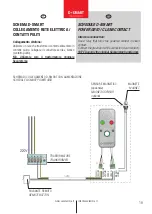
Page 21: ...Securemme SCHEDULE D SMART POWER GRID CLEAN CONTACT Intercom connection Use a relay that turns the powered contact in clean contact Connect the green and white connector clean contact NOTE Use only the original Securemme transformer SCHEMA DI COLLEGAMENTO D SMART CON ALIMENTAZIONE SCHEDULE D SMART POWER GRID MAGNETE MAGNET SENSORE MAGNETICO opzionale MAGNETIC SENSOR optional TRASFORMATORE TRANSFOR...

Page 22: ...eguenza Securemme Srl non è soggetta a responsabilità alcuna sia civile che penale in caso di danni alle cose o alle persone contestabili sulla base dell inefficacia del prodotto fornito WARRANTY CONDITIONS This product is warranted against malfunctions due to manufacturing defects To be eligible for warranty please contact your dealer and exhibit the receipt in order to prove the date of purchase...

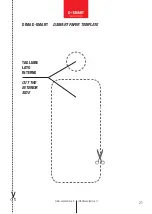
Page 23: ...www securemme it info securemme it DIMA D SMART D SMART PAPER TEMPLATE TAGLIARE LATO INTERNO CUT THE INTERIOR SIDE 21 ...

Page 24: ... ...
Reviews: