11
CHARGING THE BATTERY
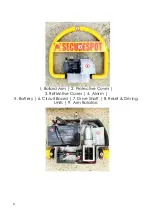
To remove your bollard battery for charging, you can follow
these simple steps:
1.
Raise the bollard in the upright position. You can do this using
your remote control, or if your battery is completely
depleted, you can manually raise your bollard, ensuring you
do so very gently and slowly.
2.
Use your key to unlock the bollard base and carefully
remove and put aside.
3.
Unplug the
battery from the bollards’ connection.
4.
Using the provided wall charger, plug the battery into the
connection, and the charger into a power point.
PLEASE FOLLOW THESE SAFETY GUIDELINES
•
Check battery and cords for any signs of damage prior to
charging. If damaged, do not charge.
•
Ensure the battery is connected to the correct charger
provided.
•
Plug the wall charger directly into a wall socket, not through
an extension cord or power board.
•
For a full charge, the battery requires a minimum of 6, to a
maximum of 8 hours charging time.
•
LED indicators on the chargers may not be accurate in some
cases, so always go by charging time, rather than waiting for
the light to turn green.
BATTERIES THAT ARE LEFT LONGER THAN 8 HOURS ON CHARGE RISK
BOTH THE BATTERY & CHARGER BURNING OUT AND IN EXTREME CASES
MAY POSE A FIRE DANGER.
CHARGING SHOULD BE SUPERVISED, BE NO LONGER THAN 8 HOURS, AND
NOT LEFT ON CHARGE OVERNIGHT.


