Copyright, 2000, all rights reserved
•
Securitron Magnalock Corp., 550 Vista Blvd., Sparks NV 89434, USA
Tel: (775) 355-5625
•
(800) MAGLOCK
•
Fax: (775) 355-5636
•
Website: www.securitron.com
An ASSA ABLOY Group company
PN# 500-17700
Page 1
Rev. A.1, 8/00
SECURITRON MODEL TSH TOUCH SENSE HANDLE
INSTALLATION AND OPERATION INSTRUCTIONS
1. DESCRIPTION
Securitron's Model TSH is an exit device for doors secured by electric locks. It can be employed
as a door push or pull and is particularly well suited for
aluminum frame glass doors
. The
assembly consists of a plastic base with an electronic touch sensor mounted inside and an
aluminum handle which is used to pull or push the door open.. When the handle is touched, a
relay in the sensor is tripped, releasing the lock. The relay contacts are double pole with the
second pole being optionally employed to shunt either an alarm system or the alarm function of
an access control system. The unit’s sensitivity is adjustable. In the unlikely event of sensor
failure, a push switch is mounted on the plastic base. Depressing the switch has the same effect
as activating the sensor by touch and therefore represents built in safety redundancy.
The TSH
cannot be used outside in rain conditions.
As the TSH is normally used to allow egress on an electrically secured door, make sure
that you are complying with applicable building codes for your area. Check with your
local building department and/or fire prevention department.
2. PHYSICAL INSTALLATION
First, unscrew the handle from the plastic base (large Phillips screws) to reveal the base
mounting holes. Put the handle aside for now as initial mounting procedures concern the base.
2.1 MOUNTING HOLE DRILLING
Use the supplied template to set drilling positions for the two mounting holes. There are two
different hole diameters depending on the door type. Hollow metal doors employ supplied
machine screws and "blind nut" fasteners. The second method is to simply use wood screws (not
supplied) on a solid wood door. By "solid wood", we mean a hardwood interior rather than
pressed wood as the wood needs enough structural integrity to hold wood screws.
Note however
that when the TSH is used on a solid door, the door must be core drilled to get the wire way cable
to the hinge side for take-off via the supplied door cord
.
For other door types, such as a chalk
filled fire door, consult the factory for additional mounting accessories.
Note that the Touch
Sense Handle may not be used on a fire rated door that requires a fire rated latch
(the TSH
has no latch), but sometimes fire doors are used on openings where a fire rated barrier is not
required, because the door type has been selected for other reasons (such as solidity).
For a
hollow
metal door
, drill two 3/8" (9.5MM) diameter holes only deep enough to get through
the inner side of the door- not completely through the door.
For a
solid wood door
, you may elect to mount the handle with wood screws (not furnished).
We recommend 1 3/4" #14 wood screws with a hex, pan, oval or round head. Drill two 3/16"
(5MM) diameter holes to a depth of 1 1/4" (32MM).
2.2 WIREWAY HOLE DRILLING
The TSH connects to its power source and to the devices it controls via a six-conductor cable
with push-on connector (supplied). Exit from the door may be via the supplied door cord which
may be mounted at the top of the door where it is out of the way, or via any of many commercially
available transfer hinges or pivots which serve to route the wiring off the door in a concealed
manner. A
3/8" (9.5MM)
wireway hole is then drilled into the door. Note that
the template is
handed
. The TSH can be vertically flipped to suit a right hand or left hand door but you have to
know which way the aluminum handle will face in order to correctly orient the template.
2.3 MOUNTING THE PLASTIC BASE TO THE DOOR
In the case of a
hollow metal door
, identify the two supplied blind nuts. The nuts are used as
follows. Insert the nuts with the knurl engaging the edge of each hole. Then utilize the supplied
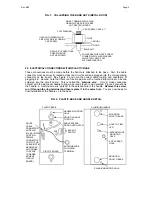
collapsing tool to collapse the nuts. Use of the tool is shown in Figure 1. Then, place a tooth
washer under the head of each screw and mount the plastic base. Do not over torque.
Summary of Contents for TSH
Page 8: ...Rev 8 00 Page 8...


