background image

500-33705, Rev A 

NOTE:


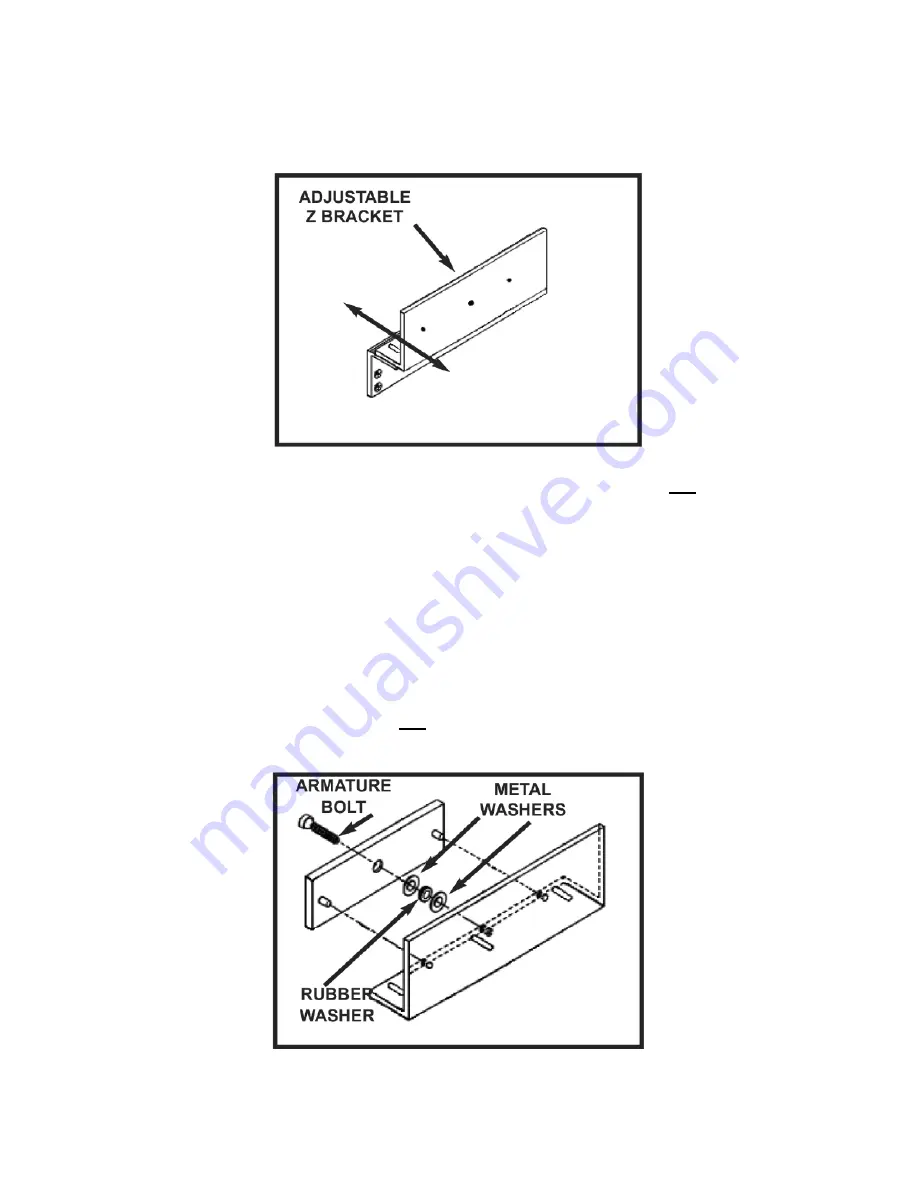
The cap screws are not tightened at this time.  The Z bracket 
must be adjustable. 

5.  ASSEMBLE the Z bracket with the provided socket head cap screws. 


NOTE: 

The rubber washer attached to the armature bolt is not 
removed. 

6.  MOUNT the armature plate to the adjustable section of the Z bracket 

using the armature bolt. 

NOTE: 

The washer assembly must be between the armature plate and 
the adjustable section of the Z bracket. 

7.  USE one rubber washer between the two metal washers on the 

armature bolt. 

NOTE: 

The armature must not be over tightened.  The armature must 
rock to align with the magnet. 


Summary of Contents for Vista V2M1200

Page 1: ...1 500 33705 Rev A V2M1200 1290 Series Maglock Installation Instructions Securitron Phoenix AZ 85044 Tel 1 800 624 5625 Mon Fri 6 00am 4 00pm PDT Fax 1 800 232 7329 www securitron com ...

Page 2: ...V2M1200 1290 on an Out Swinging Door 4 Determining the Door Frame Header 4 Installing the Armature Plate on a Solid Door 5 Installing the Armature Plate on a Hollow Door 5 Installing the V2M1200 1290 on an In Swinging Door 6 Wiring the V2M1200 1290 9 Electrical Specifications 9 Typical Magnetic Lock Wiring 9 Wire Gauge Chart 9 Magnetic Lock Care and Maintenance 10 Troubleshooting 10 VistaCare Warr...

Page 3: ...n Switch DPS uses a change over reed switch sensor Besides the unmonitored version the V2M1200 1290 Series Maglock is available with either a MBS a DPS or both LED Operation Colors for V2M1200 1290 with MBS The LED operation color can be set in the field Colors can be reversed by reversing the two pin plug connection on the Printed Circuit Board PCB The factory default setting is as follows LED in...

Page 4: ...ad screw and cover see Figure 1 Wiring Compartment AND TOGGLE the 12V 24V slide switch to the desired position Figure 1 Wiring Compartment 3 REPLACE the cover and Phillips head screw Installing V2M1200 1290 on Out Swinging Door Determining the Door Frame Header 1 DETERMINE the type of door frame header and whether a filler plate header bracket or angle bracket is required for installation see Figu...

Page 5: ... the installation template against the door 5 TAPE the installation template in place 6 LOCATE and MARK the hole locations to the door and header frame Installing the Armature Plate on a Solid Door 7 DRILL a 1 4 6 35 mm diameter hole through the armature side of the door see Figure 3 Installing Armature to Solid Door 8 DRILL a 1 2 12 7 mm diameter hole into the door to accommodate the armature bol...

Page 6: ... Figure 4 Figure 3 Installing Armature to Solid Door Installing V2M1200 1290 on In Swinging Door 1 FASTEN the L bracket on the door frame in a suitable location 2 MOUNT the magnetic lock to the L bracket 3 ENSURE the magnetic lock does not obstruct the closing of the door 4 CONNECT the correct voltage to the magnetic lock ...

Page 7: ...to the armature bolt is not removed 6 MOUNT the armature plate to the adjustable section of the Z bracket using the armature bolt NOTE The washer assembly must be between the armature plate and the adjustable section of the Z bracket 7 USE one rubber washer between the two metal washers on the armature bolt NOTE The armature must not be over tightened The armature must rock to align with the magne...

Page 8: ... bracket assembly is firmly against the closed door 11 TIGHTEN the cap screws holding the Z bracket armature plate assembly 12 FASTEN the Z bracket assembly to the door using the supplied screws 13 ENERGIZE and DE ENERGIZE the magnetic lock several times to open and close the door in order to check the completed alignment and installation of the magnet and armature plate ...

Page 9: ...er Supply to Magnetic Lock 12 VDC 50 feet 100 feet 150 feet 200 feet 300 feet 400 feet 500 feet 750 feet 1000 feet 24 VDC 200 mA 24 22 22 22 20 18 18 16 14 24 24 24 22 22 22 20 20 18 300 mA 24 22 22 20 18 18 16 14 14 24 24 22 22 22 20 20 18 16 400 mA 22 22 20 18 18 16 14 14 12 24 22 22 22 20 18 18 16 14 600 mA 22 20 18 18 16 14 14 12 10 24 22 22 20 18 18 16 14 14 800 mA 22 18 18 16 14 12 10 10 8 2...

Page 10: ...C ripple in power supply REPLACE power supply Insufficient Holding Force Incorrect input voltage CHECK voltage switch position for correct setting Low input voltage CHECK power supply voltage wire gauge incorrect for wire run Misalignment of armature plate CHECK to ensure armature plate covers all magnetic poles of the lock Armature plate screwed tight to door CHECK that armature plate rocks on do...

Page 11: ...URITRON s sole option may be the identical item or a newer unit which serves as a functional replacement In the event that the product type has become obsolete in SECURITRON s product line this VISTA warranty will not apply This VISTA warranty also does not apply to custom built to order or non catalog items items made by others such as batteries returns for payment distributor stock reductions re...

Page 12: ...ociated with Hanchett Entry Systems Inc an ASSA ABLOY Group company Copyright 2016 Hanchett Entry Systems Inc All rights reserved Reproduction in whole or in part without the express written permission of Hanchett Entry Systems Inc is prohibited ...

Reviews: