background image

7

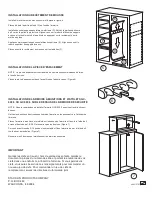
INSTALLATION OF GC-900-5 or GC-500-5 PISTOL-AMMO CABINET 

ON TOP OF SECURITY CABINET

NOTE:  The GCD-924-5 security cabinet must be installed as described above.

Remove the top hole plugs from the cabinet by pushing out from the inside of the cabinet.

Place the Pistol-Ammo cabinet on top and assemble with (2) 1/4-20 nuts and bolts.  Do not 

tighten bolts.  (Figure 7)

Drill (4) 3/16" pilot holes into the wall studs and secure the cabinet to the wall using (4) lag 

bolts and washers.  (Figure7)

Tighten the (2) bolts that connect the cabinets.

STACK-ON PRODUCTS COMPANY

P. O. BOX 489

WAUCONDA, IL 60084

4943-0707

2 12

5

6

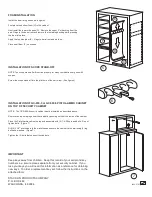
FOAM INSTALLATION

Install the foam lining as shown in figure 5.

First place the bottom foam (C) in the cabinet. 

Next install the lower side pads (D).  Remove the upper 2" of backing from the 

pad.  Gage to the barrel rest and remove the remaining backing while pressing 

the foam into place.

Apply the top side foam (E).  Gage to barrel rest and work up.

Place shelf foam (F) on shelves.

C

D

E

F

INSTALLATION OF SCOPE STAND-OFF

NOTE: The scope stand-off will function properly for many combinations of guns with 

scopes.

Screw the scope stand-off into the pilot hole of the barrel rest. (See figure 6)

IMPORTANT

Keep keys away from children.  Keep this record of your serial and key 

numbers in a secure place separate from your security cabinet.  If you 

lose your keys you will need this information as a reference for obtaining 

new keys.  To order a replacement key set, follow the instructions on the 

attached form.

Summary of Contents for Stack-On GCD-924-5

Page 1: ...ally the cabinet would be installed on the side wall of a closet Figure 3 The cabinet should be flat against the wall and floor Remove the baseboard if necessary Figure 4 Insert the plastic plugs in t...

Page 2: ...s shown in figure 5 First place the bottom foam C in the cabinet Next install the lower side pads D Remove the upper 2 of backing from the pad Gage to the barrel rest and remove the remaining backing...

Page 3: ..._______ Unit Dimensions________________________________________ Unit Description___________________________________________________________ Owner s Name ____________________________________ Date Purch...

Page 4: ...USE ACCIDENT NEGLIGENCE ABUSE OR MISUSE INCORRECT MAINTENANCE ALTERATION OR REPAIR BY ANYONE OTHER THAN STACK ON IN ADDITION THIS WARRANTY DOES NOT COVER ANY ACCESSORIES OR PARTS USED WITH OR IN THE...

Page 5: ...vrait tre appuy e plat contre le mur et le sol Retirez la plinthe si n cessaire Figure 4 Ins rez les bouchons de plastique dans les trous de fixation sup rieurs de l armoire si vous n installez pas l...

Page 6: ...ond C au fond de l armoire Installez ensuite les panneaux lat raux inf rieurs D Retirez la partie sup rieure de 5 cm de la pellicule protectrice Alignez vous sur le rebord inf rieur des appuis canon e...

Page 7: ...___________ Num ro de cl le cas ch ant ________________ Dimensions de l unit ________________________________________________________ Description de l unit ____________________________________________...

Page 8: ...GLIGENT ABUSIF D UNE MAUVAISE UTILISATION D UN ENTRETIEN INCORRECT D ALT RATIONS OU DE R PARATIONS PAR QUICONQUE AUTRE QU UN REPR SENTANT DE STACK ON EN OUTRE CETTE GARANTIE NE S APPLIQUE AUCUN ACCESS...

Page 9: ...los hoyos que se encuentran en la parte superior del gabinete si no se va a instalar un gabinete para pistolas y municiones sobre este gabinete Para Montar a la Pared Los 4 hoyos para montar el gabin...

Page 10: ...uma inferior C al gabinete Luego instale las almohadillas laterales D Quite unos 5 cm del forro de papel del hule espuma Fije a la orilla inferior del soporte para ca ones del gabinete y quite el rest...

Page 11: ..._____ N mero de Llave si aplica ______________ Dimensiones de la Unidad_____________________________________________________ Descripci n de la Unidad___________________________________________________...

Page 12: ...CCIDENTE NEGLIGENCIA ABUSO O MAL USO MANTENIMIENTO INCORRECTO ALTERACI N O REPARACI N POR CUALQUIER TERCERO QUE NO SEA STACK ON ADICIONALMENTE ESTA GARANT A NO CUBRE ACCESORIOS O PIEZAS USADAS CON O D...

Reviews: