background image

4327-0707

2 18

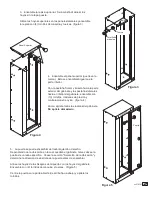
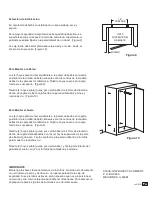
3.   Assemble the optional storage shelf at this time.  It will be 

easier to align the holes without the top on.

Use the top set of holes in the side panels and assemble the 

shelf with (4) machine screws and locking nuts. (See Figure 3)

4.   Assemble the top panel (which has the 

name plate).  This will assemble the same 

as the bottom panel.

With the front and back flanges on the 

outside of the cabinet and the side flanges 

on the inside of the cabinet, assemble with 

(10) carriage bolts, lock washers and nylon 

locking nuts. (See figure 4)

Now tighten all the fasteners in the cabinet 

body.  

Do not over tighten.

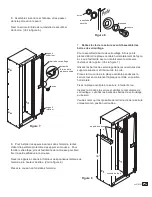
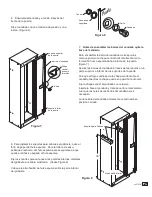
5.   The door can be assembled on the left or right.  Depending on where you 

are going to place your cabinet, you may want your door to open in a certain 

direction.  Review the section "Selecting a Location" and determine the 

opening direction before assembling the door.

Align the door hinge holes with the cabinet holes.  Assemble with (8) machine 

screws and locking nuts. (See figure 5)

Center the door in the opening (from top to bottom) and tighten the screws.

Top panel

Figure 4

STA

CK-

ON

Figure 5

STA

CK-

ON

Door

Figure 3

Machine 

screw

Shelf

Locking nut

Summary of Contents for Stack-On Series

Page 1: ...ollowing pages 1 Assemble the side panels to the back panel For easy assembly stand the panels up as shown Assemble each side with 6 carriage bolts locking washers and nylon locking nuts Hand tighten...

Page 2: ...arriage bolts lock washers and nylon locking nuts See figure 4 Now tighten all the fasteners in the cabinet body Do not over tighten 5 The door can be assembled on the left or right Depending on where...

Page 3: ...ntal position Secure the center plate to the lock with the nut Insert the key into the lock and try the locking mechanism Lubricate the tips of the lock bars if necessary Please note that the key only...

Page 4: ...Secure the cabinet to the wall using 2 lag bolts and washers Drill 2 pilot holes and secure the cabinet bottom to the floor with 2 lag bolts and washers WALL MOUNT OPTION The 4 mounting holes in the r...

Page 5: ..._______ Unit Dimensions________________________________________ Unit Description___________________________________________________________ Owner s Name ____________________________________ Date Purch...

Page 6: ...USE ACCIDENT NEGLIGENCE ABUSE OR MISUSE INCORRECT MAINTENANCE ALTERATION OR REPAIR BY ANYONE OTHER THAN STACK ON IN ADDITION THIS WARRANTY DOES NOT COVER ANY ACCESSORIES OR PARTS USED WITH OR IN THE...

Page 7: ...Fixez les panneaux lat raux aux panneaux arri res Pour faciliter l assemblage placez les panneaux verticalement tel qu illustr Assemblez chaque panneau lat ral avec 6 boulons de carrosserie rondelles...

Page 8: ...sserie rondelles de blocage et crous de blocage en nylon Voir la figure 4 Serrez maintenant toutes les pi ces de fixation de corps de l armoire Evitez de trop serrer 5 Vous pouvez fixer la porte du c...

Page 9: ...ntale Fixez la plaque centrale la serrure l aide l crou Ins rez la cl dans la serrure et v rifiez le m canisme de verrouillage Lubrifiez les bouts des barres de verrouillage au besoin Veuillez noter q...

Page 10: ...2 rondelles Percez deux avant trous et fixez le fond de l armoire au plancher l aide de 2 tire fond et de 2 rondelles INSTALLATION AU MUR Les 4 trous de fixation a l arri re de l armoire doivent tre...

Page 11: ...___________ Num ro de cl le cas ch ant ________________ Dimensions de l unit ________________________________________________________ Description de l unit ____________________________________________...

Page 12: ...GLIGENT ABUSIF D UNE MAUVAISE UTILISATION D UN ENTRETIEN INCORRECT D ALT RATIONS OU DE R PARATIONS PAR QUICONQUE AUTRE QU UN REPR SENTANT DE STACK ON EN OUTRE CETTE GARANTIE NE S APPLIQUE AUCUN ACCESS...

Page 13: ...dad siga la secuencia exacta de los pasos a seguir 1 Ensamble los paneles laterales del gabinete Para mayor facilidad pare los paneles como se muestra Ensamble cada lado con 6 tornillos rondanas de pr...

Page 14: ...contratuercas de nylon figura 4 Ahora apriete todas las tuercas del gabinete No apriete demasiado 5 La puerta se puede ensamblar del lado izquierdo o derecho Dependiendo de la ubicaci n en la cual que...

Page 15: ...rca Inserte la llave al candado y trate de cerrar el mecanismo Lubrique las putas de las barras del candado si es necesario La llave sale del candado nicamente cuando est en posici n cerrada 8 Para in...

Page 16: ...llos para madera y rondanas c u Taladre 2 hoyos piloto gu as poco profundos y fije la parte inferior del gabinete al suelo con 2 c u tornillos para madera y rondanas Para Montar a la Pared Los 4 hoyos...

Page 17: ..._____ N mero de Llave si aplica ______________ Dimensiones de la Unidad_____________________________________________________ Descripci n de la Unidad___________________________________________________...

Page 18: ...CCIDENTE NEGLIGENCIA ABUSO O MAL USO MANTENIMIENTO INCORRECTO ALTERACI N O REPARACI N POR CUALQUIER TERCERO QUE NO SEA STACK ON ADICIONALMENTE ESTA GARANT A NO CUBRE ACCESORIOS O PIEZAS USADAS CON O D...

Reviews: