background image

MAINTAINING  YOUR  BIS

®

  Ultima  CF 

FIREPLACE

Creosote -  Formation and Need for Removal

When wood is burned slowly, it produces tar 

and  other  organic  vapors,  which  combine 

with expelled moisture to form creosote.  The 

creosote vapors condense in the relatively cool 

chimney flue of a slow-burning fire.  

As a result, creosote residue accumulates on the 

flue lining.  When ignited this creosote makes 

an extremely hot fire.

The chimney shall be inspected at least twice 

a year during the heating season to determine 

when a creosote buildup has occurred. 

When  creosote  has  accumulated  it  shall  be 

removed to reduce the risk of a chimney fire.

When  the  creosote  accumulation  is  large,  a 

creosote fire in the chimney can damage the 

chimney and overheat the surrounding wood 

framing.  Creosote formation in a chimney can 

be minimized by making sure there is always 

visible flame burning, avoid smouldering fires 

and by proper refuelling techniques.

Chimney Maintenance

Regular chimney inspection and maintenance 

combined with proper operation will prevent 

chimney fires. Keep your chimney clean.  Do not 

allow more than 1/16” (1.6 mm) creosote build 

up in your chimney.  The amount of creosote 

will depend on variables such as frequency of 

use and type of fire.  We recommend that you:

A. Initially inspect the chimney system weekly.  

From this, you will learn how often it will be 

necessary to clean your chimney.

B. Have your chimney cleaned by a qualified 

chimney  sweep.    If  you  wish  to  clean  it 

yourself, we recommend using a stiff plastic 

or non-metallic brush.  If a metal brush is 

used, its size should be slightly smaller than 

the flue to avoid damaging the chimney.  Do 

not use a brush that will scratch the stainless 

steel interior of the chimney.

C. Do  not  expect  chemical  cleaners  to  keep 

your chimney clean.  The rain cap can be 

removed for inspection and/or cleaning of 

the chimney. 

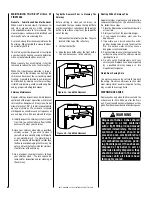
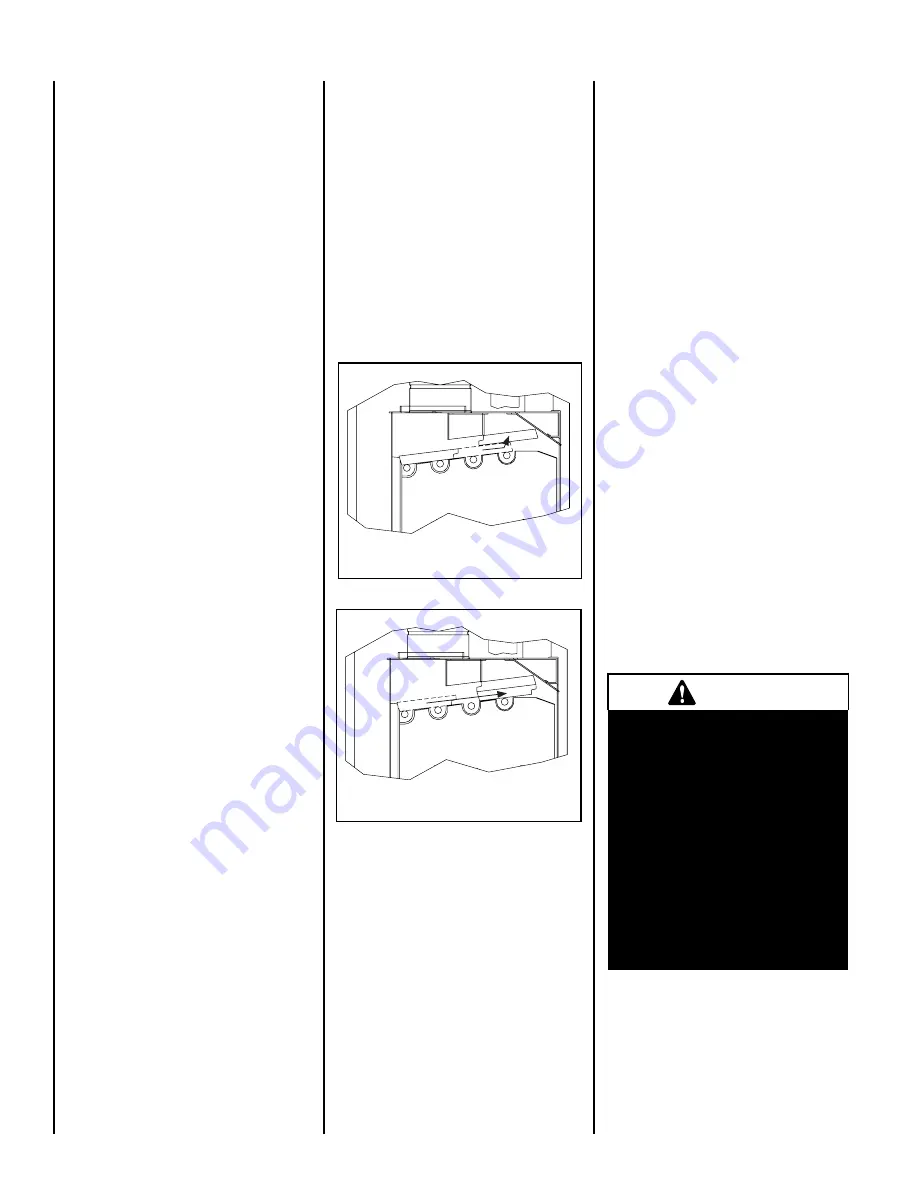
Top  Baffle  Removal  Prior  to  Cleaning  The 

Chimney 

Before  starting  to  clean  your  chimney,  we 

recommend that you remove the top baffle to 

avoid creosote dust collection at the top of the 

baffle.  Follow these steps to set the top baffle 

out of the way:

1. Remove the side refractory holder. They are 

located at the top of the refractory. 

2. Lift the front baffle.

3. Slide the back baffle under the front baffle.  

You now have access to the chimney.

       WARNING 

Disposal of Ashes:  Ashes should 

be  placed  in  a  steel  container 

with a tight fitting lid and moved 

outdoors immediately.  The closed 

container  of  ashes  should  be 

placed on a non-combustible floor 

or on the ground well away from 

all combustible materials, pend-

ing final disposal. If the ashes are 

disposed  of  by  burial  in  soil  or 

otherwise locally dispersed, they 

should be retained in the closed 

container  until  all  cinders  have 

thoroughly cooled.

Dealing With a Chimney Fire

Regular chimney maintenance and inspection 

can prevent chimney fires.  If you have a chimney 

fire, follow these steps:

1. Close the fireplace door and the combustion 

air controls.

2. Alert your family of the possible danger.

3. If  you  require  assistance,  alert  your  fire 

department.

4. If possible, use a dry chemical fire extin-

guisher, baking soda or sand to control the 

fire.  Do not use water as it may cause a 

dangerous steam explosion.

5. Check outside to ensure that sparks and hot 

embers coming out of the chimney are not 

igniting the roof.

6. Do  not  use  the  fireplace  again  until  your 

chimney and fireplace have been inspected 

by  a  qualified  chimney  sweep  or  a  Fire 

Department Inspector.

Finish Door Casing Care

Use a glass cleaner and a soft cloth to polish 

the casing.  Do not use abrasives such as steel 

wool, steel pads or an abrasive polish for they 

may scratch the casing’s finish.

DISPOSING OF ASHES

Remove ashes only when the fire is out and the 

ashes are cold (24 to 48 hours after the fire is 

out).  Do not leave the ashes in the house as they 

give off carbon monoxide and other toxic gases.

Figure 2b  - Top Baffle Removal

Figure 2a - Top Baffle Removal

NOTE: DIAGRAMS & ILLUSTRATIONS ARE NOT TO SCALE.

6

Summary of Contents for BIS ULTIMA CF

Page 1: ...eport No 3011202 EPA Cert No 537 SAVE THESE INSTRUCTIONS FOR FUTURE REFERENCE WARNINGS Hot Do not touch The glass and surfaces of this appliance will be hot during operation and will retain heat for a while after shutting off the appli ance Severe burns may result Carefully supervise children in the same room as appliance If small children are present in the home it is recommended that this applia...

Page 2: ...vals of this system WARNING Never leave your fireplace unat tended while it is burning WARNING Always ensure that the air inlet to the fireplace is free from debris and any other obstructions that can block the entrance of air WARNING Neither the manufacturer nor the seller warrants smoke free operation nor are we respon sible for inadequate system draft caused by mechanical systems general constr...

Page 3: ...nd check your local build ing codes Install the fireplace only as described in these instructions and using onlySecurityChimneysInternationalLimited components This fireplace has been tested for CAN ULC S610 M87 and ANSI UL 127 under report number 3011202 It has also been tested for EPA 40 C F R Part 60 section 60 532 b Certificate number 537 TheBISUltimaCFfireplaceisnotintendedfor use with a gas ...

Page 4: ... causing damage to the unit a fire or even possibly ignit ing a chimney fire if the chimney is creosoted Burningunapprovedfuel resultinginexcessive pollutantsbeingemitted maybeprohibitedand subjecttoafineorotherpenaltybytheauthority having jurisdiction in your area Processed firelogs can be used Although do not poke or stir the logs while they are burning Use only firelogs that have been evaluated...

Page 5: ...ding to avoid smoking problems SMOKING CAUSES AND TROUBLESHOOTING Toreducethelikelihoodofsmokingwhenopen ing the door set the combustion air controls to the left before opening the door Your fireplace hasbeendesignedandtestedtoprovidesmoke free operation Occasionally there may be a smallamountofsmokinguponlightingthefire until the chimney heats up but this should not continue If the fireplace cont...

Page 6: ...Prior to Cleaning The Chimney Before starting to clean your chimney we recommend that you remove the top baffle to avoid creosote dust collection at the top of the baffle Follow these steps to set the top baffle out of the way 1 Remove the side refractory holder They are located at the top of the refractory 2 Lift the front baffle 3 Slide the back baffle under the front baffle You now have access ...

Page 7: ...ted to be com pletelyairtight Thegaskets air tightnesscanbe adjustedusingtheadjustmentscrewlocatedon the right side of the fireplace facade An Allen key 1 8 not supplied will be necessary for this adjustment Checking Door Seal A one inch strip of paper may be used to perform a test of the integrity of the door seal Close the door on the paper in at least eight points It is normal to feel only a sl...

Page 8: ...o determine if additional support is needed The BIS Ultima CF fireplace may be installed directly on the floor or on a raised base for proper guidelines refer to Hearth Extension Requirements and a minimum of 6 8 2 m measured from the base of the appliance to the ceiling is required Whenselectingthelocation thechimneyoutlet positionandthedirectionofthewindareimpor tant factor affecting the chimney...

Page 9: ...h the clean face kit to allow hot air flow that wouldnormallycomeoutofthetoplouver ANY OTHER INSTALLATION MAY RESULT IN THE FIREPLACE OVERHEATING AND POTENTIALLY CAUSE A FIRE See Gravity Kit section on Page 14 to install the gravity vent kit Installation Steps 1 Install the side finishing trim making sure to differentiate the left from the right The shortest end bend should be towards the bottom 2...

Page 10: ...replace must be covered with a non combustible material tile marble stone etc See Figures 9 and 10 Cold climate INSTALLATIONS Climates where temperatures will fall below 32 F 0 C The heating performance of the appliance will vary depending upon the level of insulation house design how the appliance is operated etc If this fireplace is being installed in a cold climate it is especially important to...

Page 11: ...photo graphs are not to scale consult installation instructions Product designs materials dimensions specifications colorsandpricesare subjecttochangeordiscontinuance without notice All framing dimensions calculated for1 2 drywallatthefireplaceface If sheathing the chase or finishing with other thickness materials calculations will need to be made Thefireplacemustnotbeincontact with any insulation...

Page 12: ...2 4 m Level Outside Base Insulation Thermal Barrier Solid Continuous Surface NOTE It is recommended that the chase walls and floor be insulated in the same manner using the same insulation as the rest of the building below the attic SEE NOTE Nailing Flanges Four nailing flanges are provided to secure the fireplace to the floor see Figure 13 Bend the nailing flanges down so that each flange is flus...

Page 13: ...can not overlay on the fireplace front black steel faceofthefireplace seeFigures16and17 Non combustible materials such as brick stone or ceramic tile can project in front of and onto the fireplace facing up to the tiling flange on the clean face kit Figure 19 Mantel The mantel must be installed at least 45 1143mm above the base of the fireplace Figure 14 Figure 14 Figure 15 Figure 16 Figure 17 Fig...

Page 14: ...ystem forward of the BIS Ultima CF fireplace not flush it will be necessary to purchase two adjustable lengths 7B26ZL2A When installing the double outlet system the hotairoutletscanbeinstalledinthesameroom as the fireplace or one or both of the outlets can be installed in adjacent or upper rooms Installing the ducts at different elevations will tend to exhaust more heat out of the higher outlet Fi...

Page 15: ...llthetwooutletgrillswhenusing the double hot air outlet kit and blocking the upper louver of the fireplace CENTRAL FORCED AIR KIT NOT TESTED UNDER EPA CERTIFICATION The knock outs provided on the back and on the sides of the BIS Ultima CF fireplace allow the connection of insulated flexible pipe which enables you to heat adjacent rooms up to 50 feet from the fireplace The ducting system must be in...

Page 16: ...e must not draw air from the attic from the basement or garage D The air intake should be installed where it is not likely to be blocked by snow or exposed to extreme wind and away from automobile exhaust fumes gas meters and other vents E The duct and register may be installed above or below floor level The following components are required Outside air kit UZI includes 4 inch flex that goes up to...

Page 17: ...asesthelikelihoodofoperatingproblemssuch as low draft high rate of creosoting and poor start up characteristics Exterior chimneys are also prone to down drafting and flow reversal Installations which are located on lower floors in the house such as in a basement in combination with outside chimney are especially prone to flow reversal If interior installation is impossible install an AC chimney en...

Page 18: ...al the joint between the roof and the flashing with roofing pitch see Figures 30 and 31 For sloping roofs place the flashing under the upper shingles and on top of the lower shingles Nail the flashing to the roof using roofing nails 6 Place the spacers and the storm collar over the flashing and tighten it with the bolt supplied Finally seal the joint between the storm collar and the chimney using ...

Page 19: ...Use a plumb bob to line up the center of the hole Cut a hole for the chimney in the ceiling floor Frame this hole as described previously refer to section Chimney Instal lation Instructions 5 From below install a firestop See Figure 29a 6 A support ST or SO must be used on the first 15 section 5 m 7 Continue with the regular installation AC Chimney 1 Install the first elbow Turn it in the required...

Page 20: ... 48 48 AC 6 15 A 4 13 16 122 mm 6 1 8 156 mm 11 280 mm 14 1 8 359 mm 16 7 8 429 mm 18 7 16 468 mm 23 584 mm 26 3 16 665 mm B 27 11 16 703 mm 33 1 2 851 mm 50 7 8 1292 mm 62 1 2 1588 mm 72 5 8 1845 mm 78 7 16 1992 mm 95 3 4 2432 mm 107 3 8 2727 mm 30 A 9 3 8 238 mm 12 3 8 314 mm 21 3 8 543 27 3 8 695 mm 32 5 8 829 mm 35 5 8 905 mm 44 5 8 1134 mm 50 5 8 1286 mm B 25 3 4 654 mm 31 787 mm 46 1 2 1181 ...

Page 21: ...m x 781 mm 11 1 8 x 30 3 4 45º 283 mm x 518 mm 11 1 8 x 20 3 8 S 2100 HT6000 AC 6 dia 30º 327 mm x 881 mm 12 7 8 x 34 11 16 30º 380 mm x 972 mm 15 x 38 1 4 Table 5 Figure 36 Drywall Insulated Wall Insulated Wall Radiation Shield Figure 34 Offset Chimney Installation Figure 35 Insulated Wall Radiation Shield Support Straps ACRS Chimney AC Starter Section Straps Rain Cap Collar Roof Flashing Offset ...

Page 22: ...ctions provided with the support CHIMNEY MODEL MAXIMUM HEIGHT OF SUPPORTED CHIMNEY OFFSET SUPPORT ROOF SUPPORT ASHT HT6103 6 dia 28 feet 8 54 m 29 feet 8 84 m S 2100 HT6000 6 dia 18 feet 5 49 m 20 feet 6 1 m AC 6 dia 40 feet 12 19 m 50 feet 15 20 m Table 6 CHIMNEY CHASE AND MULTIPLE TERMINATIONS For the purpose of this manual a chimney chase is considered a part of the chimney system rather than p...

Page 23: ...r the insulation and fix it in place using the 3 metal screws supplied Figure 39 FIREPLACE 1 Clearance Insulated Elbow ASHT or HT6103 3 Screws Insulation Pad Cover High Temp Cement Firestop TUBINOX or Projet SS Stainless Steel Liner Insulated Length Masonry Chimney New or Existing TUBINOX or Projet SS Liner Must Slide at Least 2 Inside Length 6 8 NOTE DIAGRAMS ILLUSTRATIONS ARE NOT TO SCALE 23 INS...

Page 24: ...8KL1 8KL1 Optional installation accessories uNot tested under EPA certification If installed this appliance no longer qualifies for EPA certification Fireplace Kits Description Cat Part No Blower Motor Speed Control wall mount VRUW VRUW Masonry Chimney Adaptor 30º BISUMA30 for use with TUBINOX liner BISUMA30 Masonry Chimney Adaptor 45º BISUMA for use with TUBINOX liner Canada ONLY BISUMA Rigid Fir...

Page 25: ...fset Support SO SO Roof Support ST ST Roof Brace BS2 BS2 Firestops Firestop 6BF 6BF Radiation Shield 6RS 6RS Insulated Attic Radiation Shield 6RSA 6RSA2 Insulated Wall Radiation Shield 6RSM 6RSM Insulated Wall Radiation Shield 30º 6RSMI30 6RSMI30 Uninsulated Wall Radiation Shield 30º 6RSM30 6RSM30 Attic Radiation Shield H0487 Roof Flashings Flat Roof Flashing 6FR 6FR 1 12 7 12 5º 30º 6FAR 6FAR 8 1...

Page 26: ...B H0496 Storm collar ACFC H0500 Misc Telescopic attic radiation shield ACRST H0498 Firestop ACBF H0485 Radiation Shield ACRS H0486 Attic Radiation Shield ACRSA H0487 Insulated Wall Radiation Shield 30º ACRSMI30 H0489 TUBINOX LL Chimney Lining System Rigid Stainless Steel Liner For Relining A Masonry Chimney 6 Diameter Listed to ULC S635M UL 1777 and ULC S640M at 2100º F Description Cat Part No 6 L...

Page 27: ... to spacer Top Do not fill the space above the fireplace with any material Except the wood framing See Page 11 Figure 11 Chimney 2 50 mm Mantel 45 1143 mm measured from the base of the fireplace SPECIFICATIONS Cat No Model BISULTIMACF BIS Ultima CF Product Reference Information Weight 385lbs Height 36 Width 36 Depth 24 1 2 Firebox W x H x D measured in front 22 x11 3 4 x 12 Chimney weight ASHT 6 d...

Page 28: ...replace left side PR SR2503 18 Fireplace back PR SR2499 19 Touch up paint aerosol black metallic SBMB6309 20 Louvers upper and lower set of 2 LOUVRECF 21 Complete door PR SR3003 22 Wooden door handle PR SR3027 23 Door handle rod and lock PR SR2855 24 Ceramic glass panel PR SR3004 25 Gasket door 77 3 4 3 4 dia PR SR1823O 26 Gasket glass 74 3 16 x 1 PR SR1685J 27 Hinge assembly fireplace and door PR...

Page 29: ...REPLACEMENT PARTS BIS Ultima CF 1 8 15 16 17 20 10 14 12 11 13 20 22 23 24 21 25 26 30 19 2 3 4 5 6 7 PA I N T 18 28 29 NOTE DIAGRAMS ILLUSTRATIONS ARE NOT TO SCALE 29 ...

Page 30: ... dealer please call 450 973 9999 Replacement parts See Page 28 for a complete replacement parts list Use only parts sup plied from the manufacturer Normally all parts should be ordered through your Security Chimneys InternationalLimiteddistributorordealer Partswillbeshippedatprevail ing prices at time of order When ordering repair parts always give the following information 1 The model number of t...

Reviews: