13
Use your mouse to
select the camera(s), type of recording you wish to use, then left-click
and drag through the schedule
. Normal is a constant recording mode. Motion is the video
motion detection mode that will be further detailed in a later step. Select the time periods to
operate video motion detection now. Alarm recording (optional feature) controls any external
triggers connected to the alarm input terminals. Note: The above example shows normal
(constant) recording Monday through Friday from 8:00AM till 6:00PM, and video motion
detection at all other times. These would be the settings used by a business with typical
weekday hours of operation.
<Apply> <Next>
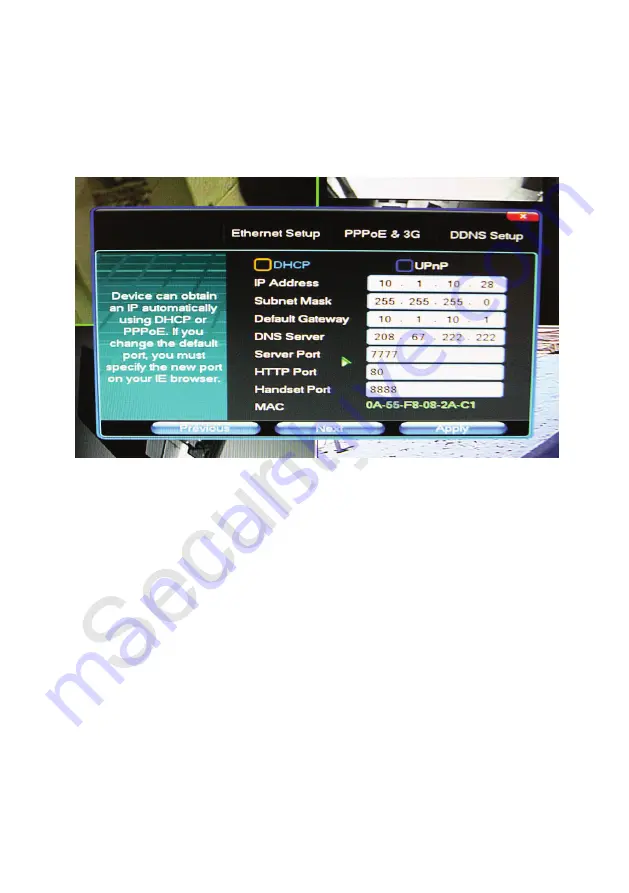
Network Setup Screen
Please be sure the LAN cable included with your Security Labs DVR is connected from the
DVR to your router or network switch.
Using your mouse,
check DHCP, click <APPLY>, uncheck DHCP, then click <Apply>
again.
This short procedure will auto fill the boxes on the setup page for you. Write down the
following information that you have just collected:
IP Address
Subnet Mask
Default Gateway
DNS Server
MAC Address
Keep this information with the DVR for future reference
<Apply><Next>
If you selected
Standard User
at the beginning of the Setup Wizard
click <Finish>.
Note: You should now be able to access your DVR on a computer that is connected to the
same router. This is your Local Area Network (LAN). Type the new IP address of the DVR into
the address bar of Internet Explorer. You will be prompted to download an Active X file. This is
the viewer program, Client V3, stored in the DVR asking to be installed on your computer.
Follow the prompts to complete the installation of Client V3.
If you selected
Professional User
at the beginning of the Wizard, four more setup screens will
be shown starting with
PTZ Setup.
Summary of Contents for 960H Series
Page 6: ...6 1 3 IR Remote control ...
Page 51: ...51 ...


