v2.0 11/8/11
7
4. WIRING CONNECTIONS and HARD DRIVE INSTALLATION
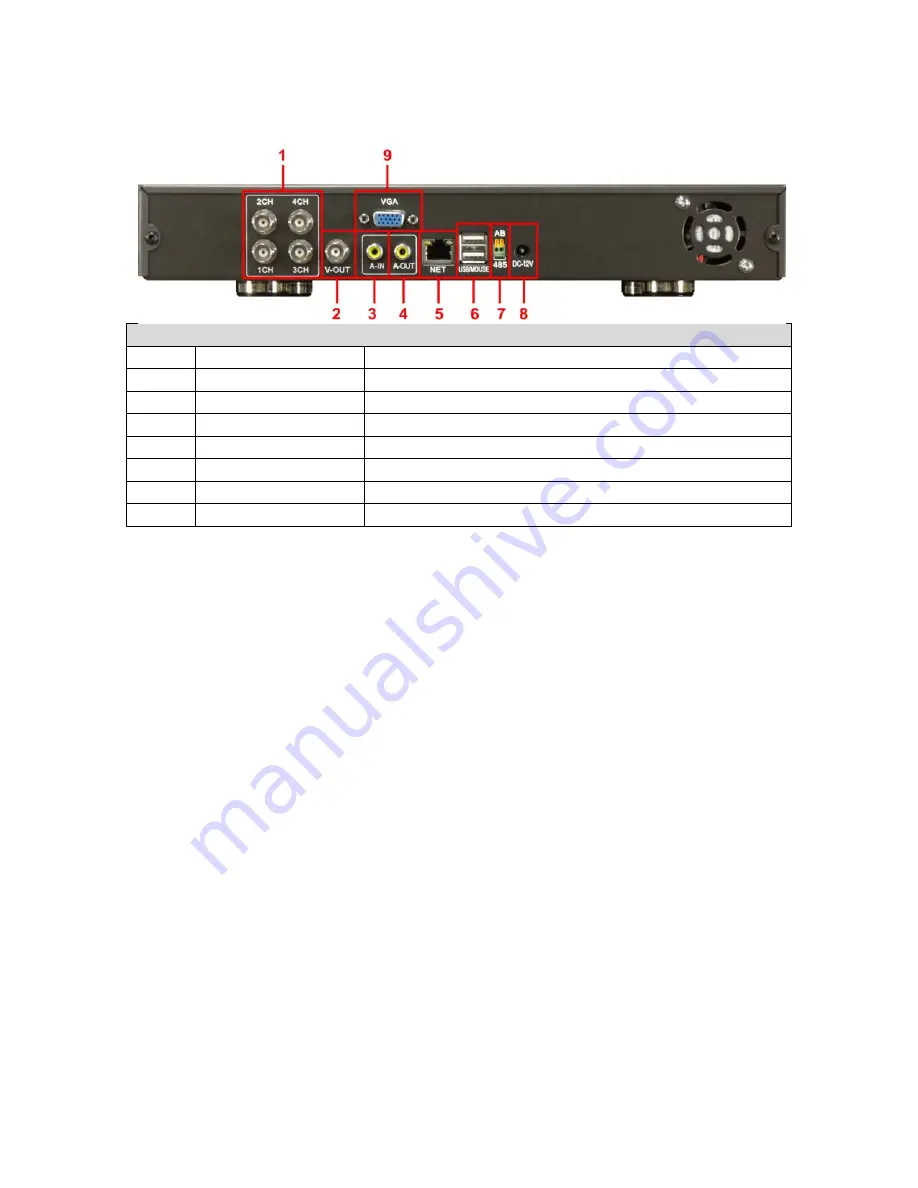
Item
Panel Key/Indicator
Description
1
1CH, 2CH, 3CH, 4CH Video In BNC ports for cameras 1 through 4
2
V-OUT
Video Out BNC port for connection to a monitor
3
A-IN
Audio In RCA port
4
A-OUT
Audio Out RCA port
5
NET
Ethernet jack for connection to a local area network (LAN)
6
USB
USB ports for the optical mouse and back up drive/flash drive
7
AB 485
RS485 connections for controlling a PTZ camera
8
DC 12V
Port for connecting the included 12VDC power supply
a. Using a quality 75 ohm coaxial cable with a BNC connector, connect the camera(s) to the
DVR’s
CAM In
port(s).
b. Using a quality 75 ohm coax cable with a BNC connector, connect the video monitor to the
DVR’s
MON Out
port. If the display is a VGA monitor then connect the monitor’s VGA
cable to the DVR’s
VGA
port.
c. If audio monitoring is required, connect the audio monitoring device to the DVR’s RCA
A-
OUT
port.
d. To control a PTZ camera using the DRV’s embedded PTZ controller use the DVR’s
RS485 A and B connections. A is positive (+), B is negative (-). Be sure the polarities are
correct and consistent with the camera. You may also use the RS485 AB connections for
an external PTZ controller.
e. If the DVR is to be networked for remote monitoring and/or management connect the unit
to the network using the Ethernet jack.
f.
USB
ports – The DVR has 2 USB ports located on the back of the unit. One port is
intended for the optical mouse. The second USB port is can be used for backing up files to
a separate drive (e.g., flash drive, CD/DVD burner, etc.).
g. Hard Drive Installation – Unless ordered with and preconfigured at the factory, the DVR
requires a DVR hard drive to be installed. This unit will support a single hard drive up to
2TB. Secure the drive in the bottom of the case using the four included screws. Then
connect the drive to the SATA hard drive cable and power cable. Be sure the drive is
installed securely in the case. When applying power to the DVR the unit should
automatically (i) detect the drive, (ii) alert the user to confirm initialization and (iii) begin to
initialize it. Note that when the drive is initialized it will be formatted.
Formatting the drive
will erase any existing data on the drive
.
Important Note Regarding Hard Drives
– Not all hard drives are fully compatible with
DVRs. If you have an existing hard drive you wish to use with the DVR you may install it at
your own risk and determine if the DVR recognizes the drive and correctly records data to
it. If you are considering the purchase of a hard drive, contact Securitytronix for
Summary of Contents for ST-DVR7204G
Page 1: ...v2 0 11 8 11 1 USER MANUAL ST DVR7204G 4 Channel Digital Video Recorder ...
Page 70: ...v2 0 11 8 11 70 ...
Page 79: ...v2 0 11 8 11 79 f Double clicking on cameras on the list will display the camera channel ...
Page 87: ...v2 0 11 8 11 87 The About screen displays SNS version information ...
Page 89: ...v2 0 11 8 11 89 ...


