background image


55

SPECIFICATION

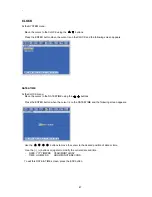
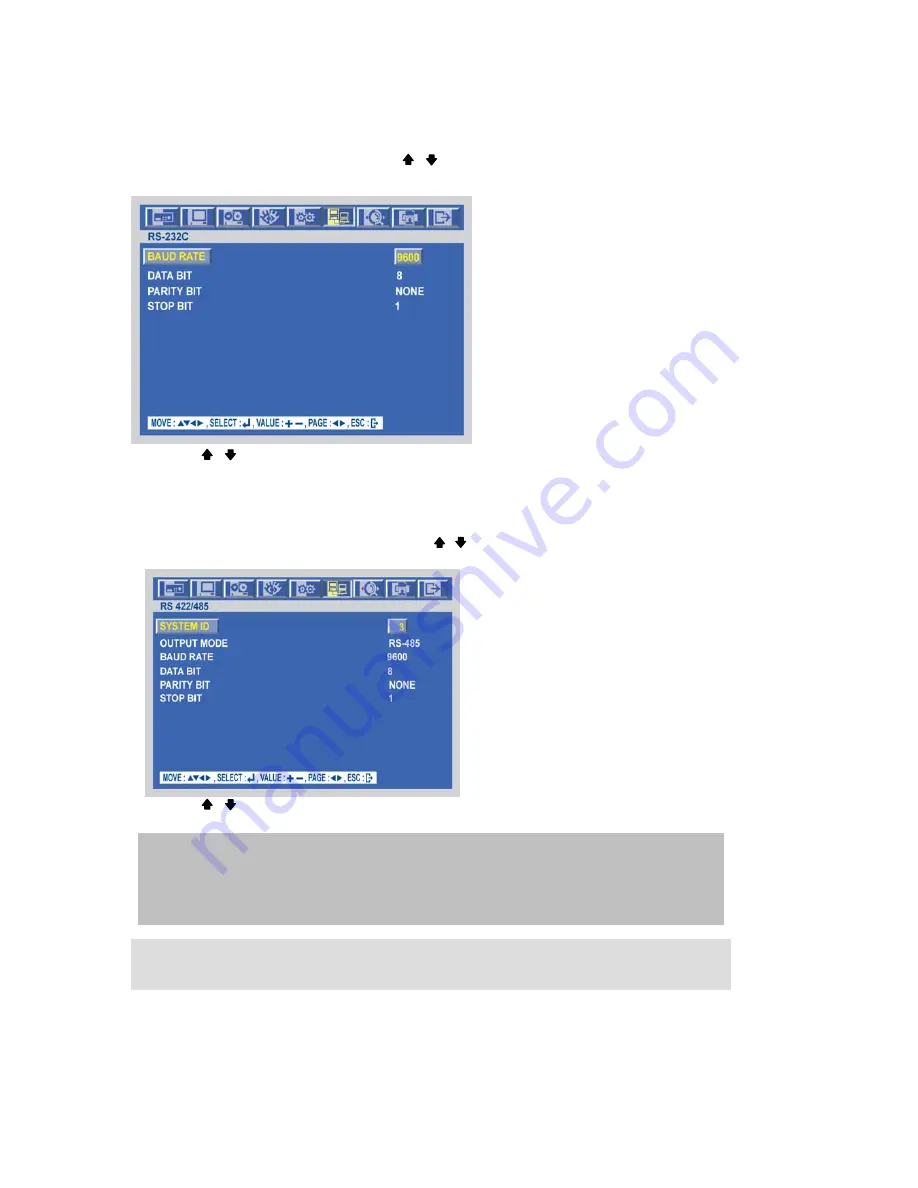
RS 232C 

At the LINK menu, 

  Move the cursor to the RS232 using the      ,      buttons. 
  Press the ENTER button when the cursor is on the RS232 and the following screen appears. 


 Use the      ,      buttons to choose the item and use the (-), (+) buttons or jog dial to set the data value. 
 To exit this RS232 menu, press the ESC button.


RS 422 / 485 

At the LINK menu, 

  Move the cursor to the RS422/485 using the      ,      buttons. 
  Press the ENTER button when the cursor is on the RS422/485 and the following screen appears. 


 Use the      ,      buttons to choose the item and use the (-), (+) buttons or jog dial to set the data value. 
 To exit this RS422/485 menu, press the ESC button.


NOTE 

BAUD RATE : Data transmission speed per second. 
DATA BIT      : Data transmission bit. 
PARITY BIT : Data transmission error checking. 
STOP BIT    : Data transmission ending bit 

# CAUTION: 

Turn off the power not to damage this unit when you connect RS-232C connector. 

Summary of Contents for DVR16MP4

Page 1: ...nk you for purchasing our product Please read this User s Manual before using the product Change without Notice 8 16 Channel MPEG4 Digital Video Recorder User s Manual for model numbers DVR8MP4 DVR16M...

Page 2: ...o the presence of important operation and maintenance servicing instructions in the literature accompanying the appliance WARNING TO PREVENT FIRE OR SHOCK HAZARD DO NOT EXPOSE UNITS NOT SPECIFICALLY D...

Page 3: ...e of this product contact your local dealer Strong recommendation on installation of the DVR unit 1 Check electricity at the place you want to install the DVR unit is stable and meets our electricity...

Page 4: ...t installed and used in accordance with the instructions may cause harmful interference to radio communications However there is no guarantee that interference will not occur in a particular installat...

Page 5: ...split screen button 1 16 numeric button Audio OFF FUNC 4 Audio 4 ON MT split screen button 1 16 numeric button Audio OFF LED Status Networking DVR stand by HDD operating DVR power on USB Data backup...

Page 6: ...r panel to the correct location Activate the power switch to on and you are ready for operation Camera 1 16 in and looping out Main Call monitor S Video Y C monitor Audio in x 4 out x 2 RS 232 75 Ohm...

Page 7: ...NC COM NO Alarm input Short circuit between Alarm1 16 and GND is recognized as alarm by default Alarm 1 16 will be corresponding to Camera 1 16 NC Normal Close NO Normal Open NOTICE Sensor input is RE...

Page 8: ...o change a single camera display to the multi camera press the MULTI button b Full screen display Press the desired camera number button to display on the monitor Before the power of this DVR is on ch...

Page 9: ...on again to exit the AUTO mode Freeze MULTI SCREEN MODE At the Multi display mode press the FREEZE button and then select the desired camera number Press the FREEZE button again to release the FREEZE...

Page 10: ...rd indication on the screen will be changed according to the type of recording and refer to the following Yellow Manual recording status Green Schedule recording status Red Event recording status Moti...

Page 11: ...date using the buttons And then press the ENTER button and the following screen appears Move the cursor to the desired position using the buttons and then press the ENTER button to play the selected i...

Page 12: ...using the or button Move the cursor to the desired position of SEARCH TIME using the buttons and then set up the desired time using the buttons or turn the JOG DIAL to set the search time Press the E...

Page 13: ...rch using the or button Move the cursor to the desired position of SEARCH TIME using the buttons and then set up the desired time using the buttons Press the ENTER button or turn the JOG DIAL and the...

Page 14: ...using the or button Move the cursor to the desired position of SEARCH TIME using the buttons and then set up the desired time using the buttons Or turn the JOG DIAL to search the block list Press the...

Page 15: ...TER button for the playback BOOKMARK SEARCH At the SEARCH menu Move the cursor to BOOKMARK SEARCH using or button Press the ENTER button and the BOOKMARK SEARCH screen appears Press the ENTER button a...

Page 16: ...the below seven speed level i 1 2 2 times slower than normal playback speed ii 1 4 4 times slower than normal playback speed iii 1 8 8 times slower than normal playback speed iv 1 16 16 times slower t...

Page 17: ...Turn the SHUTTLE ring to the desired playback direction and speed level according to the above drawing during the playback The DVR will go back to the normal playback mode when the SHUTTLE ring is re...

Page 18: ...Press this button again to return to the playback mode SPOT MONITOR Call monitor Set up the desired mode in SPOT of SCREEN MENU before executing the SPOT mode MANUAL MODE Press the SPOT button on the...

Page 19: ...e desired position of COPY START TIME COPY END TIME using the buttons and press the or button to set up the time to set up the COPY START TIME and COPY END TIME Scroll bar Turn the shuttle ring to the...

Page 20: ...o set up the COPY START TIME and COPY END TIME Scroll bar Turn the shuttle ring to the right to move the cursor of COPY END TIME or to the left to move the cursor of COPY START TIME and the cursor wil...

Page 21: ...And then turn the Jog dial to move the cursor to the desired time It can operate with just Mouse click Press the ENTER button to copy When the copy is done the CD RW or DVD RW tray will be opened auto...

Page 22: ...FORMAT At the COPY menu Move the cursor to MEDIA FORMAT using the buttons Press the ENTER button and the following screen appears Select formatting media using the button Move the cursor to MEDIA FORM...

Page 23: ...ss the STATUS button again to move on next information screen or press the ESC button to exit the menu MOUSE CONTROL Double click the left button on the mouse to select menu item 1 Status display Doub...

Page 24: ...K SETUP Select ON or OFF using the buttons or jog dial to use the QUICK SETUP setting IMAGE SIZE Select the desired IMAGE SIZE for recording using the buttons or jog dial RECORD FRAME Select the desir...

Page 25: ...is 5 POST RECORD TIME Select the desired time for post recording using the buttons or jog dial When video loss alarm or motion is detected the DVR will store post recorded data during the selected per...

Page 26: ...ition of the screen The value is from 4 to 4 and the default is 0 To exit this POSITION menu press the ESC button At the SCREEN menu Press the ENTER button when the cursor is on the POSITION and the f...

Page 27: ...nel is selected change the value of AUTO SEQUENCE duration using the buttons or jog dial to set the length of time for switching each channel in sequence The value is from 1SEC to 60SEC and the defaul...

Page 28: ...the cursor using the buttons to select the HDD FREE SPACE MODE Use the buttons or jog dial to choose PERCENT or GIGABYTE The default is PERCENT RECORD STATUS At the DISPLAY menu Move the cursor using...

Page 29: ...he buttons to select the TITLE MODE Use the buttons or jog dial to choose TEXT or BITMAP The default is TEXT BORDER COLOR At the DISPLAY menu Move the cursor using the buttons to select the BORDER COL...

Page 30: ...sing the buttons to select the SPOT DISPLAY Use the buttons or jog dial to choose ON or OFF The default is OFF TITLE At the SCREEN menu Move the cursor to the TITLE using buttons Press the ENTER butto...

Page 31: ...d make a 4 split screen and a 9 split screen using this menu At the SCREEN menu Move the cursor to the MULTI SCREEN using buttons Select the character using the buttons and then press the ENTER button...

Page 32: ...RT and the following 2 pages screen appears Move the cursor and select the desired item using the buttons Use the buttons or jog dial to choose ON or OFF Use the buttons to see the next page In the ea...

Page 33: ...channel of spot monitor EVENT Event channel will be displayed automatically on spot monitor SEQUENCE Every single channel will be switching and displaying in sequence SPOT SEQ TIME Use the buttons or...

Page 34: ...ollowing screen appears Move the cursor to choose the desired time using the buttons Select the desired program among PROGRAM 0 9 and POWER OFF using the buttons or jog dial Turn right the shuttle rin...

Page 35: ...l number when an event happened For example if you connect 16 cameras and set EVENT RECORD of all channels to 30 one event channel will be recorded by 30 ips and the other channel will be recorded by...

Page 36: ...80 D1 720x240 Half D1 and 360x240 CIF The default is 720x240 You can set the frame rate of each channel using the buttons or jog dial N Frame rate for normal recording E Frame rate for event recording...

Page 37: ...88 704x288 704x288 704x576 704x576 704x576 NORMAL Max 4 7 7 2 3 3 1 1 1 EVENT SINGLE 0 15 30 0 15 30 0 15 30 0 EVENT COMPLEX Max 0 0 7 0 0 3 0 0 1 QUALITY NORMAL F L F S L F S L F S QUALITY EVENT F L...

Page 38: ...ress the ESC button AUDIO RECORD At the RECORD menu Move the cursor to the AUDIO RECORD using the buttons Press the ENTER button when the cursor is on the AUDIO RECORD and the following screen appears...

Page 39: ...menu Move the cursor to the BACKUP MODE using buttons Select the BACKUP MODE using the buttons or jog dial ON The recorded data will be overwritten when it is a point of time to work the REPEAT RECOR...

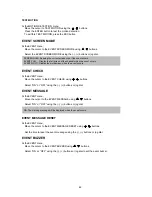
Page 40: ...FF of HOLIDAY RECORD using the buttons or jog dial Move the cursor using buttons and set up the value using the buttons or jog dial To exit this HOLIDAY menu press the ESC button EVENT To set up the E...

Page 41: ...SENSITIVITY using buttons Select the sensitivity level using the buttons or jog dial AREA SETUP At the MOTION DETECTION menu Move the cursor to AREA SETUP using buttons Press the ENTER button to set t...

Page 42: ...E At the EVENT menu Move the cursor to the EVENT MESSAGE using buttons Select ON or OFF using the buttons or jog dial EVENT MESSAGE RESET At the EVENT menu Move the cursor to the EVENT MESSAGE RESET u...

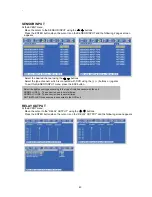
Page 43: ...DVR using the buttons or jog dial To exit this SENSOR INPUT menu press the ESC button RELAY OUTPUT At the EVENT menu Move the cursor to the RELAY OUTPUT using the buttons Press the ENTER button when t...

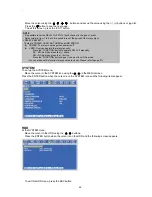
Page 44: ...cursor is on the HDD and the following screen appears To exit this HDD menu press the ESC button NOTE It is possible to set the RELAY OUTPUT of each channel in the type of event Relay output is from...

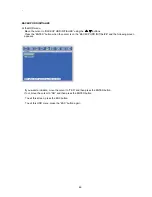
Page 45: ...lue REC HDD INITIALIZE At the HDD menu Move the cursor to REC HDD INITIALIZE using the buttons Press the ENTER button when the cursor is on the REC HDD INITIALIZE and the following screen appears If y...

Page 46: ...ENTER button when the cursor is on the BACKUP HDD INITIALIZE and the following screen appears If you want to initialize move the cursor to YES and then press the ENTER button If not move the cursor to...

Page 47: ...menu Move the cursor to the DATE TIME using the buttons Press the ENTER button when the cursor is on the DATE TIME and the following screen appears Use the buttons to move the cursor to the desired po...

Page 48: ...to the MASTER PASSWORD using the buttons Press the ENTER button when the cursor is on the MASTER PASSWORD and the following screen appears Insert the current password in the eight digits marked beside...

Page 49: ...OR PASSWORD menu press the ESC button MENU DISPLAY CHECK At the PASSWORD menu Move the cursor to the MENU DISPLAY CHECK using the buttons Select ON or OFF to set up the MENU DISPLAY CHECK using the bu...

Page 50: ...ttons or jog dial KEY ECHO At the SYSTEM menu Move the cursor to the KEY ECHO using the buttons Set ON or OFF using the buttons or jog dial If you are operating more than one DVR in the same place and...

Page 51: ...NTER button when the cursor is on the DVR INITIALIZE and the following screen appears If you want to initialize move the cursor to YES and then press the ENTER button If not move the cursor to NO and...

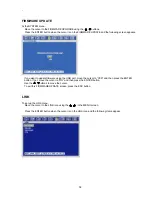
Page 52: ...update firmware using the USB port move the cursor to YES and then press the ENTER button If not move the cursor to NO and then press the ENTER button Use the buttons to move the cursor To exit this F...

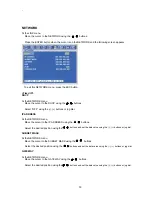
Page 53: ...ial IP ADDRESS At the NETWORK menu Move the cursor to the IP ADDRESS using the buttons Select the desired position using the buttons and set the data value using the buttons or jog dial SUBNET MASK At...

Page 54: ...buttons and set the data value using the buttons or jog dial Dynamic IP At the NETWORK menu Move the cursor to the DHCP using the buttons Select ON using the buttons or jog dial Move the cursor to the...

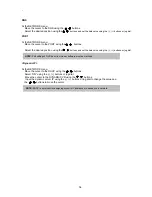
Page 55: ...menu Move the cursor to the RS422 485 using the buttons Press the ENTER button when the cursor is on the RS422 485 and the following screen appears Use the buttons to choose the item and use the butto...

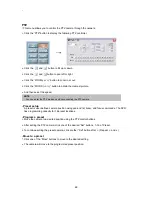
Page 56: ...the next page To exit this PTZ menu press the ESC button PTZ control in live view Full channel press the PTZ button to control pan tilt and zoom functions of PTZ camera and the PTZ channel model name...

Page 57: ...the PTZ camera using the buttons Press the NUMBER button to set up the revised presetting PRESETS A preset is a user defined camera position using pan and tilt zoom and focus commands This DVR has the...

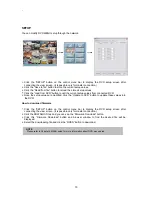
Page 58: ...he cursor is on the SEARCH icon and the following items appear COPY Press the COPY button to copy the recorded images into other media and the COPY MENU screen appears To set up the COPY menu Move the...

Page 59: ...ing status and the following screen appears MEDIA FORMAT At the COPY menu Move the cursor to MEDIA FORMAT using the buttons Press the ENTER button and the following screen appears Select formatting me...

Page 60: ...NLY Select this item if you want only to save the changed setup SAVE AND EXIT Select this item if you want to save the changed setup and exit this screen EXIT WITHOUT SAVE Select this item if you want...

Page 61: ...may vary from your actual recording situation In the Recording Time Table multiply by 2 for recording hours with an 240 GB HDD and 3 for recording hours with a 360 GB HDD The complexity of the image...

Page 62: ...More than 3Mbps More than 3Mbps Transfer rate of image varies with the number of client accessed to DVR Installation To start the installation 1 Start Windows 2000 or XP 2 Insert viewer Software CD i...

Page 63: ...te button to erase the information on the list Connect to a DVR 1 Select the desired DVR that you want to connect in the DVR list 2 Select the necessary Information according to the connection type 3...

Page 64: ...d SEARCH window will appear on the PC screen 3 Click the Play button after select of the desired Channel and Search Time in Time Search window 4 Click the Search button after select of the desired Cha...

Page 65: ...rch images saved in CD RW DVD RW or PC insert the CD or DVD into your PC and click the File Search button and the File Search window will appear 3 Click the Folder Select button and then select the de...

Page 66: ...and the windows are arranged in a grid on your PC screen 1 site windows 2 4 site windows 5 9 site windows 10 16 site windows NOTE You can connect up to 16 DVRs with your PC simultaneously 16 users x...

Page 67: ...f each channel will be displayed on the viewer screen Event If you check Event red OSD will be indicated on the event channel screen when any event detected Date Time If you check Date Time OSD of dat...

Page 68: ...ull screen in sequence 2 Change the interval time using the buttons 3 Click the AUTO button again to exit this mode Controller Click the Controller button and the control keys same as front panel of D...

Page 69: ...eset is user defined camera position using pan and tilt zoom and focus commands The DVR has programming capacity for 16 preset locations Program a preset 1 Move the camera to a desired position using...

Page 70: ...p values from connected DVR 5 Once the setup values are modified click the Update to DVR button to update those values into the DVR How to download firmware 1 Click the SETUP button on the control men...

Page 71: ...DVR status after connecting the view screen PRINT After connecting the view screen 1 Click the PRINT button on the control menu bar to print the desired image 2 And the preview window will be displaye...

Page 72: ...utton of the control window after setting the desired HDD and the time AUDIO IN After connecting the view screen 1 Click the Audio In button on the control menu bar to input the audio 2 Sound of your...

Page 73: ...nd the Channel and set the Search Time for playback 4 Click the Play button to display the images on the screen EVENT SEARCH You can review the event list that was triggered on the DVR After connectin...

Page 74: ...dow to display the images on the screen Click the Next button to search the next list LOG SEARCH You can search and playback the images by logging 1 Click the LOG button on the control menu bar to dis...

Page 75: ...28 SLOW Reverse Forward 1 Use these buttons to playback images faster than normal speed in either direction 2 Multiple clicks of these buttons will decrease the fast forward the reverse speed 3 Variou...

Page 76: ...76 NETWORK VIEWER INSTALLATION Select DDNS mode ON Notice DDNS function support update ENTER...

Page 77: ...77 NETWORK VIEWER INSTALLATION Insert Host name User name and password with character table Net viewer DDNS mode...

Page 78: ...Host name is the priority if there is an IP address is still fill in Host name should be left blank if IP address is used HDD is readable in PC with netveiwer Please select NTSC or PAL mode if the vid...

Page 79: ...79 NETWORK VIEWER INSTALLATION...

Reviews: