background image


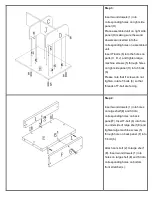
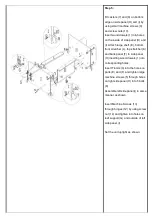
Step 3


Insert wood dowels (1) into 

corresponding holes on right side 

panel (H).   

Place assembled unit on right side 

panel (H) making sure the wood 

dowels are inserted into the 

corresponding holes on assembled 

unit. 

Insert T-bolts (6) into the holes on 

parts (C, D, J) and tighten large 

machine screws (5) through holes 

on right side panel (H) into T-bolts 

(6).   

Please note that if screws do not 

tighten, rotate T-bolts (6) so that 

threads of T-bolt are facing. 


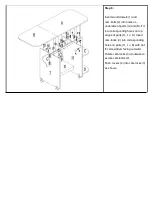
Step 4


Insert wood dowels (1) into holes 

on large shelf(E) and fit into 

corresponding holes on back 

panel(F). Insert T-bolt (6) into hole 

on underside of large shelf (E) and 

tighten large machine screw (5) 

through hole on back panel (F) into 

T-bolt (6).   


Attach cam bolt (2) to large shelf 

(E). Insert wood dowels (1) into   

holes on large shelf (E) and fit into 

corresponding holes on bottom 

front stretcher(L). 

Summary of Contents for OC9665R0TX

Page 1: ...OC9665R0TX Sewing Table White Assembly Instructions For assistance with assembly contact Southern Enterprises Inc Customer Service 1 800 633 5096 service seidal com www seidal com ...

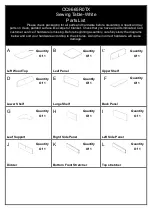
Page 2: ...ully study the diagrams below and sort your hardware according to the pictures Using the incorrect hardware will cause damage A Left Wood Top B Leaf Panel C Upper Shelf D Lower Shelf E Large Shelf F Back Panel G Leaf Support H Right Side Panel I Left Side Panel J Divider K Bottom Front Stretcher L Top stretcher Quantity Of 1 Quantity Of 1 Quantity Of 1 Quantity Of 1 Quantity Of 2 Quantity Of 1 Qua...

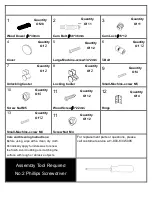
Page 3: ...ty Of 12 Small Machine screw M4 11 Screw Nut M4 Care and Cleaning Instructions Before using wipe with a clean dry cloth Periodically apply furniture wax to renew the finish Avoid rubbing or scratching the surface with rough or abrasive objects For replacement parts or questions please call customer service at 1 800 633 5096 Assembly Tool Required No 2 Phillips Screwdriver Quantity Of 12 Quantity O...

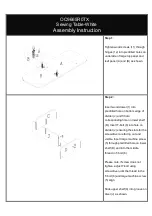
Page 4: ...ider J and fit into corresponding hole on lower shelf D Insert T bolt 6 into hole on divider J ensuring the slots for the screwdriver are facing out and visible Insert large machine screw 5 through predrilled hole on lower shelf D and into the middle thread in T bolt 6 Please note if screw does not tighten adjust T bolt using screwdriver until the thread in the T bolt 6 and large machine screw 5 a...

Page 5: ...ht side panel H into T bolts 6 Please note that if screws do not tighten rotate T bolts 6 so that threads of T bolt are facing Step 4 Insert wood dowels 1 into holes on large shelf E and fit into corresponding holes on back panel F Insert T bolt 6 into hole on underside of large shelf E and tighten large machine screw 5 through hole on back panel F into T bolt 6 Attach cam bolt 2 to large shelf E ...

Page 6: ...er K and back panel F to side panel H inserting wood dowels 1 into corresponding holes Insert T bolts 6 into the holes on parts E and F and tighten large machine screws 5 through holes on right side panel H into T bolts 6 Assemble left side panel I in same manner as shown Insert Machine Screws 13 through hinges 12 by using screw nut 14 and tighten into holes on leaf support G and outside of left s...

Page 7: ... of parts A and B Fit into corresponding holes on top edges of parts H I J K Insert cam locks 3 into corresponding holes on parts H I J K with slot for screwdriver facing outward Rotate cam locks 3 clockwise to secure cam bolts 2 Push covers 4 into cam locks 3 as shown ...

Page 8: ...e contact Southern Enterprises at 800 633 5096 or in Dallas 972 869 0111 9am 4pm Mon Fri Central time if you have product issues or email us at service seidal com Please ask for customer service representative for issues involving damages or replacement parts Please ask for technical assistance representative for any issues with product and assembly construction Please contact the retailer that yo...

Reviews: