background image

14

Using the Remote Control

• Battery should normally last for about one year.
• Do not mix old and new batteries in the remote
• Do not use different types of battery
• If you do not intend to use the unit for a long time, please remove batteries from the  
  remote to avoid accident.
• Keep batteries away from children and pets.
• Never throw batteries into a fire.
• Do not drop, or impact the remote control as it void warranty immediately.
• The remote control operate at a range of 5 to 6M effectively 
• Do not expose the remote control sensor to a bright light.

REMOTE CONTROL (Cont.)

Summary of Contents for SC4000S

Page 1: ...40 FULL HD SMART TV SC4000S INSTRUCTION MANUAL Please read this manual carefully before using and keep it for future reference...

Page 2: ......

Page 3: ...nstallation 8 Controls and Connections 10 Remote Control 12 Basic Operations 15 Tuning your TV 16 Menus Picture 17 Audio 17 Lock 18 Network 18 System 19 Streaming Apps 20 Media 21 FAQs 22 Specificatio...

Page 4: ...t The lightning flash symbol within the triangle is intended to warn you of non insulated dangerous voltage the product s enclosure that could be of sufficient magnitude to generate a risk of electric...

Page 5: ...ctric shock Unplug this TV during lightning storms or when unused for long periods of time Not doing so may result in fire or electric shock Do not cover the ventilation openings of the product with i...

Page 6: ...or the products If a television is not positioned in a sufficiently stable location it can be potentially hazardous due to falling Many injuries particularly to children can be avoided by taking simpl...

Page 7: ...ls inside the products it may result in short circuit fire or electric shock Do not place small metallic objects on top of the unit Metal object falls inside the product it may result in short circuit...

Page 8: ...hing the stand Step 1 Place a soft cushioned material on top of a flat surface to prevent damaging the screen panel Then place the TV screen flat on top with the screen side facing down as illustrated...

Page 9: ...get another person to assist in the following task We recommend you use a professional installer as we assume no liability for any eventual damage to the product or injury to yourself if you mount th...

Page 10: ...10 CONTROLS AND CONNECTIONS TV BUTTONS 1 1...

Page 11: ...ETHERNET LAN INPUT 3 HDMI 1 ARC 4 DTV TV ANTENNA 5 HDMI 2 6 USB INPUT 7 Y PB PR INPUT COMPONENT 8 AUDIO L R INPUT 9 HEADPHONE USB connection Insert a USB storage device into the USB port to record pla...

Page 12: ...12 REMOTE CONTROL...

Page 13: ...13 REMOTE CONTROL Cont...

Page 14: ...d to use the unit for a long time please remove batteries from the remote to avoid accident Keep batteries away from children and pets Never throw batteries into a fire Do not drop or impact the remot...

Page 15: ...BASIC OPERATIONS Press the SOURCE button to display the input source list Press the buttons to select the input source and then perss OK to confirm You can access connected USB drives by selecting US...

Page 16: ...tenna RF cable is plugged into your TV before proceeding Press the MENU button for the below menu to appear Use the directional arrows on your remote control and go to Channel Then select Channel to a...

Page 17: ...17 MENUS To access MENU settings Press the menu button on the remote control and the menu will display on your screen MAIN MENU...

Page 18: ...justs the lightness and darkness between objects and the background Brightness Adjusts the brightness of the picture Color Adjusts the colors making them lighter or darker Sharpness Adjusts the outlin...

Page 19: ...nds User Customise to the settings of your choice Equaliser Set sound equalizer Balance Adjust the volume of the left and right speaker AVL Each channel has its own signal conditions and it is inconve...

Page 20: ...the time when your want your TV to turn off while watching TV Off 10mins 20mins 30mins 60mins 90mins 120mins 180mins 240mins Auto Sleep Set this on to power off the TV in 10 minutes when there is no s...

Page 21: ...o OPTION OSD Language Select Menu TV language OSD Time How long for OSD Menu to be displayed on screen when accessed Reset Reset the TV and all its settings Network Please refer to page 23 Software Up...

Page 22: ...ings press the MENU on your remote control go to LOCK Lock Systen Can select On or Off Set Password Enter your 4 digit password once entered confirm password by entering the same 4 digit code and your...

Page 23: ...rk go down and select Scan AP once scanning is complete choose your WIFI network then select PASSWORD and a small key board will appear Please enter in your WIFI password then select RETURN 3 Your WIF...

Page 24: ...reaming apps Press on your remote control then go left to APPS To select which app you want to open go up into the selection of apps and using the left or right directional arrows you can go through t...

Page 25: ...25...

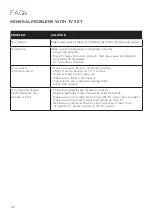
Page 26: ...is connected correctly Check if input settings for TV is correct Audio settings are properly set Make sure volume is not muted If earphones are connected unplug them Adjust the volume No operation ca...

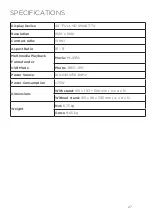
Page 27: ...rast ratio 1000 1 Aspect Ratio 16 9 Multimedia Playback Format under USB Mode Movie M JPEG Photo JPEG JPG Power Source 100 240V 50 60Hz Power Consumption 75W Dimensions With stand 915 193 580 mm w x d...

Page 28: ...28 CUSTOMER HELPLINE info ayonz com DISTRIBUTED BY Ayonz Pty Ltd...

Reviews: