
background image

2-18

6

Close the paper roll drawer.

Gently push in the Roll 1 or Roll 2 drawer.

When the paper roll drawer is closed, the following

message appears.

After the replacement, the device will return to the

status before the paper roll was replaced.

Note

Note

W A I T

A

M O M E N T

(It will take about 30 seconds until paper feeding is ready.)

After closing the paper roll drawer, wait until the “WAIT A

MOMENT” message disappears before opening the paper

roll drawer again. As the device initiates a paper detection

just after the paper roll drawer is closed, so opening the

paper roll drawer during this operation may cause a paper

jam.

If you change the type of paper roll, you must change the

corresponding settings, referring to “Paper settings” (

page 7-2).

Downloaded From ManualsPrinter.com Manuals

Summary of Contents for LP-1020

Page 1: ...s Guide to use the plotter safely and properly Keep this manual in a place where you can quickly access it at any time Black and White Raster Plotter LP 1020 LP 1020L Seiko I Infotech Inc Downloaded From ManualsPrinter com Manuals ...

Page 2: ...Downloaded From ManualsPrinter com Manuals ...

Page 3: ...cations Operation of this equipment in a residential area is likely to cause harmful interference in which case the user will be required to correct the interference at his own expense U00107742300 November 2007 U00107742301 December 2007 Durch die Kennzeichnung dieses Produktes mit dem CE Zeichen erklärt Seiko den folgenden Direktiven der Europäischen Union zu entsprechen mit Wirkung vom siehe Da...

Page 4: ...duct These directives set the scope of machinery subjected to the specific directive Our LP 1020 complies with the EMC Directive 2004 108 EC and Low Voltage Directive 2006 95 EC For inquiries concerning CE Marks Seiko Instruments Europe S A European Head Office Avenue de Messidor 198 1180 Brussels Belgium TEL 32 0 2 346 62 74 FAX 32 0 2 347 52 68 Downloaded From ManualsPrinter com Manuals ...

Page 5: ...Precautions so that you may operate this device safely and correctly Keep this manual in a place where you can quickly access it at any time This device employs either one of the following feeders 1 roll paper feeder for standard sheet drawings with output up to 2 5 m or 2 rolls paper feeder for long sheet drawings with output up to 10 m This manual explains how to use the 2 rolls paper feeder dev...

Page 6: ...notes items that require special care while executing a certain procedure or operation This symbol denotes items that are forbidden This symbol denotes items you should follow to prevent accidents or injury Cautions must be observed to avoid damage to your equipment and bodily injury Warnings must be followed carefully to avoid serious bodily injury or death WARNING CAUTION Downloaded From Manuals...

Page 7: ... possibly be splashed by any liquids If any liquids get into the plotter it could lead to fire electric shock or other serious accidents DO NOT allow metal to touch the internal parts of the plotter Doing so may cause fire electric shock or other accidents DO NOT disconnect or connect the power cable with wet hands Doing so may lead to electric shock Power OFF the plotter and unplug the power cabl...

Page 8: ...diately Handle the paper rolls with care because they are very heavy Dropping them may lead to personal injury Use care when cutting the paper rolls with a scissors or knife during installation DO NOT unplug the electric cable by pulling on the cable Doing so may cause the cable to fray or break which could lead to electric shock and or fire In order to ensure the safe operation of the plotter hee...

Page 9: ...You should understand the meanings of these warning labels and handling instructions 1 Caution high temperature label 2b Caution when dealing with paper jam label 2a Caution when dealing with paper jam label 3 WARNING HIGH VOLTAGE label Warning labels Downloaded From ManualsPrinter com Manuals ...

Page 10: ...ling with paper jams 2 Caution when dealing with paper jams label This label indicates the direction that jammed paper should be pulled out when paper is jammed in the fixation device Follow the directions on the label to remove the paper 3 WARNING HIGH VOLTAGE label This label cautions against contact due to high voltage application As it is dangerous never contact this area a b Downloaded From M...

Page 11: ...ce Chapter 7 Refer to this chapter when you have loaded a different type of paper in the device and you must change the settings accordingly Chapter 8 Refer to this chapter to confirm Setup contents or to set the date and time Chapter 9 Refer to this chapter when setting the communication protocol Chapter 10 Refer to this chapter when conducting initialization Chapter 11 12 Refer to these chapters...

Page 12: ...id damage to the equipment and bodily injury Contain important information This is a Tip mark Contain additional hints for better use This is a See mark A reference section and page is indicated after this mark DSCAN format Please remember The DSCAN format described in this manual as well as DSCAN that appears on the operation display are for only customers in Japan Downloaded From ManualsPrinter ...

Page 13: ...t PORT2_HPGL Indicates a control panel key Indicates the control panel LCD Indicates flashing light On Flashing Off Key LCD LED notations LED on flashing and off states are indicated as follows S E T U P P O R T 1 _ H P G L M E N U S E T U P S E T U P P O R T 2 _ H P G L Downloaded From ManualsPrinter com Manuals ...

Page 14: ...ozone filters Roll paper 1 box A0 A1 A3 x 1 unit each for checking at the time of installation Scanner exit guide 3 pieces MF model only Panel sheet 2 sheets 200V only English and Chinese Power cable 2 units 200V only 2 types Options Item Quantity Remarks LP 817 bucket 1 unit LP 819 carrier sheet set 1 unit MF model only LP 840 color upgrade kit S 1 unit MF S model North South America and Europe L...

Page 15: ...ns ix Supplied components x Chapter 1 Getting started 1 1 Features 1 2 Operating conditions 1 4 Environmental conditions 1 4 Installation space 1 6 Usable paper 1 7 Spool memory configuration 1 10 The names and functions of each part 1 11 Front 1 11 Right side rear side 1 12 Interior 1 13 Control panel 1 14 How to read the status displays for this device 1 17 Downloaded From ManualsPrinter com Man...

Page 16: ...g replacement 2 13 How to detach the paper rolls 2 14 How to attach the paper roll 2 16 Replacing the toner 2 19 Precautions on handling 2 20 Toner replacement procedures 2 21 Replacing the waste toner bottle 2 24 Precautions during replacement 2 24 Waste toner bottle replacement procedures 2 25 Replacing the process cartridge 2 28 Precautions during replacement 2 28 Process cartridge replacement ...

Page 17: ...ting 2 40 Additional printing 2 40 Web function 2 41 Functions 2 41 Web function startup method 2 42 Cleaning the exterior 2 43 Using paper of new standard series 2 44 Using paper of Chinese standard series 2 46 Limiting rolls to be used 2 48 Chapter 3 Menu overview 3 1 Channels and ports 3 3 Data formats 3 3 Data formats which can be used 3 3 Data format auto judging 3 3 Downloaded From ManualsPr...

Page 18: ... menu DEVICE 3 12 Paper menu PAPER 3 13 Function menu FUNCTION 3 14 Protocol menu PROTOCOL 3 15 Reset menu RESET 3 16 System menu SYSTEM 3 17 Chapter 4 Basic Menu Operation 4 1 Summary of basic menu operation 4 2 Offline menu operation 4 3 Switching the menu on the same hierarchy 4 3 Moving the menu hierarchy 4 4 Setting or changing the parameters 4 5 Exiting the setting 4 10 Downloaded From Manua...

Page 19: ...ALS only 5 11 AUTO SUPPLY 5 12 FIXING MODE 5 13 COPY COUNT 5 14 SUPPLY PARAM 5 15 DRAWING PARAM 5 17 SCALING PARAM 5 21 FORMAT PARAM HP GL DSCAN only 5 24 PEN PARAMETER HP GL DSCAN only 5 29 RASTER PARAM 5 34 Chapter 6 DEVICE menu 6 1 Setting items 6 2 POWER SAVE 6 3 EDGE CUT TIMER 6 4 DOOR OPEN CUT 6 5 DENSITY 6 5 TRACING PAP MODE 6 5 BOTTLE MODE 6 6 Downloaded From ManualsPrinter com Manuals ...

Page 20: ...NT 8 3 HPGL SELF PLOT 8 5 DSCAN SELF PLOT 8 6 ERROR LOG 8 7 JOB LOG 8 8 ENGINE LOG 8 10 SYSTEM DATE 8 11 SYSTEM TIME 8 11 INIT CHARG INF 8 11 PRINT CHARG INF 8 11 MAINTE INFO 8 12 DATA DUMP 8 12 Chapter 9 PROTOCOL menu 9 1 Setting items 9 2 PDL SELECT 9 3 XPT PORT 9 4 PRINTER NAME 9 4 USER NAME 9 5 Downloaded From ManualsPrinter com Manuals ...

Page 21: ...ter COMM PARAM 11 3 WEB LOCK 11 5 ENABLE SERIES 11 6 APPLY ROLL 11 8 CHINA SIZE 11 10 INITIAL SET 11 11 LANGUAGE 11 12 LENGTH UNITS 11 12 ADMIN PASSWORD 11 12 Chapter 12 Ethernet parameter ETHERNET 12 1 Setting items 12 2 PORT SELECT 12 4 DHCP 12 4 IP ADDRESS 12 5 SUBNET MASK 12 5 ROUTING TABLE 12 6 SETUP DETAILS 12 7 Downloaded From ManualsPrinter com Manuals ...

Page 22: ...message appears 14 3 Paper Jam 14 3 Door Open 14 14 Operator Call 14 16 Warning 14 17 Service Call Errors 14 25 Error log 14 29 Classification of Error Warning 14 29 Format of Message 14 29 Log Registration Format 14 30 Type of Error Log 14 31 Error Log Classification Table 14 33 Troubleshooting for ethernet 14 34 If BOTTLE MAINT STARTS appears 14 36 Downloaded From ManualsPrinter com Manuals ...

Page 23: ... Appendix 12 PROTOCOL MENU Appendix 13 RESET MENU Appendix 14 SYSTEM MENU Appendix 15 Command list Appendix 21 HP GL HP GL 2 Device Control Command List Appendix 21 HP GL HP GL 2 Device Plotting Command List Appendix 22 HP RTL Plotting Command List Appendix 25 D SCAN Format Command List Appendix 27 TIFF Tag Appendix 33 CALS Format Records Appendix 34 ftp Tag Appendix 34 lpd Support Commands Append...

Page 24: ...Downloaded From ManualsPrinter com Manuals ...

Page 25: ...d this chapter to understand the basics of this device before proceeding to the following chapters Chapter 1 Getting started Contents of this chapter Features Operating conditions The names and functions of each part How to read the status displays for this device Downloaded From ManualsPrinter com Manuals ...

Page 26: ...er rolls compatible with drawing sizes ranging from A0 to A4 a low running cost is achieved by reducing paper consumption This device can also output 2 5 m 98 4 inch size 10 m 393 7 inch for the LP 1020L long sheet drawings The maximum plotting range of this device is as follows Note Picture quality and printing accuracy can only be assured for plain paper and recycled paper Only up to twice the l...

Page 27: ... In addition 10 logical ports can be used for the Ethernet interface which then allows up to 12 computers including parallel interface and USB interface to be simultaneously connected 4 types of rolls paper recycled paper tracing paper and film are supported The device has a front paper feeding and finished drawing outlet structure This allows for paper to be loaded and output drawings to be proce...

Page 28: ...operating conditions of this device including environmental conditions installation space supported papers and spool memory configuration Environmental conditions This device should be used within the temperature and humidity ranges indicated in the graph below To obtain the best picture quality use the device within a temperature and humidity range of 20 to 30 C 45 to 60 RH relative humidity Down...

Page 29: ...s with excessive dust Places subject to extreme changes in temperature or humidity Places near an air conditioner or a heater Places where the plotter may get wet Places subject to direct air flow from a vent Places near a diazo copier that may generate ammonia gas Places with poor ventilation Operating conditions Downloaded From ManualsPrinter com Manuals ...

Page 30: ...ur company s service center Note Installation space When installing this device space to the front rear left and right sides of the device should be accommodated for the replacement of consumables the processing of output drawings and the ventilation The minimum installation space indicated in the diagram below should be ensured The maintenance space indicated in the diagram below is needed to per...

Page 31: ... mm 16 5 inches LP 781 A3 size width 297 mm 11 7 inches LP 735 Tracing paper 75g m2 A0 size width 841 mm 33 1 inches LP 782 A1 size width 594 mm 23 4 inches LP 740 A2 size width 420 mm 16 5 inches LP 783 A3 size width 297 mm 11 7 inches LP 744 Mat film 300 A0 size width 841 mm 33 1 inches LP 786 A1 size width 594 mm 23 4 inches LP 743 A2 size width 420 mm 16 5 inches LP 787 A3 size width 297 mm 11...

Page 32: ...2 inches 12 inches 304 8 mm B form size 457 2 mm 18 inches 304 8 mm 12 inches A form size 304 8 mm 12 inches 228 6 mm 9 inches Roll width Name of fixed form Lengthwise Widthwise 34 inches 863 6 mm E form size 1117 6 mm 44 inches 863 6 mm 34 inches D form size 863 6 mm 34 inches 558 8 mm 22 inches 22 inches 558 8 mm D form size 863 6 mm 34 inches 558 8 mm 22 inches C form size 558 8 mm 22 inches 43...

Page 33: ... mm 39 4 inches 707 0 mm 27 8 inches B2 form size 707 0 mm 27 8 inches 500 0 mm 19 7 inches 500 0 mm 19 7 inches B2 form size 707 0 mm 27 8 inches 500 0 mm 19 7 inches B3 form size 500 0 mm 19 7 inches 353 0 mm 13 9 inches Chinese series A0 roll width Chinese series A1 roll width Chinese series A2 roll width Chinese series A3 roll width 914 mm 36 inches 620 mm 24 4 inches 450 mm 17 7 inches 310 mm...

Page 34: ...memory configuration Spool memory configurations are available for this device as specified below The maximum capacity to be actually spooled is slightly different from the values indicated in the above table Confirm the capacity by executing MENU PRINT Notes Store the paper in a cool dark place with in the specified humidity ranges Store the paper in it s packaging material so that dust will not ...

Page 35: ...door when a paper jam occurs in the vicinity of the finished drawing outlet page 14 3 7 Manual paper feeding guide door 8 Open this door when feeding the paper manually page 2 34 8 Manual feed inlet Insert paper from this inlet during manual feeding page 2 34 9 Toner cover Open this cover when replacing toner page 2 19 0 Control panel The LEDs and LCD which indicate device status and the keys to s...

Page 36: ...or This is an interface connector for a 100 BASE TX and 10 BASE T Ethernet interface connector 5 USB interface connector This is an interface connector for a USB 2 0 interface connector 6 Cutter door door 5 Open this door to deal with paper jams at the cutter area page 14 3 7 Cutter door inside door 9 Open this door to deal with paper jams at the cutter area page 14 3 8 Cutter door lower small doo...

Page 37: ...ice Interior The names and functions of each part 1 Paper feed knob Feeds the end of the roll to the paper feed inlet page 2 11 2 Paper flange This flange is attached to the roll paper page 2 11 Downloaded From ManualsPrinter com Manuals ...

Page 38: ...CD The status of this device as well as a menu to set the device functions appears on a 20 digit 2 line display 1 LEDs The device status is indicated by LED s on flashing and off 3 Keys Use these keys to set device functions 4 Power key Use this key to turn ON OFF this device Downloaded From ManualsPrinter com Manuals ...

Page 39: ...ent time is approaching Off Process cartridge is not installed Display LCD Menu lamp green Indicates that this device is ready for setting receiving data or printing On Setting operations can be performed Off Ready to receive data and print Displays a variety of messages in a 20 figure and 2 line display to inform you of the device status Keys Power MENU key ENTER key CANCEL key Key Key Key Key Po...

Page 40: ...cessed flashing Port number this number is not displayed when using parallel or USB interface Sxxx The job number standing by for processing P R O C E S S I N G S 0 0 1 F 0 1 H P G L J 0 0 9 P R I N T R E A D Y PDL name HPGL DSCAN TIFF CALS Error lamp Menu lamp Note Parallel and USB are only displayed when each interface is installed This section explains the control panel LEDs and LCD which infor...

Page 41: ... of this information for your reference This display appears for approximately three seconds after which the display will automatically return to the original data standby display condition M E N U S E T U P The functions for this device can be set chapter 3 Error lamp Menu lamp An error has occurred Errors are classified according to those which can be dealt with by the operator or errors which c...

Page 42: ... lamp Menu lamp This display appears when the device enters the power saving mode after the data standby status has continued for a certain period of time WA R M I N G U P n n n P OWE R S A V I N G Warming up display Power saving display Counts down Downloaded From ManualsPrinter com Manuals ...

Page 43: ...cedures overview Turning the power on and off Installation operations Online and offline Replacing paper rolls Replacing the toner Replacing the waste toner bottle Replacing the process cartridge Manual paper feeding cut paper Pause continue cancel and additional printing Web function Cleaning the exterior Using paper of new standard series Using paper of Chinese standard series Limiting rolls to ...

Page 44: ... the Menu lamp is on When the Toner lamp is flashing or off replace the toner page 2 19 When the Toner waste bottle lamp is flashing or off replace the waste bottle page 2 24 When the Process lamp is flashing or on replace the process cartridge page 2 28 When the Error lamp is on refer to chapter 14 for information on troubleshooting 3 Open your application software on your computer and create a d...

Page 45: ...ackout is the first step but will not turn the plotter on You must also turn ON the power key on the control panel Main power switch Power key Notes Control panel Turning the power on and off This device has two power switches the main power switch located at the lower left as seen from the rear of the device and the power key on the control panel The device power is turned on by first turning on ...

Page 46: ...e control panel of this device when the main power switch is on When you first turn on the power after purchasing this device a guidance display prompts you to set the panel s display language If this setting has already been completed this message is omitted L A N G U A G E E N G L I S H I N I T I A L I Z I N G WA I T A MOM E N T Main power switch Downloaded From ManualsPrinter com Manuals ...

Page 47: ...he device is now online PRINT READY A PRINT READY message indicates that the device is functioning normally D E L E T E J O B Y E N T E R N C A N C E L S Y S T E M V E R S I O N 0 1 A WA R M I N G U P n n n P R I N T R E A D Y If a key input is not made this message will time out after about 10 seconds and the device starts up with the job in saved condition Warm up will take about 4 minutes about...

Page 48: ...turn the power on Only when HDD is installed When the shut down process has been completed the power will turn off 2 Turn the main power off when you are not using this device for an extended period of time Press the power switch toward the symbol downwards S H U T D OWN WA I T A MOM E N T Note Even when SHUTTING DOWN appears the power will not turn off until you release the power key This indicat...

Page 49: ...sible 1 Subnet mask settings 2 Routing table settings Once you set the panel display language selection initialized optimal setup parameters according to your region and set IP address settings this guidance display will not appear the next time the power is turned on When INITIALIZE is executed in the System menu explained later the IP address will return to an unset condition and the IP address ...

Page 50: ...Select the optimal setup parameters according to your region using the keys Press the key to go to the confirmation screen Press the key to determine this setting I N I T I A L I Z I N G WA I T A MOM E N T L A N G U A G E E N G L I S H L A N G U A G E E N G L I S H L A N G U A G E E N G L I S H O K I N I T I A L S E T S T A N D A R D I N I T I A L S E T C H I N A I N I T I A L S E T C H I N A OK D...

Page 51: ...ng the keys Press the key to go to the confirmation screen Press the key to determine the selection U S I N G N E T WO R K Y E N T E R N C A N C E L I P A D D R E S S 0 0 0 0 0 0 0 0 0 0 0 0 I P A D D R E S S 1 9 2 1 6 8 1 2 3 1 2 3 I P A D D R E S S 1 9 2 1 6 8 1 2 3 1 2 3 O K S Y S T E M V E R S I O N 0 1 A P R I N T R E A D Y Installation operations Downloaded From ManualsPrinter com Manuals ...

Page 52: ...omputer If the device is not online follow the procedures below to set the device online The device will automatically go online when the device power is turned on 1 Press the key to turn the Menu lamp off Offline To select menu operations and paper feed method etc using the device control panel the device must be offline Before using the control panel keys set the device offline according to the ...

Page 53: ...ined here Detach and replace a paper roll when the device has run out of paper or when you change the paper roll size on type When the paper is used up during printing the Error lamp will turn on and the LCD will display the following message Example The screen requesting the A3 tracing paper to be loaded in the roll 1 drawer S E T P A P E R A 0 S E T P A P E R R O L L 1 A 0 S E T P A P E R A 0 T ...

Page 54: ... 22 17 11 30x42 series 30 MAP series 707 mm 500 mm DIN series 707 mm 500 mm Chinese series 914 mm 620 mm 450 mm 310 mm 297 mm When a paper type is specified as SET PAPER A0 TRACE and the paper roll is loaded the display may be automatically switched to the paper menu In such a case set the type of the paper roll If the media series is different that is appropriate media series was not loaded into ...

Page 55: ...the paper roll drawers take care not to get your hands caught in the drawer Do not open other paper roll drawers while one paper roll drawer is open Doing so will increase your chances of getting your hands caught in the drawers Notes If you change the paper type you must also change the device settings accordingly chapter 7 Use media types specified by our company If you use media types which are...

Page 56: ...nd pull the drawer out gently The diagram indicates a case where the Roll 2 drawer is opened 2 Rewind the paper roll and then remove it Turn the paper flange in the direction indicated in the diagram and continue to rewind the roll until you see the end of roll Lift up the paper flange and remove the paper roll Downloaded From ManualsPrinter com Manuals ...

Page 57: ... paper flange and take out the paper roll Loosen the paper flange by turning the knobs in the OPEN direction and remove both ends of the paper flange Take care not to use excessive force when you turn the paper flange knobs The flange ends may come off Downloaded From ManualsPrinter com Manuals ...

Page 58: ... the flange guide to match the paper roll size you are using 3 Load the paper roll into the drawer Hold the paper roll so that the end of the paper is positioned at the bottom facing the back of the device Then align the paper flange to the depressions in the flange guide and gently insert the flange in place C L O S E O P E N Knob Note Note Flange guide If the paper flange knobs are loosely fitte...

Page 59: ... label is affixed to both ends of the space where the cutter blade should be inserted Insert the cutter blade into the space where the label arrow is pointing Slide the cutter blade along the space and cut the paper The paper can be cut cleanly when the cutter is inserted in a perfectly sideways direction Paper feed knob Take care not to hurt yourself and damage the device when handling the cutter...

Page 60: ...30 seconds until paper feeding is ready After closing the paper roll drawer wait until the WAIT A MOMENT message disappears before opening the paper roll drawer again As the device initiates a paper detection just after the paper roll drawer is closed so opening the paper roll drawer during this operation may cause a paper jam If you change the type of paper roll you must change the corresponding ...

Page 61: ...res indicated below Note Replacing the toner S E T T O N E R C A R T R I D G E O P E N L E V E R When you open the toner door you will find a Toner replacement label affixed to the inside surface Refer to this when replacing toner After the Toner lamp starts flashing approximately 50 m of plots can be produce at normal size and density If plots with a high printing rate such as drawings containing...

Page 62: ...r skin or clothing quickly wash it off with water Take care not to get toner in your eyes or breathe it in If the toner gets in your eyes wash your eyes out with lots of water and consult your physician Notes If you move the toner cartridge from a cold to a warm location leave it in room temperature for over three hours before using it After replacing the toner try to use it up within a six month ...

Page 63: ...cing the toner Notes Toner should be replaced only when the device power is On If the toner is replaced while the power is Off the device will not be able to detect the amount of toner and an error status will not be cancelled even when toner has been replaced correctly Replace toner after plotting finishes Replacing the toner during plotting may cause the operation to stop and the plotting data t...

Page 64: ... message appears on the LCD After performing the procedure 6 operation return the lever and remove the toner cartridge If the above message does not appear check to see that the lever has been pulled up to the right end C L O S E L E V E R R E MO V E C A R T R I D G E Downloaded From ManualsPrinter com Manuals ...

Page 65: ...idge to allow toner to drop down 7 Return the lever to the left 8 Remove the toner cartridge and close the cover At this time the following message appears on the LCD WA I T A MOM E N T Replacing the toner Downloaded From ManualsPrinter com Manuals ...

Page 66: ...age appears on the control panel replace the waste bottle in accordance with the procedures outlined below A Waste bottle replacement label is affixed to the side of the waste toner bottle Refer to this when replacing the waste bottle Even after the Waste toner lamp starts flashing you should be able to produce about 120 m of plots Warning Replacing the waste toner bottle Precautions during replac...

Page 67: ...sult a physician Waste toner bottle replacement procedures 1 Take out a new waste toner bottle from its package and remove the cap This cap should be used to cover the waste toner bottle which you are removing so keep it at hand procedure 4 2 Open the waste toner bottle door The waste bottle door is located at the right side of the device Notes Replace the waste bottle after plotting has been comp...

Page 68: ... the LCD will display the following message 4 Attach the cap to the waste toner bottle Attach the cap which you have removed in procedure 1 to the waste bottle containing waste toner Dispose of the waste bottle containing waste toner as non burnable garbage Cap Bottle containing waste toner Attach the cap securely as it may come off S E T WA S T E B O T T L E Downloaded From ManualsPrinter com Man...

Page 69: ...t of the main unit by slightly lifting it 2Set it onto the bottom surface and position it so that it is stable After the following message appears the device status will return to the status before the waste bottle was replaced 6 Close the waste door WA I T A MOM E N T Replacing the waste toner bottle Downloaded From ManualsPrinter com Manuals ...

Page 70: ...comes on and plotting becomes impossible The following error message appears on LCD When the Process lamp flashes or goes out follow the procedures indicated below to replace the Process cartridge Precautions during replacement Warning Do not throw the process cartridge into fire Doing so may cause accident and fire Dispose of process cartridge as non burnable garbage P R I N T R E A D Y R E P L A...

Page 71: ...otect the photoconductor drum and to prevent optical deterioration Some black developing toner may be visible on the photoconductor drum of a new Process cartridge This is to ensure that the cartridge is kept in a ready to use condition at all times so you may use it as it is After the cartridge is mounted on the device body cleaning will automatically start so you need not worry about the liquid ...

Page 72: ...Remove the Process cartridge from the box together with its protective case 2 Place the Process cartridge on the top of the device together with the protective case Two types of filters for replacement use are contained in the process cartridge packaging box Replace the filter after replacing the process cartridge Downloaded From ManualsPrinter com Manuals ...

Page 73: ...e tape at 2 points on the inside Remove the sheet together with the tape 5 Remove the Process cartridge from its protective case While holding onto the handles open the protective case while pushing with your thumbs and remove the Process cartridge from the protective case Replacing the process cartridge Downloaded From ManualsPrinter com Manuals ...

Page 74: ...nsert it in the direction of the alignment arrows three points green After insertion remove the protective cover from the top of the cartridge 7 Close the top cover 8 Remove the filter cover Pull out the filter covers at 2 points on the right side of the main unit as it faces you and remove them Downloaded From ManualsPrinter com Manuals ...

Page 75: ...r Pull out the filters toward you and remove and replace with the two filters contained in the process cartridge packaging box 10 Attach the filter covers and turn ON the device Replacing the process cartridge Downloaded From ManualsPrinter com Manuals ...

Page 76: ...eeding cut paper Manual feeding procedures 1 Adjust the paper guide Adjust the paper guide to the position where you will set the cut paper for manual feeding 2 Set the paper so that the printing surface is face down When you insert the paper into the manual paper feed inlet the paper is drawn in and the paper is ready for printing Downloaded From ManualsPrinter com Manuals ...

Page 77: ...anel this function is called continuous manual paper feeding function Refer to page 5 12 for details of the paper feeding mode 2 Load the cut paper Cut paper as listed below can be used with this device Manual paper feeding procedure A series fixed form cut paper Name of fixed form Lengthwise length Widthwise length A0 1189 mm 46 8 inches 841 mm 33 1 inches A1 841 mm 33 1 inches 594 5 mm 23 4 inch...

Page 78: ...hes 9 12 series width cut paper Width name Paper width Paper length E width 914 4 mm 36 inches Max up to printing length D width 609 6 mm 24 inches C width 457 2 mm 18 inches B width 304 8 mm 12 inches 8 5 11 series fixed form cut paper Name of fixed form Lengthwise length Widthwise length E 1117 6 mm 44 inches 863 6 mm 34 inches D 863 6 mm 34 inches 558 8 mm 22 inches C 558 8 mm 22 inches 431 8 m...

Page 79: ...8 inches 500 0 mm 19 7 inches B3 500 0 mm 19 7 inches 353 0 mm 13 9 inches DIN series width cut paper Width name Paper width Paper length B1 width 707 0 mm 27 8 inches Max up to printing length B2 width 500 0 mm 19 7 inches Chinese series width cut paper Width name Paper width Paper length 914 mm width 914 mm 36 inches Max up to printing length 910 mm width 910 mm 35 8 inches 900 mm width 900 mm 3...

Page 80: ... pulls the paper into it Notes When the paper is manually fed printing is made only on one sheet of paper even if the number of prints is set to more than two Even if the correct size cut paper is not used printing takes place when cut paper is fed into the device In this case the drawing may be missing in part Set the paper sideways in case of A4 fixed form cut paper of A series A fixed form cut ...

Page 81: ...and set the device to Print stop status When a drawing has already begun printing printing will be stopped after the printing of that drawing is completed Printing of the next drawing will not be executed The Print stop status appears on the following offline display and enables each offline process to be executed Continue printing From the Print stop status pressing the key again returns the devi...

Page 82: ... drawing as that printed last called accumulated drawing can be additionally printed At this time the number of copies can be also specified If no drawing has been stored or accumulated the device is not activated The stored drawings can be erased by pressing the key in the data standby condition S T A C K P R I N T C O P I E S 1 P R I N T R E A D Y Press the key S T A C K P R I N T 0 1 0 1 Press ...

Page 83: ...tion allows you to check the status of the device etc from the host display screen You will be able to monitor job execution status and error occurrences remotely 2 Setup reference change function Printing parameters etc set for the device can be reviewed to and changed on the host screen 3 Job control function This function allows you to view job information details and conduct reprinting of alre...

Page 84: ... to the instructions which appears when the device is booted 3Set each Ethernet parameter where necessary 2 Launch the Web browser 1Obtain the Web browser for the host computer Microsoft Internet Explorer Ver11 5 and later Netscape Communicator Ver5 0 and later 2Launch the Web browser 3Enter http the IP address set to the device into the address column and press the Enter key Downloaded From Manua...

Page 85: ...rior To clean the exterior of the device soak a soft cloth with water or a neutral detergent and wring the cloth well and wipe away dirt Note Never use a volatile solvent such as a thinner benzine and alcohol Downloaded From ManualsPrinter com Manuals ...

Page 86: ...rocess is also applicable to other series When using the Chinese series refer to When using paper of China series page 2 45 1 Adding new media series Set the 8 5 series to ON in the enable series screen page 11 5 2 Change the apply roll setting The 34 22 17 and 11 inch rolls can be used for the 8 5 11 inch series Set the roll to be actually used to ON in the apply roll setting process page 11 7 It...

Page 87: ...ch series was set to the 8 5 series page 7 2 When using the cut paper of the 8 5 11 inch series this step is not needed 5 PDL setup Set the auto media series of the PDL setup for the port to transfer the data to 8 5 series page 5 11 6 If not operated as expected If the preset series does not work as expected check the process from steps 1 to 5 again Note All of the apply rolls of the same series c...

Page 88: ...s of A0 width 2 types of A1 width and 2 types of A2 width of the China series can be used Set the required width in the Chinese size page 11 8 Using paper of Chinese standard series China A0 roll width China A1 roll width China A2 roll width China A3 roll width 914 mm 36 inches 620 mm 24 4 inches 450 mm 17 7 inches 310 mm 12 2 inches 910 mm 35 8 inches 610 mm 24 inches 440 mm 17 3 inches 297 mm 11...

Page 89: ...dia series of the drawer in which the roll was set to the China series page 7 2 When using the cut paper of the China series only this step is not needed 6 PDL setup Set the auto media series of the PDL setup for the port to transfer the data to the China series page 5 11 When the China series is operated with the printer driver set the printer driver to Chinese page 5 24 7 If not operated as expe...

Page 90: ... when starting to print with this device reloading of paper will be prompted on the control panel At this time rolls which have been set to OFF in the setting of apply rolls are not required 3 In case of optimum mode When the auto supply mode is set to the optimum mode page 5 12 a roll which will leave the least wasted paper will be automatically selected from the rolls having been set to ON in th...

Page 91: ...des an overview of the menu functions covered by this device Chapter 3 Menu overview Contents of this chapter Channels and ports Data format Job Setting menu PDL menu Items which you can set Menu screen Downloaded From ManualsPrinter com Manuals ...

Page 92: ...ve data from up to 12 computers simultaneously This device has 4 types of plotting parameter tables for each port on the Ethernet interface 4 types for the parallel interface and 1 type for the USB interface for a total of 45 available types Each parameter table is set in SETUP MENU To use the ports it is necessary to enable the Ethernet parameters corresponding to each port beforehand in SYSTEM M...

Page 93: ...the received data will be processed as DSCANC C2 format is a data format conforming to the command system of HP company indicated below D SCAN C format conforming to HP GL D SCAN C2 format conforming to HP GL 2 HP RTL For details on the commands supported by this device refer to COMMAND LIST in the appendix In this manual the above data formats are collectly referred to as PDL Data format auto jud...

Page 94: ...ts of JOBS refer to the same thing However as data comprised of multiple drawings can also managed as a single job So one print job isn t mecessarily composed of one drawing For all print fobs the print status of the job can be checked from the remote control the print order can be changed and reprinting etc is available Reprinting By using the REPRINT function in the Job menu pre processed jobs c...

Page 95: ... operating status settings for the device engine Moreover this device has four Print parameter setup tables to be used independently for each of the parallel channels and Ethernet ports These tables can be set from the Setup menu this Setup table is referred to as the PDL table hereafter These four PDL tables can be assigned to each channel or port via PDL SELECT in the Protocol menu the USB chann...

Page 96: ...etup menu listed below Note Disabled ports will not be indicated refer to Port select in the System menu Only the PDL selected via PDL Select is displayed refer to PDL Select in the Protocol menu Parallel and USB will only be indicated when each interface is installed USB will only indicate HPGL Downloaded From ManualsPrinter com Manuals ...

Page 97: ...u select the PDL numbers in PDL SELECT as listed below When the Protocol menu is changed system reset is executed Setting menu Note You can set the ports you use in Ethernet parameters in System menu initial parameter is 3 ports 3 System menu Set the number of ports you use and the protocol types in System menu listed below Note FTP XPT and LDP comprehensively allow for 10 ports to be set Initial ...

Page 98: ...meters set for this device are disabled and printing is performed in accordance with the print parameters set for the print driver printing in accord with the print driver settings If you wish to enable the PDL menu print parameters using our company s print driver go to Format parameters and set the PRINT DRIVER to DISABLE initial parameter is print driver disabled PRINT DRIVER ENABLE DISABLE CHI...

Page 99: ...s are saved in non volatile memory and are not lost when the power is turned off Although the offline display appears even while printing there are functions which cannot be operated and these menus will not be displayed Idle status M E N U S E T U P M E N U D E V I C E M E N U P A P E R M E N U F U N C T I O N M E N U P R O T O C O L M E N U R E S E T M E N U S Y S T E M Downloaded From ManualsPr...

Page 100: ...3 10 Printing status M E N U S E T U P M E N U D E V I C E M E N U P A P E R M E N U P R O T O C O L M E N U R E S E T M E N U S Y S T E M Downloaded From ManualsPrinter com Manuals ...

Page 101: ..._DSCAN Performs the settings relating to DSCAN format printing Setup Sets PDL table parameter settings for Ethernet port n PORT n_TIFF Perform the settings relating to TIFF format printing Sets PDL table parameter settings for Ethernet port n PORT n_CALS Performs the settings relating to CALS format printing M E N U S E T U P S E T U P P O R T 1 _ H P G L Setup menu SETUP Press the key on the disp...

Page 102: ...fter a Device Data standby status has continued for a while DOOR OPEN CUT To plot the first data after the roll door is opened and closed sets whether to start plotting after the end of the roll paper is automatically cut DENSITY Adjusts the printing density TRACING PAP MODE Sets the tracing paper printing mode BOTTLE MAINT Sets whether the maintenance of waste toner bottle starts automatically or...

Page 103: ...PAPER Press the key while the display below is appearing to enter the Paper menu In this menu you can specify the paper type and series Press the key Menu screen M E N U P A P E R P A P E R R O L L 1 Downloaded From ManualsPrinter com Manuals ...

Page 104: ...in this device ERROR LOG Prints error log information JOB LOG Prints job log information Function ENGINE LOG Prints detailed information for the engine SYSTEM DATE Sets the date year month day SYSTEM TIME Sets the time hour minutes seconds INIT CHARG INF Initializes accounting information PRINT CHARG INF Prints accounting information MAINT INFO Prints maintenance information DATA DUMP Outputs a po...

Page 105: ...thernet port PDL selection and protocol name are set here N indicates the port number xxx indicates the Ethernet protocol type Up to 10 ports may be specified Protocol To set the protocol name XPT sets the XPT port LPD sets the printer name and FTP sets the user name PARALLEL Performs the PDL selection for the parallel channel M E N U P R O T O C O L P R O T O C O L P O R T 1 X P T Downloaded From...

Page 106: ...the same status as when the device power is turned on PORT RESET Ethernet port reset Resets the communication for the selected logical port Reset menu RESET Press the key on the display below to enter the Reset menu M E N U R E S E T S Y S T E M R E S E T Downloaded From ManualsPrinter com Manuals ...

Page 107: ... be used in this device System APPLY ROLL Sets the roll sizes for each media series you use in this device CHINA SIZE Sets the roll sizes to be used in China in this device INITIAL SET Sets all parameter settings to their initial values LANGUAGE Switches the language on the LCD message display LENGTH UNITS Switches the length uint millimeter or inch ADMIN PASSWORD Specifies the administrator passw...

Page 108: ...Downloaded From ManualsPrinter com Manuals ...

Page 109: ...on Chapter 4 provides the basic operating information that you set up each menu Chapter 4 Basic Menu Operation Contents of this chapter Summary of basic menu operation Offline menu operation Downloaded From ManualsPrinter com Manuals ...

Page 110: ...nu S E T U P P O R T 1 _ H P G L P OWE R S A V E E F C T H I G H P A P E R R O L L 1 M E N U P R I N T S Y S T E M P R O T O C O L P O R T 1 X P T S Y S T E M R E S E T S Y S T E M C OMM P A R A M M E N U S E T U P M E N U D E V I C E M E N U P A P E R M E N U F U N C T I O N M E N U P R O T O C O L M E N U R E S E T M E N U S Y S T E M Downloaded From ManualsPrinter com Manuals ...

Page 111: ...the and keys To enter each menu press the key If any disabled key is pressed a buzzer sounds Switching the menu on the same hierarchy Press the or key to switch the menu within the same hierarchy An example of the setup menu group is shown below S E T U P P O R T 1 _ H P G L S E T U P P O R T 1 _ D S C A N S E T U P P O R T 1 _ T I F F S E T U P P O R T 1 _ C A L S Downloaded From ManualsPrinter c...

Page 112: ...ierarchy You can move through the menu hierarchy using the or key An example of the setup menu group is shown below S E T U P P O R T 1 _ H P G L A U T O S U P P L Y C O N T MO D E Downloaded From ManualsPrinter com Manuals ...

Page 113: ... P T I M A L MO D E A U T O S U P P L Y O P T I M A L MO D E A U T O S U P P L Y C O N T MO D E Setting or changing the parameters Press the key to change the parameters Press the or key to select a parameter Shift the digits of a numerical value or character to enter a desired one using the and keys Press the key to select the parameter In some menus the key is used to execute the respective func...

Page 114: ...alue using the key or key 4 Change the parameter using the and keys 5 Select the new value using the key Press the key to cancel the change I P A D D R E S S 0 2 0 0 0 5 0 7 0 1 0 0 I P A D D R E S S 0 2 0 0 0 5 0 7 0 1 0 0 I P A D D R E S S 0 1 0 0 0 5 0 7 0 1 0 0 I P A D D R E S S 0 1 0 0 0 5 0 6 7 2 5 1 I P A D D R E S S 0 1 0 0 0 5 0 6 7 2 5 1 I P A D D R E S S 0 2 0 0 0 5 0 7 0 1 0 0 Download...

Page 115: ...s digits using the key or key 3 Change the characters using the key or key 4 Change the parameter using the and keys 5 Select the new characters using the key Press the key to cancel the change U S E R N A M E F T P 0 3 U S E R N A M E F T P 0 3 U S E R N A M E F S P 0 3 U S E R N A M E U S E R 1 U S E R N A M E U S E R 1 U S E R N A M E F T P 0 3 Downloaded From ManualsPrinter com Manuals ...

Page 116: ... 2 Execute using the key or return to exit display without execution using the key After completion of execution display before the execution appears E N G I N E L O G E N G I N E L O G O K L O C A L P R I N T 0 1 0 1 Downloaded From ManualsPrinter com Manuals ...

Page 117: ... key 3 Execute using the key or return to exit display without execution using the key After completing execution display before execution appears M E N U P R I N T S Y S T E M M E N U P R I N T S Y S T E M O K Offline menu operation M E N U P R I N T P O R T 1 O K L O C A L P R I N T 0 1 0 1 Downloaded From ManualsPrinter com Manuals ...

Page 118: ...4 10 Exiting the setting Press the key to return to the online condition Downloaded From ManualsPrinter com Manuals ...

Page 119: ...etting parameter Items Chapter 5 SETUP Menu Chapter 5 explains how to set the print parameters Contents of this chapter Setting parameter items Chapter 5 SETUP Menu Downloaded From ManualsPrinter com Manuals ...

Page 120: ...or changed during the printing process the changed parameters are effective from the next job The changed parameters are automatically saved after the completion of the setup operation but the parameters that were only referred to are not saved Setting parameters in the setup menu are tabulated below and each parameter is explained Most of setting parameters as well as those of PDL are common Para...

Page 121: ... U T E S A R A P _ L G P H A o t r e f e R P U T E S A R A P N A C S D _ P U T E S A R A P F F I T _ P U T E S A R A P S L A C _ P U T E S L G P H _ B S U Note 1 Disabled ports will not be indicated refer to PORT select in the system menu Only the PDL selected via PDL select is displayed refer to PDL select in the Protocol menu Parallel and USB will be indicated only when the respective interfaces...

Page 122: ...E ROLL 1 MODE ROLL 2 MODE MANUAL FEED FIXSIZE MODE FIXED SIZE EXTENSION A FIXED SIZE REAL SCALE DSCAN displays the FIXED SIZE as A FIXED SIZE COPY COUNT 1to99 Initialvalue 1 SUPPLY PARAM refer B DRAWING PARAM refer C SCALING PARAM refer D FORMAT PARAM refer E HP GL DSCAN only PEN PARAMETER refer F HP GL DSCAN only RASTER PARAM refer G B Third hierarchy item Parameter Remarks CENTERING OFF ON PAPER...

Page 123: ...o 393 700 inches Initial value 0 WRITE MODE OR WRITING OVER WRITING MIRROR OFF ON REVERSE OFF ON TIFF CALS only ERROR MEMO ON SPECIAL OFF SPECIAL for HP GL only PlotDataToFile OFF ON Print D Third hierarchy item Parameter Remarks SCALE MODE MANUAL SCALE REDUCE SCALE X 0 01 to 1000 00 Initial value 100 00 Enabled when scale mode manual scale SCALE Y 0 01 to 1000 00 Initial value 100 00 Enabled when...

Page 124: ...n E e l a c s l a u n a m 0 A 0 A 4 A 3 A 2 A 1 A e d o m e l a c s n e h w d e l b a n E e l a c s l a u n a m D 2 m e t i y h c r a r e i h h t r u o F r e t e m a r a P s k r a m e R A A B C D E e d o m e l a c s n e h w d e l b a n E e l a c s l a u n a m B B C D E A e d o m e l a c s n e h w d e l b a n E e l a c s l a u n a m C C D E A B e d o m e l a c s n e h w d e l b a n E e l a c s l a ...

Page 125: ...b a n E e l a c s l a u n a m B B C D E A e d o m e l a c s n e h w d e l b a n E e l a c s l a u n a m C C D E A B e d o m e l a c s n e h w d e l b a n E e l a c s l a u n a m D D E A B C e d o m e l a c s n e h w d e l b a n E e l a c s l a u n a m E E A B C D e d o m e l a c s n e h w d e l b a n E e l a c s l a u n a m Downloaded From ManualsPrinter com Manuals ...

Page 126: ... only TERMINATOR NR ON OFF HP GL only TERMINATOR SP0 ON OFF HP GL only TERMINATOR ESC ON OFF HP GL only TERMINATOR AF ON OFF HP GL only TERMINATOR AH ON OFF HP GL only TERMINATOR FR ON OFF HP GL only PLAN SIZE ON PS ON IP ON IW OFF HP GL only DRAWING NOP EOP DSCAN only PAPER NO PAPER SOURCE PAPER TYPE OFF DSCAN only Downloaded From ManualsPrinter com Manuals ...

Page 127: ...2 0 016 inches PEN 3 0 020 inches PEN 4 0 024 inches PEN 5 0 028 inches PEN 6 0 031 inches PEN 7 0 035 inches PEN 8 and later 0 039 inches Pen 8 and later 10 Set HP GL to pen 0 to 15 0 00 is 1 dot width Set DSCAN to pen 1 to 32 PEN DENSITY 0 to 100 Initial value Pen 0 0 Pen 1 and later 100 Set HP GL to pen 0 to 15 Set DSCAN to pen 1 to 32 PEN N CORNER ROUND BUTT Set HP GL to pen 0 to 15 Set DSCAN ...

Page 128: ...AR MODE PEN n WIDTH PEN n DENSITY PEN n CORNER Note PEN n JOINT Note Note Equipment setting is always enabled in the D SCAN PDL When a printer driver HP GL PDL is used and the printer driver setting is disabled PRT DRIVER DISABLE setting of this device is enabled without using the setting on the printer driver screen of the computer G m e t i y h c r a r e i h d r i h T r e t e m a r a P s k r a m...

Page 129: ...ode is set to CONT MODE OPTIMAL MODE or MANUAL FEED mode set the series of paper to be fed This setting is performed on the second hierarchy Parameter choice input method Default value A SERIES Allows for A series automatic feeding 9 SERIES Allows for 9 12 inch series automatic feeding 8 5 SERIES Allows for 8 5 11 inch series automatic feeding 30 42 SERIES Allows for 30 42 inch series automatic fe...

Page 130: ...uously produced Small rolls only OPTIMAL MODE An optimum roll is used for plotting to minimize wasted media If the optimum roll is not loaded the printing process is suspended and replacement of paper is demanded ROLL 1 MODE Prints on roll 1 paper ROLL 2 MODE Prints on roll 2 paper MANUAL FEED Prints on the paper fed by hand The default value varies depending on the setting in the INITIAL SETTING ...

Page 131: ...mm 27 6 inches 500 0 mm 19 7 inches 9 12 series Long side Short side E size 1219 2 mm 48 inches 914 4 mm 36 inches D size 914 4 mm 36 inches 609 6 mm 24 inches C size 609 6 mm 24 inches 457 2 mm 18 inches B size 457 2 mm 18 inches 304 8 mm 12 inches A size 304 8 mm 12 inches 228 6 mm 9 inches 8 5 11 series Long side Short side E size 1117 6 mm 44 inches 863 6 mm 34 inches D size 863 6 mm 34 inches...

Page 132: ...e REAL SCALE Prints at actual length The default value varies depending on the setting in the INITIAL SETTING When producing plots on paper of China series printing is always made at actual length DSCAN displays FIX as A SERIES COPY COUNT Allows for choosing of the number of copies When the number of copies is set with the HP GL data setting of the data is used This setting is performed on the sec...

Page 133: ...e of paper to be used in the paper feed mode continuous mode or optimum mode This setting is found on the second hierarchy Parameter choice input method Default value NON DESIGNATED Paper type is not specified NORMAL PAPER Allows for normal paper feeding TRACING PAPER Allows for tracing paper feeding FILM Allows for film feeding Centering OFF Paper feed direction Cut position X Y Drawing Centering...

Page 134: ...he paper size of the fixed size or paper roll size is judged as being larger by the value preset for the size margin However the area where plotting can be performed actually is the original paper size and thus the drawing area beyond the original paper size is clipped Parameter numerical value input method 0 to 30 0 to 1 1 inches Default value 2 0 08 inches Downloaded From ManualsPrinter com Manu...

Page 135: ...lue MARGIN MARGIN is used as the offset function Setting of MARGIN is enabled VARIABLE SIZE Offset X and Y are used as the offset function Offset X and Y setting is enabled Drawing size increases or decreases depending on the offset value FIXED SIZE Offset X and Y are used as the offset function Offset X and Y setting is enabled As the drawing size does not vary depending on the offset data may be...

Page 136: ...Y This setting is enabled at the time of OFFSET MODE VARIABLE SIZE or FIXED SIZE setting This setting is disabled when CENTERING ON setting This setting is disabled when the drawing being produced at the center of the origin coordinates is produced in the PAGE SIZE REAL SCALE for the HP GL data only This setting is performed on the third hierarchy Parameter numerical value input method 9999 99 to ...

Page 137: ...d Default value OR WRITING Drawing is overlapped OVER WRITING Drawing is overwritten MIRROR Allows for setting whether to produce a plot by turning over the plot around the drawing center line in parallel with the X axis line symmetry This setting is performed on the third hierarchy Parameter choice input method Default value OFF Mirror plotting is not performed ON Mirror plotting is performed Dra...

Page 138: ...if a command error or other PDL error occurs This setting is performed on the third hierarchy Parameter choice input method Default value ON If a PDL error occurs during data processing an error memo is attached to the side of the drawing while it is being printed SPECIAL If an PDL error occurs during data processing an error memo is attached to the side of the drawing while it is being printed Fo...

Page 139: ...allow the automatic reduction When the manual scale is selected the scale is applied to the drawing according to the setting of scale X scale Y and scale FIX This setting is performed on the third hierarchy Parameter choice input method Default value MANUAL SCALE Automatic scaling does not take place Manual scale parameters scale X and Y and fix scale are enabled REDUCE Drawing is automatically re...

Page 140: ...hen the drawing is scaled down in the same X and Y proportion This setting is performed on the third hierarchy Parameter choice input method Default value ON Line width or interval between points are also scaled down Maximum line width is 16 mm 0 63 inches OFF Line width or interval between points are not scaled down FIX SCALE A FIX SCALE 9 FIX SCALE 8 5 Allows for setting the method of automatic ...

Page 141: ...matically scaled to 9 12 inch series B fix size C Automatically scaled to 9 12 inch series C fix size D Automatically scaled to 9 12 inch series D fix size E Automatically scaled to 9 12 inch series E fix size FIX SCALE 8 5 A Automatically scaled to 8 5 11 inch series A fix size B Automatically scaled to 8 5 11 inch series B fix size C Automatically scaled to 8 5 11 inch series C fix size D Automa...

Page 142: ...de with the panel may not be used for operation When data is received from a driver other than the printer driver for LP 1020 in this setting setup for this device is enabled DISABLE When the printer driver is operated in the PANEL SETUP using the printer driver for LP 1020 this setting should be used CHINA This parameter should be set up when printing the roll of the China series on the printer d...

Page 143: ... of coordinates should be the center point When HP GL 2 is employed the origin of coordinates should be the left lower point When HP GL is employed HP GL 2 data can be received without causing an error TERMINATOR HP GL only TERMINATOR PG1 TERMINATOR NR TERMINATOR SPO TERMINATOR ESC TERMINATOR AF TERMINATOR AH TERMINATOR FR Allows for setting whether the terminator is to be a condition to complete ...

Page 144: ...s the drawing size ON IP Sets the IP command as the drawing size ON IW Sets the IW command as the drawing size OFF Disables the drawing size command You need to set ON IP and ON IW only when it is clear that the IP command or IW command is used as the drawing size to avoid causing a printing error It depends on the CAD application If the PS command is available when setting ON IP or ON IW the PS c...

Page 145: ...med PAPER NO DSCAN only Allows for setting how to handle the paper type No When handling the paper type No as the paper source paper supply is controlled as listed below This setting is performed on the third hierarchy Parameter choice input method Default value PAPER SOURCE Handles paper type No as the paper source PAPER TYPE Handles paper type No as the paper type OFF Disables paper type No of i...

Page 146: ...roduced on the tracing paper 3 Plot is produced on the film 4 and above Sets paper type No disable Supplies paper according to the panel paper supply mode setting Paper type No Paper supply control 0 Sets paper type No disable Supplies paper according to the panel paper supply mode setting 1 Controls paper supply in the paper supply mode roll 1 mode 2 Controls paper supply in the paper supply mode...

Page 147: ...enable PANEL setting PEN N WIDTH mm PEN N WIDTH in Allows for setting of the width of the pen of this device If the setting value is 0 00 plot is produced in 1 dot width This setting is performed on the third hierarchy Parameter numerical value input method 0 00 to 16 00 0 00 to 0 629 inches Default value 100 3 94 inches PEN 0 0 20 mm 0 008 inches HP GL only PEN 1 0 30 mm 0 012 inches PEN 2 0 40 m...

Page 148: ... to 0 65 0 0244 to 0 0256 15 0 15 to 0 19 0 0059 to 0 0075 4 0 66 to 0 69 0 026 to 0 0272 16 0 20 to 0 23 0 0079 to 0 0091 5 0 70 to 0 74 0 0276 to 0 0291 17 0 24 to 0 27 0 0094 to 0 0106 6 0 75 to 0 78 0 0295 to 0 0307 18 0 28 to 0 31 0 011 to 0 0122 7 0 79 to 0 82 0 0311 to 0 0323 19 0 32 to 0 35 0 0126 to 0 0138 8 0 83 to 0 86 0 0327 to 0 0339 20 0 36 to 0 40 0 0028 to 0 0039 9 0 87 to 0 91 0 0...

Page 149: ...f this device Setting is performed on the third hierarchy Parameter choice input method Default value ROUND Specifies the joint in the round form MITERED Specifies the joint in the mitered form ROUND BUTT a a 1 2 of line width PEN N CORNER Allows for setting of the line end shape of the pen of this device This setting is performed on the third hierarchy Parameter choice input method Default value ...

Page 150: ... line of the plot may not be treated for joints PEN ADJUST mm PEN ADJUST in Allows for setting of the pen width adjust value Plots can be produced with a pen width larger or smaller than the pen width preset with the data or on the panel by the adjust value in the range of the maximum pen width 16 mm 0 63 inches and minimum width 1 dot This setting is performed on the third hierarchy Parameter num...

Page 151: ...ne are treated ON All ends of fine small lines are treated as round shape With this device lines less than 1mm 0 039 inches in width and length are handled as micro length lines Fine small lines may not be clearly plotted in combinations other than CORNER ROUND and JOINT ROUND By setting the parameter to ON the lines are handled as CORNER ROUND and JOINT ROUND allowing clear plotting Downloaded Fr...

Page 152: ... out SCREENING HP GL DSCAN TIFF only Specifies the multi valued image data screening method This setting is performed on the third hierarchy Parameter choice input method Default value LINE DRAW MODE Screening appropriate to line drawing is performed for multi valued image data GRAPHICS MODE Screening appropriate to computer graphics is performed for the multi valued image data PICTURE MODE Screen...

Page 153: ...ter 6 DEVICE menu Chapter 6 describes the DEVICE menu to specify the operating conditions for the engine of this device Chapter 6 DEVICE menu Contents of this chapter Setting items Downloaded From ManualsPrinter com Manuals ...

Page 154: ...i n Menu First hierarchy item Parameter Device POWER SAVE 15 min 15 min 30 min 60 min 90 min 235 min EDGE CUT TIMER OFF OFF 30 min 1 hour 2 hour 4 hour 1 min 5 min 10 min DOOR OPEN CUT OFF OFF ON DENSITY NORMAL THIN RATHER THIN NORMAL RATHER THICK THICK TRACING PAP MODE NORMAL NORMAL WETTY BOTTLE MAINT AUTO AUTO MANUAL Downloaded From ManualsPrinter com Manuals ...

Page 155: ...s 60 min Device enters the power saving mode after being left for 60 minutes 90 min Device enters the power saving mode after being left for 90 minutes 235 min Device enters the power saving mode after being left for 235 minutes After completion of plotting when the preset time for waiting data has elapsed the device automatically enters the power saving mode When data is received the power saving...

Page 156: ...ameter choice input method Default value OFF Does not cut 30 min Cuts after the device is left for 30 minutes 1 hour Cuts after the device is left for 1 hour 2 hour Cuts after the device is left for 2 hours 4 hour Cuts after the device is left for 4 hours 1 min Cuts after the device is left for 1 minute 5 min Cuts after the device is left for 5 minutes 10 min Cuts after the device is left for 10 m...

Page 157: ...ice Specify this function when you desire to cut the paper end of output drawing cleanly Parameter choice input method Default value OFF Not cut ON Cut DENSITY Adjusts the printing density Parameter choice input method Default value THIN RATHER THIN NORMAL RATHER THIC THICK TRACING PAP MODE Specifies the environmental condition for tracing paper Parameter choice input method Default value NORMAL W...

Page 158: ...mount of print is executed Set whether this maintenance starts automatically or a message to prompt you to perform maintenance is displayed In the latter case the maintenance does not start unless the key is pressed Parameter choice input method Default value AUTO The maintenance of waste toner bottle starts automatically MANUAL The maintenance of waste toner bottle is started manually Downloaded ...

Page 159: ...es the PAPER menu used to specify the type of paper Always specify this item according to the type of paper which is installed on this device Chapter 7 PAPER menu Contents of this chapter Setting items Downloaded From ManualsPrinter com Manuals ...

Page 160: ...for setting of the type of paper to be used Parameter choice input method Default value BOND Paper TRACING Tracing Paper FILM Mat Film P A P E R R O L L 1 Menu Menu First hierarchy item Second hierarchy item Parameter PAPER PAPER ROLLn MEDIA TYPE BOND BOND TRACING FILM MEDIA SERIES A SERIES A SERIES 9 SERIES 8 5 SERIES 30 42 SERIES MAP SERIES DIN SERIES CHINA SERIES Downloaded From ManualsPrinter ...

Page 161: ...12 304 8 mm 8 5 SERIES 34 863 6 mm 22 558 8 mm 17 431 8 mm 11 279 4 mm 30 42 SERIES 30 762 0 mm MAP SERIES 700 mm 27 6 inches 500 mm 19 7 inches DIN SERIES 707 mm 27 8 inches 500 mm 19 7 inches CHINA SERIES 914 mm 36 inches 910 mm 35 8 inches 900 mm 35 4 inches 880 mm 34 6 inches 620 mm 24 4 inches 610 mm 24 inches 450 mm 17 7 inches 440 mm 17 3 inches 310 mm 12 2 inches 297 mm 11 7 inches When us...

Page 162: ... Default value A SERIES 9 SERIES 8 5 SERIES 30 42 SERIES MAP SERIES DIN SERIES CHINA SERIES Only choices of MEDIA SERIES which are ON in the ENABLE SERIES of the system menu are displayed Note Downloaded From ManualsPrinter com Manuals ...

Page 163: ...hapter 8 describes the FUNCTION menu and its operating procedures Read this chapter when confirming the setup or adjusting the data or time Chapter 8 FUNCTION menu Contents of this chapter Setting items Downloaded From ManualsPrinter com Manuals ...

Page 164: ...P B S U L L A T O L P F L E S L G P H 1 T R O P n T R O P A R A P B S U T O L P F L E S N A C S D 1 T R O P n T R O P A R A P G O L R O R R E 1 T N U O C E G A P 5 o t 1 T N U O C E G A P G O L B O J 1 T N U O C E G A P 5 o t 1 T N U O C E G A P G O L E N I G N E E T A D M E T S Y S c c b b a a 1 3 2 1 9 9 o t 0 0 0 0 0 0 E M I T M E T S Y S c c b b a a 9 5 9 5 3 2 o t 0 0 0 0 0 0 F N I G R A H C ...

Page 165: ...em menu information initial value PORTn Prints the setting information for the Ethernet port Note 1 PARA Prints the setting information for the Parallel channel Note 2 USB Prints the setting information for the USB channel Note 2 ALL Prints All of the above setting information Note 1 Disabled ports will not be indicated Note 2 Parallel and USB will only be indicated when each interface is installe...

Page 166: ...8 4 Sample of print Downloaded From ManualsPrinter com Manuals ...

Page 167: ...rnet Note 1 PARA Executes self plotting based on the setting information of the PDL table HPGL for the parallel channel Note 2 USB Executes the self plotting based on the setting information of the PDL table HPGL for the USB channel Note 2 Note 1 Disabled ports will not be indicated If HPGL is not selected at the time of PDL selection Note 2 Parallel and USB will only be indicated when each interf...

Page 168: ...ng information of the PDL table DSCAN for the port n of Ethernet Note 1 PARA Executes self plotting based on the setting information of the PDL table DSCAN for the parallel channel Note 2 Note 1 Disabled ports will not be indicated If HPGL is not selected at the time of PDL selection Note 2 Parallel and USB will only be indicated when each interface is installed Sample of print Note Downloaded Fro...

Page 169: ...ue PAGE COUNT 1 Prints one page of the latest error log information PAGE COUNT 2 Prints two pages of the latest error log information PAGE COUNT 3 Prints three pages of the latest error log information PAGE COUNT 4 Prints four pages of the latest error log information PAGE COUNT 5 Prints five pages of the latest error log information Sample of print Downloaded From ManualsPrinter com Manuals ...

Page 170: ...ges of the latest job log information PAGE COUNT 4 Prints four pages of the latest job log information PAGE COUNT 5 Prints five pages of the latest job log information Prints the following items by job log print Error log file header information Print item Log media Log media type log saving place HDD Hard disk FLASH Flush memory Max log number No of logs which can be registered Log size 1 informa...

Page 171: ...e t c a r a h c 5 e z i s a t a d d e v i e c e R e g a P t u p t u O s r e t c a r a h c 3 b o j f o s t n i r p f o o N c c A t u p t u O s r e t c a r a h c 3 s t n i r p f o o N d e t r e v n o c 3 A 4 A e t a D e t a d n o i t p e c e R t r a t S b o J e m i t t r a t s n o i t p e c e r e m i t t r a t s b o J d n E b o J e m i t d n e t n i r p e m i t d n e b o J 0 1 c c A r e t n u o C s ...

Page 172: ...8 10 ENGINE LOG Prints the engine information Sample of print Downloaded From ManualsPrinter com Manuals ...

Page 173: ...e second Enters the date in the 24 hour system This setting value is referred to when the menu print error log or job log is saved INIT CHARG INF Initializes the accounting information the number of printouts by channel or port saved in the nonvolatile memory of the device PRINT CHARG INF Prints the charging information the number of printouts by channel or port saved in the nonvolatile memory of ...

Page 174: ...by this device saved in the nonvolatile memory of this device DATA DUMP Prints part of the plotting data in hexadecimal digit By this operation last plotting data of the received plot is dumped Execute to check if the plotting data is normal Downloaded From ManualsPrinter com Manuals ...

Page 175: ...L menu Chapter 9 describes the PROTOCOL menu and its operating procedures Read this chapter when setting the communication protocol Chapter 9 PROTOCOL menu Contents of this chapter Setting items Downloaded From ManualsPrinter com Manuals ...

Page 176: ... protocols are port 1 XPT port 2 LPD port 3 FTP P R O T O C O L P O R T 1 X P T u n e M m e t i y h c r a r e i h t s r i F m e t i y h c r a r e i h d n o c e S r e t e m a r a P L O C O T O R P L O C O T O R P T P X 1 T R O P T C E L E S L D P C T D H C T D H T R O P T P X 0 0 1 9 0 0 1 9 L O C O T O R P D P L 2 T R O P T C E L E S L D P C T D H C T D H E M A N R E T N I R P 2 0 P L 2 0 P L L O ...

Page 177: ...lt value HDTC Select all of HPGL DSCAN TIFF and CALS First character Specifies whether to use the HPGL format or not If using select H If not select _ Second character Specifies whether to use the DSCAN format or not If using select D If not select _ Third character Specifies whether to use the TIFF format or not If using select T If not select _ Fourth character Specifies whether to use the CALS ...

Page 178: ...he same port number for multiple ports Numbers 0 to 1023 are reserved numbers and should not be used XPT Raw Protocol socket PRINTER NAME Specifies the LPD printer name characters Parameter numerical value input method 3 to 8 characters Default value LPxx xx Port No A to Z 0 to 9 hyphen and _ under bar can be used Do not use the same printer name in multiple ports P D L S E L E C T H P D L S E L E...

Page 179: ... the FTP printer name characters Parameter numerical value input method 3 to 8 characters Default value FTPxx xx Port No A to Z 0 to 9 hyphen and _ under bar can be used Do not use the same printer name in multiple ports Downloaded From ManualsPrinter com Manuals ...

Page 180: ...Downloaded From ManualsPrinter com Manuals ...

Page 181: ...et functions Chapter 10 describes the RESET menu and its operating procedures Read this chapter when initializing this device Chapter 10 RESET menu Contents of this chapter Reset functions Downloaded From ManualsPrinter com Manuals ...

Page 182: ...ET Restarts the system Turns the device to power ON condition All received data is cleared S Y S T E M R E S E T u n e M m e t i y h c r a r e i h t s r i F r e t e m a r a P T E S E R T E S E R M E T S Y S T E S E R T R O P 1 T R O P 1 T R O P Downloaded From ManualsPrinter com Manuals ...

Page 183: ...ter 10 RESET menu Reset functions PORT RESET Executes the communication reset for the selected logical port Only active Ethernet ports are displayed for the port reset Downloaded From ManualsPrinter com Manuals ...

Page 184: ...Downloaded From ManualsPrinter com Manuals ...

Page 185: ...ead this chapter when setting the communication conditions for the Ethernet parallel and USB connections or when returning the setting of this device to the setting at the time of shipment from the factory Chapter 11 SYSTEM menu Contents of this chapter Setting items Downloaded From ManualsPrinter com Manuals ...

Page 186: ...M USB TIME OUT sec 10 0 to 99 COMM PARAM PlotDataToFile PDTF HostIP Adress 000 000 000 000 000 000 000 000 to 255 255 255 255 PDTF PORT 33000 0 to 65535 PDTF Timeout sec 33000 1 to 75 COMM PARAM Terioplot Terioplot OFF OFF ON Terioplot ADDR 000 000 000 000 000 000 000 000 to 255 255 255 255 WEB LOCK OFF OFF ON SYSTEM ENABLE SERIES Note 2 SYSTEM APPLY ROLL Note 3 SYSTEM CHINA SIZE Note 4 INITIAL SE...

Page 187: ...munication conditions signal timing for the parallel interface Parameter choice input method Default value NORMAL FAST SLOW When the NORMAL FAST or SLOW parameter is selected fixed values listed in the table below are automatically specified Initial value of communication parameter parallel m e t I e d o m t s a F e d o m l a m r o N e d o m w o l S g n i m i t E B O R T S e g d e l l a F e g d e ...

Page 188: ...fies the USB interface for communication This menu is displayed only when the USB interface is installed TIMEOUT sec Specifies the time at which communication is discontinued after the host device is hung up during communication for some reason unit second Parameter numerical value input method 0 to 99 Default value 10 PlotDataToFile Since this setting is only for Japan leave the setting as it is ...

Page 189: ...r not in operation Parameter choice input method Default value OFF ON Terioplot ADDR Specifies the IP address of the computer where Terioplot is installed Parameter numerical value input method 000 000 000 000 to 255 255 255 255 Default value 000 000 000 000 WEB LOCK Specifies whether the setup authority from the WEB browser is given to a user administrator or subordinate Parameter choice input me...

Page 190: ...es A1 594 5 mm 23 4 inches A2 420 5 mm 16 6 inches A3 297 3 mm 11 7 inches 9 SERIES ROLL 36 914 mm 24 609 6 mm 18 457 2 mm 12 304 8 mm 8 5 SERIES ROLL 34 863 6 mm 22 558 8 mm 17 431 8 mm 11 279 4 mm Menu Second hierarchy item Parameter SYSTEM ENABLE SERIES A SERIES ON ON OFF 9 SERIES OFF ON OFF 8 5 SERIES OFF ON OFF 30 42 SERIES OFF ON OFF MAP SERIES OFF ON OFF DIN SERIES OFF ON OFF CHINESE SERIES...

Page 191: ...24 4 inches 610 mm 24 inches 450 mm 17 7 inches 440 mm 17 3 inches 310 mm 12 2 inches 297 mm 11 7 inches Parameter choice input method Default value OFF ON The default value varies depending on the INITIAL SETTING All of these parameters cannot be set to OFF When this parameter is changed from ON to OFF the following related parameters must be initialized MEDIA SERIES in the paper menu Automatic p...

Page 192: ...ON ON OFF USE 24 OFF ON OFF USE 18 OFF ON OFF USE 12 OFF ON OFF APPLY ROLL 8 5 SERIES USE 34 ON ON OFF USE 22 OFF ON OFF USE 17 OFF ON OFF USE 11 OFF ON OFF APPLY ROLL 30 42 SERIES USE 30 ON ON OFF APPLY ROLL MAP SERIES USE B1 ON ON OFF USE B2 OFF ON OFF APPLY ROLL DIN SERIES USE B1 ON ON OFF USE B2 OFF ON OFF APPLY ROLL CHINA SERIES USE A0 ON ON OFF USE A1 OFF ON OFF USE A2 OFF ON OFF USE A3 OFF ...

Page 193: ... SERIES Parameter choice input method Default value OFF ON The default value varies the INITIAL SETTING This item is displayed only for choices which are ON in the ENABLE SERIES of the system menu All of the parameters of the same series cannot be set to OFF When a roll of each series is loaded into this device that parameter automatically turns ON Note Downloaded From ManualsPrinter com Manuals ...

Page 194: ...e ENABLE SERIES in the system menu is ON Menu Second hierarchy item Parameter SYSTEM CHINA SIZE CHINA A0 914 mm 36 inches 914 mm 36 inches 910 mm 35 8 inches 900 mm 35 4 inches 880 mm 34 6 inches CHINA A1 620 mm 24 4 inches 620 mm 24 4 inches 610 mm 24 inches CHINA A2 450 mm 17 7 inches 450 mm 17 7 inches 440 mm 17 3 inches CHINA A3 310 mm 12 2 inches 310 mm 12 2 inches 297 mm 11 7 inches Note Dow...

Page 195: ...E P A P d n a e p y t l l o r r e p a p e h t s e i f i c e p S s e i r e s o t n r u t e r s r e t e m a r a p l l A r i e h t e u l a v t l u a f e d N O I T C N U F f l e s r o g n i t n i r p u n e m e h t s e i f i c e p S g n i t t o l p L O C O T O R P l e n n a h c y b l o c o t o r p e h t s e i f i c e p S s i g n i t t e s s i h t r e t f A t r o p d n a t e s e r s i m e t s y s e h t ...

Page 196: ...Specifies the administrator password This password prevents the settings of the plotter from being changed Parameter numerical value input method 00000000 to 99999999 Default value 00000000 Write the administrator password down for remembrance sake If you should forget the administrator password the plotter should be initialized in which case all the settings will return to the factory default set...

Page 197: ... Press the key is pressed the digit of numeric value can be moved 2 Press the or key If the or key is pressed numeric value can be changed Repeat the Steps 1 and 2 to enter the eight digit administrator password 3 Press the key If the key is pressed the screen changes as shown below A D M I N P A S SWO R D 0 0 0 0 0 0 0 0 A D M I N P A S SWO R D 0 0 0 0 0 0 0 0 A D M I N P A S SWO R D 0 2 0 0 0 0 ...

Page 198: ... mode has the display and settings restrictions as below Items that are displayed but cannot be set Menu First hierarchy item Second hierarchy item SYSTEM COMM PARAM PROTOCOL Items that are not displayed Menu First hierarchy item Second hierarchy item SYSTEM ADMIN PASSWORD FUNCTION Downloaded From ManualsPrinter com Manuals ...

Page 199: ...Read this chapter when setting the communication conditions for the Ethernet parallel and USB connections or when returning the setting of this device to the setting at the time of shipment from the factory Chapter 12 Ethernet parameter ETHERNET Contents of this chapter Setting items Downloaded From ManualsPrinter com Manuals ...

Page 200: ... N I T U O R 1 0 R D D A Y A W E T A G 0 0 0 0 0 0 0 0 0 0 0 0 e u l a v t u p n I 6 e t o N 1 0 R D D A K R O W T E N 0 0 0 0 0 0 0 0 0 0 0 0 e u l a v t u p n I 6 3 e t o N S L I A T E D P U T E S 2 E L B A T G N I T U O R 2 0 R D D A Y A W E T A G 0 0 0 0 0 0 0 0 0 0 0 0 e u l a v t u p n I 6 e t o N 2 0 R D D A K R O W T E N 0 0 0 0 0 0 0 0 0 0 0 0 e u l a v t u p n I 6 3 e t o N 0 1 R D D A Y...

Page 201: ... 0 P A R T R E G A N A M 0 0 0 0 0 0 0 0 0 0 0 0 d o h t e m t u p n i e c i o h C R O R R E N O N O F F O B O J F F O F F O S S E R D D A P I N O T R O P N O R D D A P I 0 0 0 0 0 0 0 0 0 0 0 0 d o h t e m t u p n i e c i o h C 4 e t o N T R O P L L A L L A 5 e t o N 1 0 T R O P 0 1 T R O P Note 1 Up to 10 ports including XPT LPD FTP can be specified The initial value is 1 port for each protocol ...

Page 202: ...10 Parameter choice input method X L F X XPT protocol XPT Raw Protocol socket L LPD protocol F FTP protocol Not set 1234567890 Port select 1 10 Default XLF DHCP Selects whether to enable or disable the DHCP Parameter choice input method Default value DISABLE Disables the DHCP ENABLE Enables the DHCP Downloaded From ManualsPrinter com Manuals ...

Page 203: ...arameter numerical input method 000 000 000 000 to 255 255 255 255 Default value 000 000 000 000 not set For instance when the IP address is 130 28 3 10 specify 130 028 003 010 SUBNET MASK Specifies the subnet mask of the network to which this device belongs Parameter numerical input method 000 000 000 000 to 255 255 255 255 Default value 000 000 000 000 Downloaded From ManualsPrinter com Manuals ...

Page 204: ...0 000 000 000 to 255 255 255 255 Default value 000 000 000 000 not set NETWORK ADDR Specifies the network address Parameter numerical input method 000 000 000 000 to 255 255 255 255 Default value 000 000 000 000 If the gateway address is not specified it is not displayed When this setting value is 000 000 000 000 it means the default routing is specified Notes Downloaded From ManualsPrinter com Ma...

Page 205: ...er network GATEWAY ADDR Gateway address 02 10 Specifies the router IP address Parameter numerical input method 000 000 000 000 to 255 255 255 255 Default value 000 000 000 000 NETWORK ADDR Network address 02 10 Specifies the network address Parameter numerical input method 000 000 000 000 to 255 255 255 255 Default value 000 000 000 000 If the gateway address is not set 000 000 000 000 it is not d...

Page 206: ...liar to this device Ethernet address of this device is 0800832Annnn This parameter is displayed but cannot be specified CONNECTION SPD Specifies the communication speed Parameter choice input method Default value AUTO Automatically recognizes 100BASE 10BASE 100 Sets to 100BASE 10 Sets to 10BASE Downloaded From ManualsPrinter com Manuals ...

Page 207: ...ex HTTP PORT Specifies the HTTP port when using the Web function Parameter numerical input method 0 to 65535 Default value 80 PORT TIMEOUT Selects the closing time of TCP port Operation starts when no data is transmitted while being transferred Parameter choice input method Default value OFF Does not time out 5 min Set to 5 minutes 10 min Set to 10 minutes 15 min Set to 15 minutes 30 min Set to 30...

Page 208: ...b name Parameter choice input method Default value ON OFF SNMP VERSION Specifies the SNMP version Parameter choice input method Default value V1 V2 TRAP 01 02 MANAGER Specifies the manager IP address to return TRAP When the following TRAP conditions are OFF TRAP does not occur in this setting Parameter numerical input method 000 000 000 000 to 255 255 255 255 Default value 000 000 000 000 TRAP is ...

Page 209: ...f job printing When this operation is not set to OFF TRAP conditions can be specified by TRAP IP address or TRAP PORT operation Parameter choice input method Default value OFF ON IP address ON PORT IP ADDR IP address is enabled and can be specified setting when the ON IP address is selected from the operation TRAP job menu When specified IP address is identical to the IP address of the receiving h...

Page 210: ...ed from the operation TRAP job menu After completion of printing all jobs transmitted to the specified port of this device TRAP is transmitted to the TRAP manager Parameter choice input method Default value ALL PORT1 PORT2 PORT10 Downloaded From ManualsPrinter com Manuals ...

Page 211: ...oftware supplied with the plotter Note in Asian and Oceania countries the Terioplot software is available as the option Chapter 13 Terioplot Contents of this chapter About Terioplot Terioplot Hardware Requirements Settings Restrictions Downloaded From ManualsPrinter com Manuals ...

Page 212: ...es the Terioplot software is available as the option The Terioplot software is not supplied for the one step roll model because this model does not support the Terioplot software Notes Computer where Terioplot software is installed Plotter Job management Print charge management Previewing Zoomable drawing etc Downloaded From ManualsPrinter com Manuals ...
Page 213: ...z or more Memory 1 GB RAM 2 GB recommended Display controller 1024 768 pixels resolution or more running in true color mode 16777216 colors Touch screen monitor 1024 768 pixel resolution or more Hard disk drive 100 GB free space CD disk drive Is required for software installation USB drive USB 2 Network interface TCP IP Configuration is required Direct X Is required when using DWG DXF DWF option D...

Page 214: ...rious settings For details see the documents supplied with the Terioplot software package The documents supplied with this software also describe how to use and how to configure When using the Terioplot software ensure that the A SERIES of ENABLE SERIES in the system menu is set to ON The default setting is ON Notes Downloaded From ManualsPrinter com Manuals ...
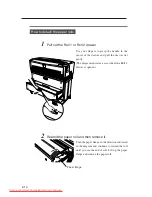
Page 215: ...B or parallel connection Print data cannot be received via USB or parallel connection In addition the USB and parallel communications settings cannot be displayed on the operation panel or in the PDL setup over the web or communication parameters WEB function A web connection can only be established with the host computer where Terioplot is installed SNMP setting When Terioplot is set to ON in thi...

Page 216: ...Downloaded From ManualsPrinter com Manuals ...

Page 217: ...the corrective measures contact your dealer or our service center Chapter 14 Troubleshooting Contents of this chapter Troubleshooting When an error message appears Error log Troubleshooting for ethernet If BOTTLE MAINT STARTS appears When a print error occurs When there is an abnormal sound Downloaded From ManualsPrinter com Manuals ...
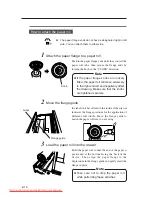
Page 218: ...lot transmitted data immediately DATA lghts on or flashing Review the time out setting Frequent paper jam Paper type Check whether the paper type setting matches the type of the loaded paper Page 7 2 Use our recommended paper Page 1 7 Paper roll Load the paper correctly Page 2 16 Check whether there is any foreign material in the paper path Remove any foreign material Paper Jam Page 14 3 In case o...

Page 219: ...played as shown above DOOR 1 Paper jams in the roll 1 drawer Open the roll 1 drawer and take a corrective measure DOOR 2 Paper jams in the roll 2 drawer Open the roll 2 drawer and take a corrective measure DOOR 4 Paper jams in the manual feed drawer Open the manual feed drawer and take a corrective measure DOOR 5 Paper jams in the main body cutter area Open the cutter door and take a corrective me...

Page 220: ...en the top cover 2 Remove the jammed paper If you cannot see the jammed paper refer to step 3 After you removed the jammed paper refer to step 5 O P E N D O O R 6 R E MO V E P A P E R Top cover Door 6 Downloaded From ManualsPrinter com Manuals ...
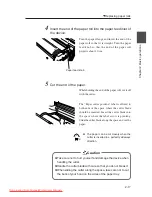
Page 221: ...per gently so that toner does not spill The fixation is very hot Do not touch it Touching the fixation could cause you to get burned If the jammed paper is not visible the paper may be jammed inside the main body cutter area See Clearing paper jam in main body cutter area page 14 7 Manual paper feed holder Door 8 Fixation door Door 7 Warning Downloaded From ManualsPrinter com Manuals ...

Page 222: ... feed holder After you closed the top cover fixation door and manual paper feed holder the following message appears on the LCD and then the plotting restarts from the drawing that jammed P R I N T X X X X S 0 0 1 F 0 1 X X X X J 0 0 9 Downloaded From ManualsPrinter com Manuals ...
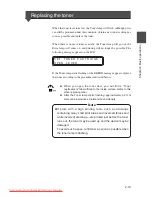
Page 223: ... gently 2 Remove the jammed paper and close the cutter door After you closed the cutter door the following message appears on the control panel and then the plotting restarts from the drawing that jammed O P E N D O O R 5 R E MO V E P A P E R WA I T A MOM E N T P R I N T X X X X S 0 0 1 F 0 1 X X X X J 0 0 9 Knob Cutter door Door 5 Downloaded From ManualsPrinter com Manuals ...
Page 224: ...ed Open the top cover Door 6 2 Open the cutter door Loosen the two knobs and open the cutter door gently O P E N D O O R 6 9 4 R E MO V E P A P E R O P E N D O O R 9 4 R E MO V E P A P E R Top cover Door 6 Knob Cutter door Door 5 Downloaded From ManualsPrinter com Manuals ...

Page 225: ...r door inside Cutter door inside Door 9 4 Open the manual feed drawer toward you The manual feed drawer will fall if you pull it out to far Thus take care not to let it fall on your feet to avoid injury Manual feed drawer Door 4 Caution Downloaded From ManualsPrinter com Manuals ...

Page 226: ...ide as well as the outside cutter door door 5 After you closed the door the following message appears on the control panel and then the plotting restarts from the drawing that jammed WA I T A MOM E N T P R I N T X X X X S 0 0 1 F 0 1 X X X X J 0 0 9 Downloaded From ManualsPrinter com Manuals ...

Page 227: ...r door Step 1 on page 14 7 Loosen the two knobs and open the cutter door gently 2 Pull out the Roll 1 or Roll 2 drawer Use your fingers to grasp the handle at the center of the drawer and pull the drawer out gently The illustration indicates a case where the Roll 2 drawer is opened O P E N D O O R X R E MO V E P A P E R O P E N D O O R 5 X R E MO V E P A P E R Downloaded From ManualsPrinter com Ma...

Page 228: ...tter position label is affixed to both ends of the space where the cutter blade should be inserted Insert the cutter blade into the space beneath where the label arrow is pointing Slide the cutter blade along the space and cut the paper Take care not to hurt yourself or damage the device when handling the cutter Handle the cutter blade with care so that you do not break it Apply the cutter to the ...

Page 229: ... 5 Close the roll paper drawer and the cutter door After you close the drawer and the door the following message appears on the LCD and then the plotting restarts from the drawing that jammed P R I N T X X X X S 0 0 1 F 0 1 X X X X J 0 0 9 Downloaded From ManualsPrinter com Manuals ...

Page 230: ...Description The roll 2 drawer is opened Measure Close the roll 2 drawer Manual feed drawer Door 4 Description The manual feed drawer is opened Measure Close the manual feed drawer Cutter door Door 5 Description The cutter door is opened Measure Close the cutter door Note See door locations on the drawing at 1 11 and 1 12 C L O S E D O O R 1 C L O S E D O O R 2 C L O S E D O O R 4 Downloaded From M...

Page 231: ...ixation door is open Measure Close the fixation door Manual paper feeding holder Door 8 Description The manual paper feed holder is open and thus the rolled paper cannot be printed Measure Close the manual paper feed holder Note See door locations on the drawing at 1 11 and 1 12 C L O S E D O O R 6 C L O S E D O O R 7 C L O S E D O O R 8 Downloaded From ManualsPrinter com Manuals ...

Page 232: ...urs frequently please contact your dealer or our service center Description The set up area is checked at powering on and if the contents are damaged this message appears Measure Press the key to display the INITIAL SET screen and selecct and execute the initial setting with the keys S E T U P I S WR O N G I N I T I A L S E T Downloaded From ManualsPrinter com Manuals ...

Page 233: ...he device and thus the data was ignored Measure Use the data in a format supported by the device Description The spool area on the HDD has been damaged and thus the memory spool area is used When HDD is installed Measure If the device does not recover from this error when you turn the power off and on please notify your dealer or our service center of the displayed error message and error conditio...

Page 234: ...job jobs standing by for processing at powering on Measure Select whether the job is deleted or not by pressing the key or key The operation goes into time out in about 10 seconds unless the key is pressed and the device starts with the job saved If a job has been left at powering on W N V R A M E R R O R D E L E T E J O B Y E N T E R N C A N C E L Job status Display Transaction Standing for proce...

Page 235: ...f the device is not initialized Measure The display of this warning message continues until the key is pressed After the key is pressed the NVRAM is initialized automatically and the display changes to the language setting specifically for the installing operation W U N I N I T N V R A M Downloaded From ManualsPrinter com Manuals ...

Page 236: ...displayed on the LCD Note xxxx Error code Error code Description Measure 0101 Duplication of XPT port number Specify the parameter at the device side correctly 0212 Lack of internal memory If the device does not recover from this error by turning the power off and on take the following measures Check if the communication condition and protocol match the specifications of the computer Check if the ...

Page 237: ...ctive 0100 to 01FF Communication to the host failed while communication time out data is transferred 1000 to 1FFF Communication connection system error 2000 to 2FFF Communication system internal error e d o c r o r r E n o i t p i r c s e D e r u s a e M F F 1 1 o t 0 0 1 1 t o n s i s s e r d d a r e v r e s P T M S d e i f i c e p s s s e r d d a r e v r e s P T M S e h t y f i c e p S F F 2 1 o...

Page 238: ... E _ R F F B _ N O G Y L O P W r o r r e w o l f r e v o r e f f u b n o g y l o P d e r r u c c o e h t t a t r a p s u o e n o r r e t c e r r o C r e f f u b n o g y l o P e d i s r e t u p m o c s t n i o p 0 0 6 6 0 1 t i m i l r e p p u 8 0 2 0 o m e m r o r r e o N e r e h t e s u a c a b d e r o n g i s i a t a D a t a d g n i t t o l p e v i t c e f f e o n s i d n a m m o c L G P H n i s...

Page 239: ...ck the computer side if the format of the compressed raster data is correct 0401 W RASTER_FORMAT_ERR There is no raster data of the size specified by the data Check the computer side if data is correct 0500 to 0505 No error memo Program warning If the error is reproducible and the print result is poor the software must be upgraded to the latest version Pleasenotifyyourdealeror our service center o...

Page 240: ...to the following table W E 5 6 E x x x x xxxx Error code e d o c r o r r E n o i t p i r c s e D F 0 0 9 o t 1 0 0 9 r o r r e r e f s n a r t e c i v e D r o r r e p i h c e r a w d r a H F F 0 9 o t 1 2 0 9 e r u l i a f n o i t a r e p O r o r r e p i h c e r a w d r a H W F 0 6 D x x x x xxxx Error code Error code Description Measure 0801 Faulty spool file Turn off and on the power If this err...

Page 241: ... service center of the displayed error message and error condition Serial number not set Description This error message may appear if the serial number checked at powering on is not specified Engine error Description This error message may appear if the engine of the device is faulty System error Description This error message may appear if an unrecoverable and exceptional system error occurs in t...

Page 242: ...OWE R O F F O N xxxx Error code e d o c r o r r E n o i t p i r c s e D F 9 3 0 o t 0 8 3 0 r o r r e m a r g o r P 0 9 A 0 o t 0 8 A 0 E E 5 6 E x x x x P OWE R O F F O N xxxx Error code Error code Description 0111 to 01FF Program error 0201 to 02FF 1000 to 1FFF 0301 to 03FF Hardware chip error 0401 to 04FF Hard disc error 0501 to 05FF Engine communication error 0601 to 06FF Scanner communication...

Page 243: ...e M A R V N F F 4 0 o t 1 0 4 0 r o r r e e l i f l o r t n o c p u t e S e d o c r o r r E n o i t p i r c s e D 1 0 1 0 r o r r e m a r g o r P F F 1 0 o t 1 1 1 0 F F 2 0 o t 1 0 2 0 F F F 1 o t 0 0 0 1 F F 3 0 o t 1 0 3 0 r o r r e M A R V N F F 4 0 o t 1 0 4 0 r o r r e c s i d M A R c s i d d r a H F F F 2 o t 0 0 0 2 r o r r e n o i t a r u g i f n o c e r a w d r a H E E F 7 0 x x x x P OW...

Page 244: ... F O N xxxx Error code e d o c r o r r E n o i t p i r c s e D 1 0 0 1 r o r r e s s e c c a e g a r o t S E F 0 6 E x x x x P OWE R O F F O N xxxx Error code e d o c r o r r E n o i t p i r c s e D 1 0 2 0 r o r r e m a r g o r P F F F 1 o t 0 0 0 1 Downloaded From ManualsPrinter com Manuals ...

Page 245: ...as follows 1 Classification E Service Call An unrecoverable error that needs the service person s intervention 2 Classification O Operator Call An error that the operator can take actions to fix 3 Classification W Warning A warning such as being low on consumables or that a data error occurred Format of Message Each error warning message to be logged if an error or warning occurs classifies one ch...

Page 246: ... 3 yyyy mm dd hh mm ss a ssssssss yyyy mm dd year month day hh mm ss hour minute second a Error warning identifier common to LC display bbbb Error classification hexadecimal notation cccc Error code hexadecimal notation may be omitted ssssssss Optional alphanumeric message may be omitted Log example 2007 05 24 12 31 55 E ENGINE 2030 Error number 2030 Power supply failure Downloaded From ManualsPri...

Page 247: ...e is faulty Measure If the device does not recovered from this error after turning the power off and on please notify your dealer or our service center of the displayed error message and error condition Log example of hard disc error E E56E 0401 Operator Call Classification O Description An error that the operator can fix Cause No paper no toner or paper jams Measure Fix the cause to restore the d...

Page 248: ...sumables or that a data error occurred Cause A consumable is almost used up or any failure in the environment settings or data occurred Measure Take appropriate measures to remove the cause Log example in case of HPGL format error W DATA 0201 Downloaded From ManualsPrinter com Manuals ...

Page 249: ...ease notify your dealer or our service center of the displayed error message and error condition O xxxxxxxx Operator Call Operator call An error that the operator can fix Remove the cause to restore the device to its noraml state Take measures according to the guidance message displayed on the control panel W xxxxxxxx Warning Warning A consumable almost used up or problems in the environment setti...

Page 250: ...esubnetmask assigned by a system administrator Specify the correct subnet mask Routine table is not set correctly Check if the setting value of the device is the same as the IP router address assigned by a system administrator Check if the address in the network system to be connected is correct Specify the correct IP router address Specify the correct network address to be connected If it is unkn...

Page 251: ... I N U n e e w t e b p t f f o e m a n r e s u e h T n e h W t c e r r o c t o n s i d e s u s i l o c o t o r p p t f d e t a n g i s e d e m a n r e s u e h t f i k c e h C e m a n r e s u e h t s e h c t a m t s o h e h t y b e c i v e d e h t y b d e t a n g i s e d r o e m a n r e s u t c e r r o c e h t e s U e h t t a e m a n r e s u e h t e g n a h c e d i s e c i v e d s i p t f f o d r o...

Page 252: ...tenance appears In this case the maintenance does not start unless the key is pressed page 6 6 If MANUAL is set The message shown below appears to prompt you to perform the maintenance of waste toner bottle If the key is pressed the message is switched and the maintenance starts The maintenance is performed for about 30 seconds and taps will be heard during the operation If AUTO is set The mainten...

Page 253: ... Symptom Cause Corrective measure Plotting is light dark Adjust the density Page 6 5 Plotting is locally deleted The type of loaded paper does not match the type of paper specified on the panel Replace the paper or change the setting Page 2 16 or 7 2 Paper contains moisture Cut the end of the rolled paper and retry plotting Page 14 11 The recommended paper is not used Use our recommended paper Pag...

Page 254: ... the waste toner from accumulating unevenly in the waste toner bottle this device provides the maintenance function that taps the waste toner bottle at the definite interval to level the waste toner page 14 36 Taps will be heard during the maintenance of waste toner but this is not a problem Downloaded From ManualsPrinter com Manuals ...

Page 255: ...ndix covers basic specifications configuration menu structure and commands of the LP 1020 series plotters Appendix The contents of Appendix are as follows Basic specifications Menu structure Command List Downloaded From ManualsPrinter com Manuals ...

Page 256: ...x triple rolls manual feeding Front delivery Type of paper Plain paper Recycled paper Tracing paper Mat film Paper size Rolled paper width A0 A1 A2 A3 36 24 18 12 Cut paper A0 A1 A2 A3 Max output length 2 5 m 98 4 inches 10 m 393 7 inches Warming up time 4 minutes or less 8 minutes or less First prin Within 28 secconds A0 drawing Plotting guarantee area Rolled paper only All areas except margin 5 ...

Page 257: ...rnal dimensions 1154 W 552 D 1063 H mm 45 5 W 21 7 D 41 9 H inches Weight 215 kg or less Temperature humidity range in use of plotter 15 to 35 C 20 to 80 RH no dew condensing Humidity should be 48 or less when temperature is 35 C or temperature should be 28 C or less when humidity is 80 RH Temperature humidity range in nonuse of plotter 5 to 40 C 10 to 90 RH no dew condensing Installation space 20...

Page 258: ...CALS SETUP PARA_HPGL SETUP PARA_DSCAN SETUP PARA_TIFF SETUP PARA_CALS SETUP USB_HPGL Note 1 DSCAN only Note 2 HP GL TIFF CALS only Note 3 Double rolls model only Note 4 A SERIES is displayed in the case of DSCAN PARAMETER MODE 1 DATA FIRST MEDIA SERIES 2 A SERIES AUTO SUPPLY CONT MODE FIXSIZE MODE FIXD SIZE COPY COUNT 1 SUPPLY PARAM OFF ON NON DESIGNATED BOND TRACING PAPER FILM 0 to 30 0 to 1 1 in...

Page 259: ...ALE X 100 00 SCALE Y 100 00 PEN WIDTH SCALE ON DRAWING PARAM SCALING PARAM MARGIN VARIABLE SIZE FIXED SIZE 0 to 100 0 to 3 9 inches 9999 99 to 9999 99 393 700 to 393 700 inches 9999 99 to 9999 99 393 700 to 393 700 inches OR WRITING OVER WRITING OFF ON OFF ON ON SPECIAL 6 OFF OFF ON Print MANUAL SCALE REDUCE 0 01 to 100 00 0 01 to 100 00 ON OFF A B B Note 5 TIFF CALS only Note 6 HP GL only Downloa...

Page 260: ...IX SCALE 9 7 A4 A4 A4 A3 A2 A1 A0 A3 A3 A3 A2 A1 A0 A4 A2 A2 A2 A1 A0 A4 A3 A1 A1 A1 A0 A4 A3 A2 A0 A0 A0 A4 A3 A2 A1 A A A B C D E B B B C D E A B C C B C Note 7 HP GL TIFF CALS only Downloaded From ManualsPrinter com Manuals ...

Page 261: ...u structure Appendix FIX SCALE 8 5 7 C C C D E A B D D D E A B C E E E A B C D A A A B C D E B B B C D E A C C C D E A B D D D E A B C C D C D C Note 7 HP GL TIFF CALS only Downloaded From ManualsPrinter com Manuals ...

Page 262: ... PS FORMAT PARM 8 E E E A B C D ENABLE DISABLE CHINA AUTO HP GL HP GL 2 PG1 ON ON OFF NR ON ON OFF SP0 ON ON OFF ESC ON ON OFF AF ON ON OFF AH ON ON OFF FR ON ON OFF ON PS ON IP ON IW OFF D E E D Note 8 HP GL DSCAN only Note 9 HP GL only Downloaded From ManualsPrinter com Manuals ...

Page 263: ...EOP PAPER SOURCE PAPER TYPE OFF DATE PRIORITY PANEL PRIORITY WIDTH mm WIDTH in n 0 00 to 16 00 0 to 0 629 inches DENSITY n 0 to 100 CORNER ROUND ROUND BUTT JOINT ROUND ROUND MITERED 0 99 to 0 99 0 038 to 0 038 inches OFF ON LINE DRAW MODE PICTURE MODE LINE DRAW MODE GRAPHICS MODE PICTURE MODE E E Note 10 DSCAN only Note 11 HP GL DSCAN only Note 12 HP GL is 0 to 15 DSCAN is 1 to 32 Note 13 HP GL DS...

Page 264: ... OFF DENSITY NORMAL TRACING PAP MODE NORMAL BOTTLE MAINT AUTO 15min 30min 60min 90min 235min OFF 30min 1hour 2hour 4hour 1min 5min 10min OFF ON THIN RATHER THIN NORMAL RATHER THICK THICK NORMAL WETTY AUTO MANUAL M E N U D E V I C E Downloaded From ManualsPrinter com Manuals ...

Page 265: ...e Appendix PAPER MENU PAPER ROLLn MEDIA TYPE BOND MEDIA SERIES A SERIES BOND TRACING FILM A SERIES 9 SERIES 8 5 SERIES 30x42 SERIES MAP SERIES DIN SERIES CHINA SERIES M E N U P A P E R Downloaded From ManualsPrinter com Manuals ...

Page 266: ...COUNT 1 JOB LOG PAGE COUNT 1 ENGINE LOG SYSTEM DATE SYSTEM TIME INIT CHARG INF PRINT CHARG INF MAINTE INFO FAX PRINT DATE DUMP SYSTEM PORTn PARA USB ALL PORTn PARA USB PORTn PARA PAGE COUNT 1 to PAGE COUNT 5 PAGE COUNT 1 to PAGE COUNT 5 M E N U F U N C T I O N Downloaded From ManualsPrinter com Manuals ...

Page 267: ...ROTOCOL PORT1 XPT PROCOCOL PORT2 LPD PROTOCOL PORT3 FTP PROTOCOL PARALLEL PDL SELECT HDTC XPT PORT 9100 PDL SELECT HDTC PRINTER NAME LP02 PDL SELECT HDTC USER NAME FTP03 PDL SELECT HDTC M E N U P R O T O C O L Downloaded From ManualsPrinter com Manuals ...

Page 268: ...Appendix 14 RESET MENU SYSTEM RESET PORT RESET PORT1 M E N U R E S E T Downloaded From ManualsPrinter com Manuals ...

Page 269: ...t sec 05 Terioplot OFF Terioplot 000 000 000 000 SYSTEM COMM PARAM COMM PARAM ETHERNET COMM PARAM PARALLEL COMM PARAM USB COMM PARAM PlotDataToFile COMM PARAM Terioplot NORMAL FAST SLOW 1 to 18000 0 to 99 000 000 000 000 to 255 255 255 255 0 to 65535 1 to 75 ON OFF 000 000 000 000 to 255 255 255 255 F I M E N U S Y S T E M Downloaded From ManualsPrinter com Manuals ...

Page 270: ...N USE A2 OFF USE A3 ON WEB LOCK OFF SYSTEM ENABLE SERIES SYSTEM APPLY ROLL OFF ON A SERIES ON 9 SERIES OFF 8 5 SERIES OFF 30x42 SERIES OFF MAP SERIES OFF DIN SERIES OFF CHINA SERIES ON APPLY ROLL A SERIES G F ON OFF ON OFF ON OFF ON OFF G Downloaded From ManualsPrinter com Manuals ...

Page 271: ...N USE 22 OFF USE 17 OFF USE 11 OFF USE 30 ON USE B1 MAP ON USE B2 MAP OFF APPLY ROLL 9 SERIES APPLY ROLL 8 5 SERIES APPLY ROLL 30x42 SERIES APPLY ROLL MAP SERIES ON OFF ON OFF ON OFF ON OFF ON OFF ON OFF ON OFF ON OFF ON OFF ON OFF ON OFF H G H G Downloaded From ManualsPrinter com Manuals ...

Page 272: ...es 440mm 17 3 inches 310mm 12 2 inches 297mm 11 7 inches SYSTEM CHINA SIZE INITIAL SET STANDARD LANGUAGE JAPANESE LENGTH UNITS MILLIMETERS ADMIN PASSWORD 00000000 APPLY ROLL DIN SERIES APPLY ROLL CHINA SERIES CHINA A0 914mm CHINA A1 620mm CHINA A2 450mm CHINA A3 310mm STANDARD CHINA JAPANESE ENGLISH MILLIMETERS INCHES 00000000 to 99999999 ON OFF ON OFF ON OFF ON OFF ON OFF ON OFF H H Downloaded Fr...

Page 273: ... 000 000 000 000 ROUTING TABLE2 METRIC 064 ETHERNET ADDR 0800832Annnn CONNECTION SPD AUTO 000 000 000 000 to 255 255 255 255 000 000 000 000 to 255 255 255 255 GATEWAY ADDR02 000 000 000 000 NETWORK ADDR02 000 000 000 000 to GATEWAY ADDR10 000 000 000 000 NETWORK ADDR10 000 000 000 000 1 to 255 AUTO 100 10 000 000 000 000 to 255 255 255 255 000 000 000 000 to 255 255 255 255 000 000 000 000 to 255...

Page 274: ...Pnn AUTO FULL HALF 0 to 65535 OFF 5min 10min 15min 30min ASCII BIN BIN OFF ON V1 V2 MANEGER 000 000 000 000 ERROR ON JOB OFF IP ADDR 000 000 000 000 PORT ALL J 000 000 000 000 to 255 255 255 255 ON OFF OFF ON IP ADDRESS ON PORT 000 000 000 000 to 255 255 255 255 ALL PORT01 to 10 Downloaded From ManualsPrinter com Manuals ...

Page 275: ... r u g i f n o c r e t t o l P 1 A C S E n o i t c u r t s n i t u p t u o r e b m u n l e d o m r e t t o l P 1 B C S E n o i t c u r t s n i t u p t u o e c a p s r e f f u B 1 E C S E n o i t c u r t s n i t u p t u o r e b m u n r o r r e d e c n a v d A 1 H C S E n o i t c u r t s n i t e s 1 e d o m e k a h s d n a H 1 I C S E n o i t c u r t s n i t e s 2 e d o m e k a h s d n a H 1 J C S E...

Page 276: ...n i L L U n o i t i n i f e d r e s u e p y t e n i L A L n o i t c u r t s n i t c e l e s e p y t n o i t c e n n o c d n e e n i L P N n o i t c u r t s n i t e s s n e p f o r e b m u N R C n o i t c u r t s n i t e s e g n a r r o l o C P G n o i t c u r t s n i t e s p u o r g n e P G S n o i t c u r t s n i t c e l e s p u o r g n e P r o t c e V s n o i t c u r t s n i A P n o i t c u r t ...

Page 277: ... s g n i c a p s r e t c a r a h C L S n o i t c u r t s n i t e s r e t c a r a h c c i l a t I O L n o i t c u r t s n i t e s n i g i r o t x e T T D n o i t c u r t s n i t e s r o t a n i m r e t t x e T A C n o i t c u r t s n i t e s t e s r e t c a r a h c y r a i l i x u A S C n o i t c u r t s n i t e s t e s r e t c a r a h c d r a d n a t S A S n o i t c u r t s n i t c e l e s t e s r...

Page 278: ...r o r r E 1 F O n o i t c u r t s n i t u p t u o t i n u r e t t o l P 1 H O n o i t c u r t s n i t u p t u o t i m i l p i l c d r a H 1 I O n o i t c u r t s n i t u p t u o o N n o i t a c i f i t n e d i l e d o M 1 L O n o i t c u r t s n i t u p t u o n o i t a m r o f n i t x e t d e r o t S 1 O O n o i t c u r t s n i t u p t u o n o i t p O 1 P O n o i t c u r t s n i t u p t u o t n i ...

Page 279: ...P 6 h t d i W r e t s a R e c r u o S C S E S s r h t d i w r e t s a r e c r u o s s t e S t h g i e H r e t s a R e c r u o S C S E T t r t h g i e h r e t s a r e c r u o s s t e S l a t n o z i r o H P A C e v o M s t n i o p i c e D H h a C S E s t n i o p i c e d y l l a t n o z i r o h P A C s e v o M l a t n o z i r o H P A C e v o M C S E X x p y l l a t n o z i r o h P A C s e v o M l a ...

Page 280: ...a c i g o L C S E O o l o t e d o m n o i t a r e p o l a c i g o l s e i f i c e p S a t a d r e t s a r e h t 8 y c n e r a p s n a r T n r e t t a P e d o M C S E O o v o t e d o m y c n e r a p s n a r t f f o n o s n r u T n r e t t a p e h t y c n e r a p s n a r T e c r u o S e d o M C S E N n v o t e d o m y c n e r a p s n a r t f f o n o s n r u T r e t s a r e c r u o s e h t 2 2 1 Para...

Page 281: ... T A C O L L A I T I N 6 0 k c o l b a f o n o i t i s o p e t a n i d r o o c t r a t s s t e S A L O B A R A P 7 0 a l o b a r a p a s w a r D D E E F R E P A P 8 0 n o i t c e r i d X n i a t a d t n e u q e s b u s s t f i h S G N I C A P S 9 0 g n i c a p s l o b m y s s t e S I J N A K 0 1 i j n a k s e t i r W E C A P S H E 0 l a t n o z i r o h i j n a k n i e c a p s l a t n o z i r o h s...

Page 282: ... 9 8 o t 1 N E P I n e p a s n g i s s A T U C I g n i t t u C T S E N g n i t s e N Y P O C I f o s e i p o c f o r e b m u n e h t s e i f i c e p S g n i w a r d Z I S A I e z i s g n i w a r d f o t n e m g d u j s e i f i c e p S Z I S P I e z i s g n i w a r d f o t n e m e r c n i s e i f i c e p S s i x a X W 8 N E P o t W 1 N E P h t d i w n e p s e i f i c e p S C 8 N E P o t C 1 N E P r...

Page 283: ... N E P I n e p a s n g i s s A T U C I g n i t t u C T S E N g n i t s e N Y P O C I f o s e i p o c f o r e b m u n e h t s e i f i c e p S g n i w a r d Z I S A I e z i s g n i w a r d f o t n e m g d u j s e i f i c e p S Z I S P I e z i s g n i w a r d f o t n e m e r c n i s e i f i c e p S s i x a X W 8 N E P o t W 1 N E P h t d i w n e p s e i f i c e p S C 8 N E P o t C 1 N E P r o l o c n...

Page 284: ...f e l n w o d p u n o i t c e r i d t x e t s t e S T N E M N G I L A T X E T 5 1 1 1 n i e c n e r e f e r t n e m n g i l a t x e t s t e S s n o i t c e r i d l a c i t r e v d n a l a t n o z i r o h T E S R E T C A R A H C 6 1 1 1 t e s r e t c a r a h c s t c e l e S T H G I E H I J N A K 0 2 1 1 m m n i t h g i e h i j n a k s t e S H T D I W I J N A K 1 2 1 1 t h g i e h i j n a k o t o i ...

Page 285: ... E T S A R 1 8 1 1 e l a c s r e t s a r s t e S E T Y B R E T S A R R O R R I M 2 8 1 1 B S L t i b p o t f o n o i t c e r i d t n e m n g i l a s t e S B S M r o L E X I P T N E M N G I L A 3 8 1 1 d n a e c n e r e f e r t n e m n g i l a l e x i p s t e S n o i t c e r i d t n e m n g i l a P U O R G R E T S A R T R A T S 4 8 1 1 p u o r g r e t s a r f o t r a t s e h t s e i f i c e p S D N...

Page 286: ...s t e S m e t s y s c i r t e m t n i o p e s a B 2 H M 2 R M R E T S A R E 9 1 1 r e t s a r d e s s e r p m o c n o n o i t a m r o f n i s t e S m e t s y s c i r t e m t n i o p e s a B 2 R M 2 R M M R E T S A R F 9 1 1 r e t s a r d e s s e r p m o c n o n o i t a m r o f n i s t e S m e t s y s c i r t e m t n i o p e s a B 2 R M M E N I F E D I J N A K 0 A 1 1 i j n a k s r e t s i g e R E ...

Page 287: ... d n a n o i t c e r i d e c n a v d a l e x i p n i g i r o e g a m i s e i f i c e p S n o i t c e r i d e c n a v d a l e x i P r e P s e l p m a S 5 1 1 0 l e x i p r e p s e l p m a s f o r e b m u n e h t s e i f i c e p S p i r t S r e P s w o R 6 1 1 0 n o i s s e r p m o c e r o f e b p i r t s h c a e f o s w o r f o r e b m u n e h t s e i f i c e p S s t n u o C e t y B p i r t S 7 1 1...

Page 288: ... data and the anonymous ftp The anonymous ftp enables you to log in by entering anonymous in the user name The ftp for data transfer enables ten users to be logged in simultaneously while the anony mous ftp enables one user to be logged in simultaneously d r o c e R n o i t c n u F t r o p p u S e p y t r e p y t a t a d e h t s e i f i c e p S t n e i r o r g n i w a r d f o n o i t a t n e i r o...

Page 289: ...a n r e s u e h t d e t u c e x e s i d n a m m o c n e p o e h t r e t f A d e r e t n e e b t s u m d r o w s s a p e m a n e l i f t u p r e t t o l p e h t o t r e t u p m o c e h t n i e l i f e n o s e i p o C y b d e t r o p p u s t o N p t f s u o m y n o n a e m a n e l i f t u p m r e t t o l p e h t o t r e t u p m o c e h t n i s e l i f e l p i t l u m r o e n o s e i p o C d w p y r ...

Page 290: ... connected xpt socket I F The LP 1020 enables the data transfer from a maximum ot ten users Three protocols of ftp for data transfer lpr lpq lprm and xpt enable the maximum ten users to be connected Command name Function lpr Copies a file in the computer to the plotter lpq Outputs the spool data in the plotter to the computer lprm Deletes an unprocessed file transferred to the plotter Downloaded F...

Reviews:

Related manuals for LP-1020