background image

Testing


Testing

① 

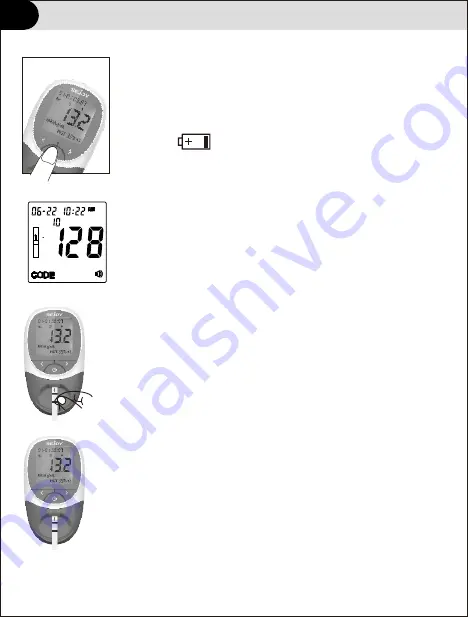
Turn the meter on. The screen will briefly display all 

of the LCD symbols. Observe the LCD at startup to 
ensure all segments and display elements are turned 
on, and there are no missing icons or elements.

Note:

 If           

appears, it indicates the battery is 

almost out of power. Replace the battery now.

② 

After startup, the Initial Screen will be displayed. 

Ensure the code chip is inserted, and compare the 
number showed in the display with the code number 
printed on the test strip canister label. Refer to Section 3 
Coding the Meter.
The 

strip symbol

 will flash when the meter is ready for 

the strip to be inserted.

③ 

Insert a test strip into the strip channel in the same 

direction as the arrows indicated on the strip. Ensure that
the test strip is inserted all the way to the end of the 
strip channel.

④ 

The 

blood drop symbol

 will flash when the meter is

 ready for the specimen to be applied.

28

No.

Summary of Contents for HB-202

Page 1: ...Owner s Booklet Hb Hemoglobin Testing System HB 202 Realiable Hemoglobin Testing System ...

Page 2: ...vice Fingertip blood sampling Disposal the lancet Setting up your meter Testing Data and Memory 11 12 12 17 20 23 25 20 30 Maintenance Replacing the battery Caring for your system 31 31 32 Troubleshooting Technical information Specifications Disposing of the meter test strips lancets and batteries Warranty Symbol Index 35 38 40 41 42 Optical check 16 Important Health Relate information 03 Computer...

Page 3: ...The Sejoy HB 202 hemoglobin Meters are used with the Sejoy HS 101 Test Strips to quantitative measuring hemoglobin content with fresh capillary wholeblood from the finger or venous blood The hemoglobin Meters can be used for self testing at home or for professional use The product is for in vitro diagnostic use only It can not be used as the only basis for the diagnosis of anemia To ensure accurat...

Page 4: ... Disinfect the meter and lancing device before allowing anyone else to handle them Do not allow anyone else to test with the meter or lancing device It is important to keep the meter and lancing device clean and disinfected Clean and disinfect the lancing device once per week to remove visible dirt or other material for safe handling and or prior to disinfecting For instructions on how to clean an...

Page 5: ...ctor Children should be taught how to use the meter and any other medical products appropriately If you have followed all the instructions in this booklet and still have symptoms that don t seem to match your test results or if you have questions talk to your doctor The sejoy hemoglobin monitoring system HB 202 is designed for using with fresh capillary whole blood from the finger or venous sample...

Page 6: ...ou District 101400 Beijing China Lotus NL B V Koningin Julianaplein 10 le Verd 2595AA The Hague Netherlands CE for lancing device CE0197 for sterile lancet Manufacturer of Lancing Device and Sterile Lancet EC REP Shandong Lianfa Medical Plastic Products Co Ltd No 1 Shuangshan Sanjian Road 250200 Zhangqiu City Jinan Shandong PEOPLE S REPUBLIC OF CHINA Shanghai International Holding Corp GmbH Europe...

Page 7: ... external power supply Use Usb data cable to connect the Meter to your computer Usb data cable upload the measurement history data to the computer for viewing Quality control Strips In Optical Check mode Cheak whether the Optical system works normally Provides detailed instructions on using the Test Strip Package Insert Hb Hemoglobin Test Strips Used with sterile lancets to prick the fingertip for...

Page 8: ...e meter and testing supplies away from young children Small items such as the battery cover batteries and test strips are choking hazards LCD Strip Channel Test strip Holder Left Arrow Button Right Arrow Button On Off Button Battery Cover Code Chip Type C ...

Page 9: ... the test result HCT Value Shows calculated HCT value Test Strip Reminder Indicates when to insert test strip Apply Blood Sample Reminder Indicates when to apply Blood Sample 7 Date and Time Test Strip Reminder Apply Blood Sample Reminder Code Number or Test Result Memory Code HCT Value Low Battery Reminder Measurement Units Sound Icon Out of optimal operating temperature 10 40 indicator ID Number...

Page 10: ...er test strips with this meter can produce inaccurate results Specimen Application For best results fill the Specimen Application Area with approximately 10 µL of blood specimen Incorrect results may occur if the specimen is not applied correctly or if the Specimen Application Area is not filled After applying the specimen ensure the Specimen Application Area is completely covered The Specimen App...

Page 11: ...ever transfer them to another vial or any other container Never store individual test strips outside the vial Getting to know your system Code Number Each package of test strips is printed with a code number lot number and expiration date Whenever a new vial is opened mark the date on the label Calculate the expiration date by adding three months Record this expiration date on the label Important ...

Page 12: ...ith clean dry hands you may touch the test strip anywhere when Write the first open date and expiration date on the vial label when you first open it Discard the vial 3 months after first open date Usage after this period may result in inaccurate readings For in vitro diagnostic use Test strips are to be used only outside the body for testing purposes Do not use test strips that are torn bent or d...

Page 13: ...etting to know your system d Lancet c Lancing Device Protective Cover Lancet Pin Lancet Ejector Trigger Button Sliding Barrel Lancet Carrier Protective Cover Lancing Device Cover Arrow Adjustable Tip 11 ...

Page 14: ...etup including date time units and sound Optical Check mode Use Quality control strips Memory Delete mode Exit setup modes and save changes when is pressed The meter will automatically turn off PC Export measurement history or The meter will turn on automatically after the batteries are inserted The meter will display the full screen Please follow below procedures to set the parameters of the mete...

Page 15: ...il the correct date is displayed Press button to save and the 24 hour figure is flashing automatically Set the year The year will appear at the top of the display Press until the correct year is displayed Press button to save and the Month and Date figure is flashing automatically Setting up your meter 12 or or or Set the time format The meter can display the time in either an AM PM 12 hour or a 2...

Page 16: ...eed to Minutes Set the measuring unit The meter can display test results in either grams per decilitre g dL or millimoles per litre mmol L or grams per litre g L Press to select g dL g L or mmol L Press to save and proceed to Measuring unit setup Set the time mmol L g dL OR OR Setting up your meter 12 or or or g L OR Set the sound Press to select sound either ON or OFF The Sound Symbol will appear...

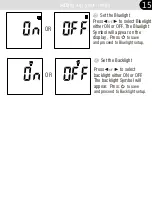
Page 17: ...he Bluelight Symbol will appear on the display Press to save and proceed to Bluelight setup or Setting up your meter Setting up your meter OR Set the Backlight 12 15 Press to select backlight either ON or OFF The backlight Symbol will appear Press to save and proceed to Backlight setup or ...

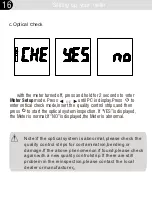
Page 18: ...controlstrip If there are still problem in the reinspection please contact the local dealer or manufacturer with the meter turned off press and hold for 2 seconds to enter Meter Setup mode Press until PC is display Press to enter optical check mode insert the quality control strips and then press to start the optical system inspection If YES is displayed the Meter is normal If NO is displayed the ...

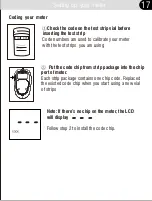
Page 19: ...strip package into the chip port of meter Each strip package contains one chip code Replaced the existed code chip when you start using a new vial of strips Check the code on the test strip vial before Note If there s no chip on the meter the LCD will display Follow step 2 to install the code chip CODE LOT Expiration date Frist open date 005 Setting up your meter 15 17 ...

Page 20: ...e code on the meter does not match the code on the test strip vial please discard this vial test strips and contact vendors CAUTION Matching the code on the meter and the code on the test strip vial is essential to obtain accurate results Each time you test check it to make sure the code numbers match 005 Example Setting up your meter CODE LOT Expiration date Frist open date 005 12 18 ...

Page 21: ...bsite 2 Open the software on your Desktop or laptop Connect computer and Meter with matching data cable Installation of meter driver 3 Login with your administrator account user name HB202 and password Password 4 Selection device Port number Enable software receiving status 5 Turn on the device transmission function When the meter is in standby mode press the key for long more than 2S to enter the...

Page 22: ...eing operated by a second person who is providing testing assistance to the user the meter and lancing device should be cleaned and disinfected prior to use by the second person Disinfect the meter and lancing device before allowing anyone else to handle them Do not allow anyone else to test with the meter or lancing device It is important to keep the meter and lancing device clean and disinfected...

Page 23: ...od drop for testing Twist off the lancing device cover Insert a new lancet into the lancet carrier firmly Hold the lancet needle cover and gently twist it until it separates from the lancet Replace the lancing device cap Avoid touching the lancet pin Adjust the depth setting The adjustable tip offers 5 levels of skin penetration Twist the lancing device cap until the desired setting appears 21 ...

Page 24: ...e lancing device Cock the lancing device Slide the ejection spring controller back until it clicks The lancing device isready to use If it does not click that s okay It may have been cocked when you inserted the lancet 22 ...

Page 25: ...w times to encourage blood flow Clean the testing site with an alcohol swab and then dry the testing site thoroughly Place the lancing device firmly against the side of your fingertip Press the Release Button Gently squeeze your finger until you get a round drop of blood Discard the first drop If the blood smears or runs Do Not use that sample Wipe the area and gently squeeze another drop of blood...

Page 26: ...y Transfer Tube will fill automatically Never squeeze the Capillary Transfer Tube while sampling Align the tip of the Capillary Transfer Tube with the Specimen Application Area of the strip to apply the second drop of blood approximately 10 µL Note Do not to touch the strip with the Capillary Transfer Tube or pipette The capillary blood should be tested immediately after collected Use of a Capilla...

Page 27: ...the lancet on a hard surface and carefully insert the lancet needle into the safety tab Press the release button to make sure that the lancet is in the extended position Slide the ejection button forward to eject the used lancet Place the lancing device cover back on the lancing device 25 ...

Page 28: ... of the strip Do not to touch the strip with the pipette Whole Blood must be tested within 8 hours of collection Mix the specimens well before testing in order to ensure the cellular components are evenly distributed Allow the specimen to come to room temperature 15 30 C or 59 86ºF for approximately 15 minutes if the specimen has been refrigerated Anticoagulants other than EDTA are not recommended...

Page 29: ...ly after use to avoid contamination and damage Store unused test strips only in their original vial Do Not open the test strip vial until you are ready to remove a test strip and perform a test Use the test strip immediately after removing it from the vial Do Not return the used test strip to the vial after performing a test Do Not re use a test strip that had blood or control solution applied to ...

Page 30: ... displayed Ensure the code chip is inserted and compare the number showed in the display with the code number printed on the test strip canister label Refer to Section 3 Coding the Meter The strip symbol will flash when the meter is ready for the strip to be inserted Insert a test strip into the strip channel in the same direction as the arrows indicated on the strip Ensure that the test strip is ...

Page 31: ...y indicating the test is in progress Hb results will be displayed within 15 seconds with Hct value displayed at the bottom of the screen Remove the used test strip and press button the meter will return to the initial screen ready for another strip to be inserted and a test performed Note Discard all blood specimens used test strips and materials carefully Treat all blood specimens as if they were...

Page 32: ...ed at any time Test results are stored from the newest to the oldest so set the time and date correctly in the meter mmol L Press to turn on the meter If no data is stored the meter will display three dash and MEM From the Initial Screen press to review each record Press to return to the initial screen or or Uploading Data In standby mode connect the computer with the USB cable To upload all data ...

Page 33: ... Press the battery cover tab on the top and lift the cover to open it Remove and discard the old batteries Insert three AAA batteries on top of the plastic tape Make sure the two outside batteries are aligned with the plus side down towards the bottom of the meter with the middle battery aligned with the plus side facing up towards the top of the meter Put the battery cover back into position unti...

Page 34: ...mmediately after use to avoid contamination or damage Store test strips only in their original vial Checking for expiration or damages to test strips and control strip Expiration dates for test strips are printed on their vial labels When you first open a new vial of test strips record the discard date on the label Refer to the test stripvial for instructions on determining vial for instructions o...

Page 35: ... covering the sensor Note Do not use bleach or alcohol to clean the Meter Sensor Area This will cause damage to the meter 33 Remove the Test Strip Holder by pressing in on middle of the Test Strip Holder and sliding it out from the meter Wipe it with a damp cloth or a mild detergent and dry it with a dry soft cloth Slide the Test Strip Holder back into the meter by laying it flat on the meter Firm...

Page 36: ...Not immerse the lancing device in any liquid To disinfect prepare a solution of one part household bleach to ten parts water Wipe the lancing device with a soft cloth dampened with this solution Immerse the caps only in this solution for 30 minutes After disinfecting rinse briefly with water and allow both to air dry 34 ...

Page 37: ...ppears Used or dirty test strip Ensure the test strips are with the expiration date printed on the canister label Test strip was removed during the test Low battery Replace the batteries then repeat the test Repeat the test and ensure the test strip remains in place No code chip or the chip is not well installed Insert the code chip to the meter correctly 35 ...

Page 38: ...men Use at least 10 µL of whole blood Insufficient specimen less than 1µL If the specimen was taken from a specimen container ensure the specimen is mixed well and repeat test The test result is higher than 25 0g dL Troubleshooting It is suggested to use it in the temperature range of 15 30 59 86 to obtain more accuratetest data Temperature prompt flashing Operation the working temperature is not ...

Page 39: ... with the printed side up Defective meter or test strips Contact the vendor Blood or foreign objects put into the test strip port Test does not start after applying the blood sample Probable Cause What to Do Blood sample too small Repeat the test with a new test strips and a larger blood sample Defective test strip Repeat the test with a new test strip Sample applied after meter times out and turn...

Page 40: ...Dimensions Weight Capillary and Venous whole blood 10uL HS 101 4 5 25 0g dL 15seconds 3 AAA Battery or TypeC USB DC5V Approximately more than 2000 tests 1000 test results 10 40 50 104 90 RH non condensing 20 55 90 RH non condensing Expected service life Five years Strip storage environment 2 30 35 6 86 Meter storage environment HB 202 126 71 25 mm Approximate 113 6g battery not included ...

Page 41: ... L 39 Data transmission with Usb data cable can be connected to the computer for data management 4 5 10 0g dL Standard 10 1 25 0g dL Coefficient Accuracy 4 5 10 0g dL 10 1 25 0g dL absolute deviation 1g dL relative deviation 4 Deviation SD 0 8g dL of Variation CV 3 Approx 3 minutes after last user action ...

Page 42: ...lth department or other appropriate authorities for proper handling and disposal of used meters used test strips used lancets and used batteries Please consider the following points when disposing of used testing materials Consider recycling of the meters and batteries at an appropriate facility Be aware the meter is potentially hazardous electronics scrap e scrap and should be disposed of accordi...

Page 43: ...r from the date of purchase If the meter does not function properly due to defective components or poor workmanship we will repair or replace it freely This warranty does not cover damage due to improper handling in any way Battery does not included in the warranty 41 ...

Page 44: ... Index SN Consult instructions for use In vitro diagnostic medical device Serial number Batch code Manufacturer Caution Do not reuse 55 20 Storage temperature limitation Use by Storage humidity limitation 42 ...

Page 45: ...is symbol indicates that you should not discard waste electrical or electronic equipment WEEE in the trash For proper disposal contact your local retailer where product was purchased Direct Current EC REP European Authorized Representative 43 ...

Page 46: ...es and can radiate radio frequency energy and if not installed and used in accordance with the instructions may cause harmful interference to radio communications However there is no guarantee that interference will not occur in a particular installation If this equipment does cause harmful interference to radio or television reception which can be determined by turning the equipment off and on th...

Page 47: ...o 365 Wuzhou Road Yuhang Economic Development Zone Hangzhou City 311100 Zhejiang China Distributed By Document No DHB 0202 010 Version Z Date of Issue 2020 09 Manufactured by Hangzhou Sejoy Electronics Instruments Co Ltd ...

Reviews: