U.4.54
SEL-421/SEL-421-1 Relay
User’s Guide
Date Code 20020501
Basic Relay Operations
Operating the Relay Inputs and Outputs
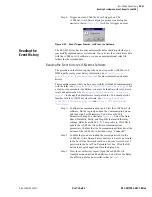
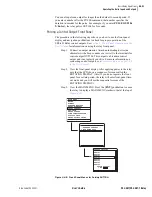
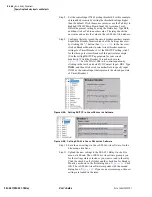
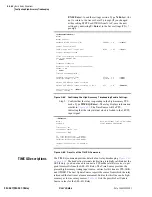
Step 4. View the local control screen. Press the
{Up}
and
{Down}
arrow navigation pushbuttons to highlight the LOCAL
CONTROL action item (See
). Press the
{ENT}
pushbutton. You will see the LOCAL CONTROL submenu
(the middle screen in
).
Step 5. View the output testing screen. Press the
{Up}
and
{Down}
arrow navigation pushbuttons to highlight the --OUTPUT
TESTING-- action item (See
, middle screen).
Press the
{ENT}
pushbutton. The relay next displays the
OUTPUT TESTING submenu (the last screen of
Step 6. Command the relay to pulse the control output. Press the
{Up}
and
{Down}
arrow navigation pushbuttons to highlight
OUT104 (See
, last screen). Press the
{RIGHT}
arrow navigation pushbutton to highlight YES under “PULSE
OUTPUT?” Press the
{ENT}
pushbutton. The relay detects
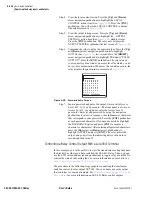
your request for a function at an access level for which you do
not yet have authorization. Whenever this condition occurs, the
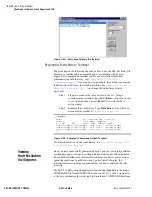
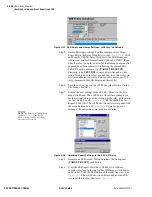
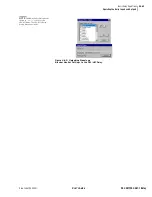
relay displays the password access screen of
Figure 4.49
Password Entry Screen.
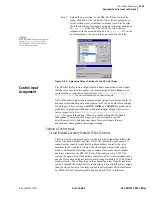
Step 7. Input a password and pulse the output. Enter a valid Access
Level B, P, A, O, or 2 password. (The front panel is always at
Access Level 1, so you do not enter the Access Level 1
password.) Enter a valid password by using the navigation
pushbuttons to select, in sequence, the alphanumeric characters
that correspond to your password. Press the
{ENT}
pushbutton
at each password character. (If you make a mistake, highlight
the BACKSPACE option and press
{ENT}
to reenter a
character or characters.) After entering all password characters,
press the
{Up}
arrow or
{Down}
arrow pushbuttons to
highlight ACCEPT, and press
{ENT}
. The relay pulses the
output, and you will see the indicating device turn on for a
second and then turn off.
Controlling a Relay Control Output With a Local Bit: Terminal
In this example, you set Local Bit 3 to start the transformer cooling fans near
the breaker bay where you have installed the SEL-421 Relay. Thus, you can
use the LCD screen and navigation pushbuttons to toggle relay Local Bit 3 to
control the state of the cooling fans. For more information on local bits, see
Local Control Bits on page U.5.18 in the User’s Guide
.
The procedure in the following steps proposes connecting the transformer
bank fan control to relay output OUT105. You can choose any relay output
that conforms to your requirements. See
Control Outputs on page U.2.6 in the
for more information on SEL-421 Relay control outputs.
A B C D E F G H
I J K L M N O P
Q R S T U V W X
Y Z a b c d e f
g h i j k l m n
o p q r s t u v
w x y z 0 1 2 3
4 5 6 7 8 9 _ .
ACCEPT BACKSPACE
PASSWORD REQUIRED
Summary of Contents for SEL-421
Page 8: ...This page intentionally left blank ...
Page 30: ...This page intentionally left blank ...
Page 110: ...This page intentionally left blank ...
Page 204: ...This page intentionally left blank ...
Page 284: ...This page intentionally left blank ...

