background image


20 


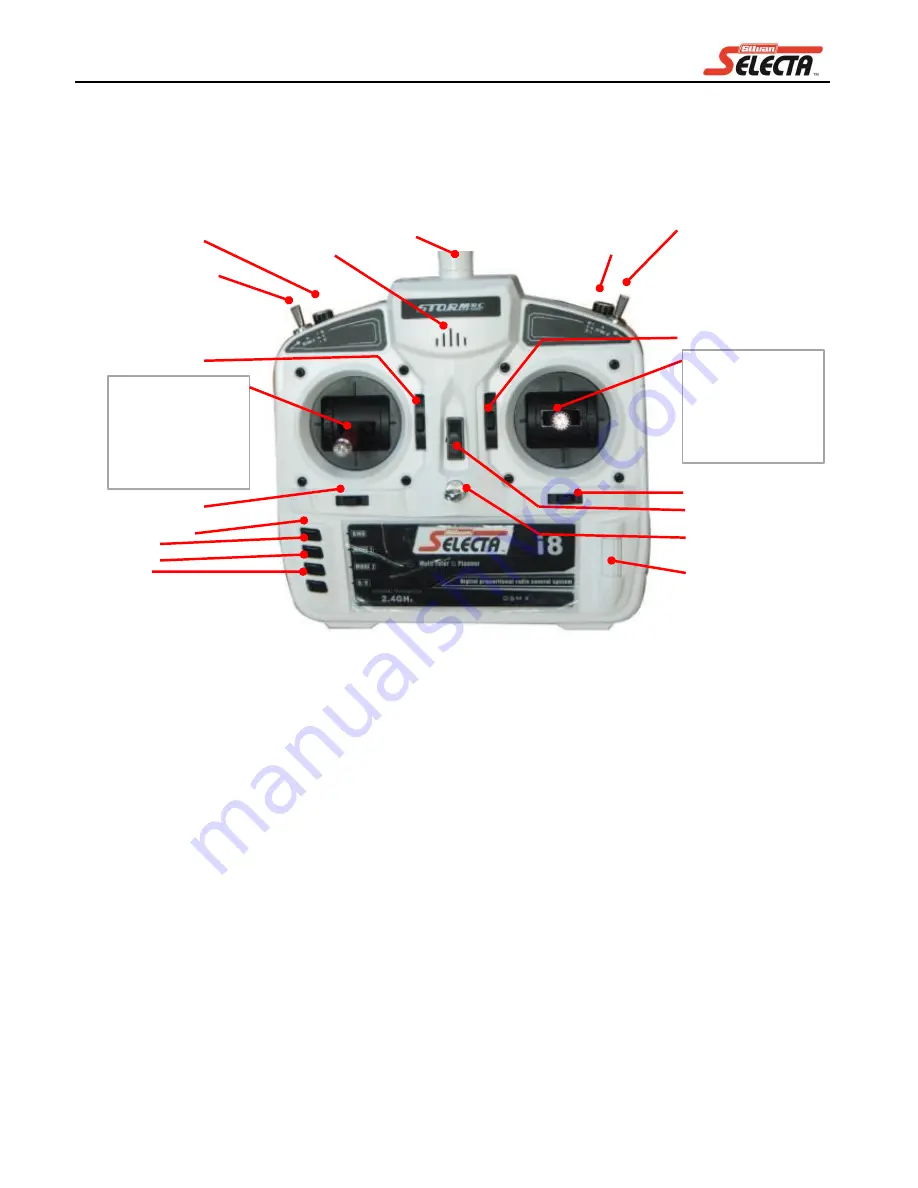
Remote Controller / Transmitter 

The controller transmitter operates 8 channels around the 2.4Ghz frequency band. Control communication is up to 1000m 

when used with fully charged batteries, without obstructions or other radio communication interference.  

Familiarise yourself with the listed actions as detailed 


Controls  

Channel 1-6: 

covered on later pages 

Channel 7 & 8:

 Controls dials adjust the aim of a connected 2D Gimbal in turn aiming the camera.  If the Gimbal is not 

connected by the (black and white) control wire to the Flight Controller these controls will not have any 

effect and the camera will simply look forwards while being stabilized. 

Trimmer’s: 

Each of  the 4 trimmers can adjust the balance or mid-point for their respective controls. For instance if you 

found the FARMEYES to slowly drift Left or Right without the influence of wind you can adjust the Aileron 

trimmer  to re-center the position. 


Trimmers will beep when adjusted and double beep when passing the default mid point. 

Binding Button: 

Mode 1 & Mode 2: 

The difference between Mode 1 & 2 is the placement of the stick controls, left throttle or right 

throttle. Press and hold when powering on to electronically switch the controller between modes. The 

controller is physically configured as Mode 2 with the right stick being spring loaded and not suited for Mode 

1 use without service advice. 

Note:

 If you have difficulty Arming motors for flight double check the 

controller is still set as mode 2 by powering off then on while holding the Mode 2 button.


D/R:

 This button toggles a speed limiter like action and effecting both 

Manual

 or 

GPS assisted

 flight modes. Press once 

to toggle: The 

Bi Bi

 (double beep) sound indicates unrestricted flight to achieve 100% of maximum speed. 

When the 

D/R

 button toggles a single 

Bi

 (beep sound) manoeuvrability is reduces to 60% of max speed. 

CHANNEL- 5/6 

SW2 (3 Position switch) 
-Manual 
-GPS loiter/Assist 
-GPS Return to land 

CHANNEL- 8 

Gimbal tilt control 

Aileron Trimmer 

On/Off Power Switch 

No Function 

Loop point for a lanyard 

Elevator Trimmer 

Elevator & Aileron stick 

 
CHANNEL- 1 

Aileron 

˂  ˃ 

movement 


CHANNEL- 2 

Elevator 

˄ ˅ 

movement


Antenna  
(transmitter 
2.4Ghz) 

Power indicator 
light and speaker 

CHANNEL- 5/6 

SW1 (3 Position switch) 
-Manual 
-Manual 
-Direction lock 
*Conditions apply 

Throttle Trimmer 

CHANNEL- 7 

Gimbal roll control 

Throttle & Rudder stick 

 
CHANNEL- 3 

Rudder 

˂  ˃ 

movement 


CHANNEL- 4 

Throttle 

˄ ˅ 

movement


Rudder Trimmer 

Binding Button 
Mode 1 
Mode2 
D/R 

Start up and Flying:  Basic Controller Operation 


Summary of Contents for Farm-Eyes ROS

Page 1: ...g South 3175 Australia Telephone 61 03 9215 2700 Facsimile 61 03 9215 2701 www silvan com au NEW ZEALAND 22 Sunshine Avenue Te Rapa Hamilton 2001 New Zealand Telephone 64 07 8496033 Fax 64 07 8496070 www silvannz co nz SILVAN AUSTRALIA PTY LTD ABN 48 099 851 144 UAV SYSTEMS Farm Eyes ROS ...

Page 2: ...MBER ___________________ PRIMARY PIOLOT NAME _______________________ SECONDARY PILOT NAME ___________________ No liability can be accepted for any inaccuracies or omissions in this publication although due care has been taken to make it as complete and accurate as possible The information illustrations and technical data were considered to be correct at the time of preparation In accordance with o...

Page 3: ...14 5 Fit LCD screen to Remote control attach battery and neaten cables 15 6 Fitting the 4S Flight battery and Accessory 2S battery 16 7 Landing Feet 17 8 Camera USB connection 17 8 Fit Rotors 18 Start up and Flying Quick Start Procedure 19 Basic Controller operation 20 Full Start procedure 24 Supplementary information Emergency Failsafe s 27 Controller binding procedure 28 Led Indicator lights and...

Page 4: ...use mis operation exceeding machine specifications including overloading impact damage negligence accidental damage or failure to perform recommended maintenance services Any product which has been repaired by other than an authorised Silvan service outlet in a way which in the sole and absolute judgement of Silvan adversely affect its performance or reliability The replacement of maintenance item...

Page 5: ... Always remove batteries before disassembly Warning This product and its accessories utilise Li ion and or LiPO type batteries that must be maintained and cared for Miss handling or improper care may degrade battery performance cause irreversible damage or fire to the battery or connected equipment Warning Ensure that the electrical cables are always in good condition Do not allow them to become t...

Page 6: ...adaptor cables LIPO Batteries 2S battery for gimbal and video transmitter 4S flight battery 3S battery for LCD screen FARMEYES bare Hexacopter Motor Arm Lock Nuts x6 Landing feet padded x4 Action Camera with video out cable Video Transmitter 5 8Ghz Rotor A CW PN 65 001A Rotor B CCW PN 65 001B Gimbal 2 D axis Product Overview Kit Contents ...

Page 7: ...e Control 2 4Ghz Transmitter Mounting Bracket for fitting LCD screen to remote control Main contents of the FarmEyes 1x Hexacopter 3x Rotor A Clockwise Spinning 3x Rotor B Anti clockwise spinning 1x Flight Battery Lipo 4S 5200mAh 1x Transmitter controller 1x Advanced battery charger 1x Mounting Bracket for accessory aluminium arm set for gimbal connection 1x Gimbal 2D 1x Video Transmitter 5 8Ghz 1...

Page 8: ...with some auto pilot functionality supporting Return to Land and GPS Loiter Assist for stabilization for position hold and altitude hold o Radio receiver 2 4Ghz 8 Channel for flight control information o Flight Battery LiPo 4S 4 cell 14 4V 5200mAh capacity with XT60 plug I8 Controller Transmitter 2 4Ghz transmitter o Set as Mode 2 for throttle by left stick o Operates with 4x AA batteries not supp...

Page 9: ...ncluded Weight 2 48kg fully equipped with FPV parts flight battery Max Take off Weight 3 00kg Standard Flight battery 0 49kg Battery Life Based on a machine loaded out to a weight of 2 48kg battery life of one Fully charged 4S Flight battery can allow up to 15 minutes of hover and flight Note The Battery life varies according to how the machine is flown and weather conditions and battery condition...

Page 10: ...al Motor Arm Camera mounting bracket Camera Mode button Camera OPERATE button main functions start stop recording Power On Off See camera manual for full instructions 5 8Ghz Video Transmitter Accessory battery 2S Lipo Transmitting antenna Rubber grommets Shock absorbers 2D Gimbal Gyro motor G3 Action Camera Memory card slot Video out cable Product Overview Getting familiar with Hexacopter Parts Bi...

Page 11: ... unwarrantable damage There are two types or rotors Rotor A is CW clockwise spinning and Rotor B is CCW counter clockwise spinning Rotors feature a small directional arrow on the top to indicate the intended direction of spin and the rotor must be fitted to the motor with the same direction of spin The motors are inscribed with CW clockwise and CCW counter clockwise Fitting rotors Ensure that the ...

Page 12: ...or a lanyard Elevator Trimmer Elevator Aileron stick CHANNEL 1 Aileron movement CHANNEL 2 Elevator movement Antenna transmitter 2 4Ghz Power indicator light and speaker CHANNEL 5 6 SW1 3 Position switch Manual Manual Direction lock Conditions apply Throttle Trimmer CHANNEL 7 Gimbal roll control Throttle Rudder stick CHANNEL 3 Rudder movement CHANNEL 4 Throttle movement Rudder Trimmer Binding Butto...

Page 13: ...arge Style Balance Cell number Voltage Capacity mAh Follow the battery charger instructions to charge WARNING LIPO Lithium Polymer batteries use different chemistry to the more common lithium Ion batteries LIPO batteries are capable of high current discharge and the best long term charging method is balance charging Inexperienced use of regular or fast charging processes may damage the battery cau...

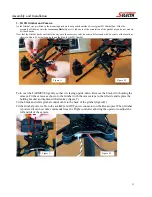
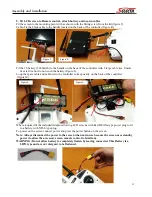
Page 14: ...und the Box for the 2D Gimbal Turn over the FARMEYES gently so that it is laying upside down Remove the bracket for holding the camera Fit the camera as shown to the Gimbal with the camera lens to the left side and replace the holding bracket and tighten with allen key figure C Fit the black and white gimbal control cable to the back of the gimbal figure D Fit the Gimbal power cable to the availab...

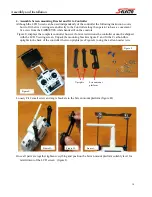
Page 15: ...for size restrictions the controller cannot be shipped with the LCD Viewing screen Unpack the mounting brackets figure F and fit the 2 carbon fibre uprights to the back of the controller the two uprights see Figure G using the 4 allen head screws Loosely Fit 2 small screw and angle brackets to the Screen mount platform figure H Once all parts are together tighten everything and position the Screen...

Page 16: ...ie to the controller to keep neatly on the back of the controller figure M Where required fit the included Adaptor allowing LCD screens with Red DEANs type power plug to fit to a battery with XT60 type plug To power on the screen connect power and press the power button on the screen Note Always disconnect the power to the screen when not in use because the screen uses standby power to allow the a...

Page 17: ...s could force the battery to disconnect HELPFUL HINT If you have difficulty getting the straps firm enough to holds the 4S battery or would like additional security apply a thick elastic band around the middle of battery which will add grip as well as acting as an additional barrier to slippage Next stage is to fit the accessory 2S battery allowing the 2D Gimbal and video transmitter to be powered...

Page 18: ... the Gimbal to move the camera without restriction As the camera is charged using the USB socket on the camera the Video out cable will occasionally need to be disconnected to allow the for Charging Supplied with the camera is a USB cable that can be fitted to any standard USB charging socket to charge the camera If the FARMEYES is to be used for recording the operator will need to supply a suitab...

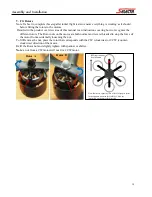
Page 19: ...threaded to stop the force of the motor from accidentally loosening the nut To fit Remove the nut place the rotor that corresponds with the CW clockwise or CCW counter clockwise direction of the motor Refit the Rotor nut and slightly tighten with spanner or shifter Note a nut from a CW motor will not fit a CCW motor RED tape indicates front direction Note Rotors on opposite sides of the Hexacopter...

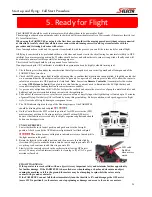
Page 20: ...rding requires micro SD card Ready for Flight Provided no errors or sensors indicating problem the Hexacopter UAV should be ready to arm the rotors Check GPS status light to confirm signal if signal is low before takeoff the accuray of the return to home position maybe of low accuracty Set controller SW2 switch to position 1 GPS Loiter Assist Recheck for people animals or potential obstables above...

Page 21: ...hold when powering on to electronically switch the controller between modes The controller is physically configured as Mode 2 with the right stick being spring loaded and not suited for Mode 1 use without service advice Note If you have difficulty Arming motors for flight double check the controller is still set as mode 2 by powering off then on while holding the Mode 2 button D R This button togg...

Page 22: ...tation direction the Operator left and UAV left are opposite Always consider UAV orientation and proceed with caution to prevent mis operation or mis judgment Throttle control Increases decreases altitude FRONT Rudder control Turn Left Turn Right FRONT Aileron control Rolls the aircraft left or right for sideways movement UAV FACING AWAY FROM OPERATOR Elevator control Tilts Front Back of UAV for F...

Page 23: ...ns the forward backward Sideways left right moment to be the same orientation as the original Forward facing direction of the FARMEYES at start up Note This mode will not work with GPS assisted flight modes in other words when the SW2 switch is set to 1 or 2 GPS modes the Position lock will be disabled Note Direction Lock can potentially disorientate the operator to make miss actions and direct th...

Page 24: ...ctly overhead of the starting position descend until landing detected allowing the rotors to switch off and the motors to disarm After landing and motors have disarmed you can switch the SW2 switch back to 0 manual Note The FARMEYES Flight controller will assess itself to have landed under the following conditions 1 The altitude detected stops descending at a rotor speed insufficient to maintain h...

Page 25: ...nnector with maroon coloured plastic plug where applicable with the included adaptor cable to fit together 2 Hexacopter Position the Hexacopter on the ground in an open space without trees or buildings Connect 4S flight battery to Hexacopter The system will undergo a start up sequence checking and calibrating all connections and hardware do not move the Hexacopter after the battery is connected as...

Page 26: ... This camera is charged through the USB socket and will need to have been charged for use Press and hold the M button for 10 Seconds to enable disable recording of date stamp on video To set date stamp use the instruction supplied with the camera Connect the 2S battery to power both the gimbal and the video transmitter The 2S batter has a Red JST type power connector that needs to be connected to ...

Page 27: ...ice recheck and ensure the area is free of people animals vehicles and buildings and you are reminded to keep current with the regulations 4 Take note of the current time or set a timer so your area aware of time flying as the flight battery is limited up to 15 minutes of general flying Note battery life is effected by many things including Battery condition wind speed aggressive flight style Over...

Page 28: ...s dropped to a pre set point the Flight controller enables Auto Land which will cause the machine to land over its current position Limitations to this function is that the speed of descent in Auto Land is slow for safety reasons however it must be warned that a machine being flown at a very high altitude with a low battery would spend a long time descending to ground level under Auto Land that yo...

Page 29: ...e watching the receiver indicator light The frequency of the blinking should slow then become alit solid to indicate successfully binding Note this binding procedure only works with genuine FARMEYES Remote controls Where a different controller is used a matching Radio receiver would also have to be provided LED Status indicator On the Hexacopter part of the FARMEYES system there is an indicator li...

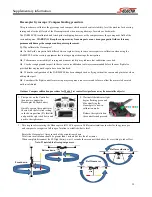
Page 30: ... as flying without the camera and gimbal or when adding other part A5 Sometimes the flight controller at start up may recognise a sensor error and refuse to allow the motors to be armed until re calibrated Outdoor Compass calibration procedure for Mode 2 set controllers preform away from metallic objects 1 First power on the Controller then power connect the Hexacopter 4S flight battery Quickly op...

Page 31: ...g solid pink red colour Continue holding the left stick in the lower right position 3 Calibration is complete when the indicator light changes to blue red and green colour Land the Hexacopter and allow the motors to disarm to finalise Disconnect the Flight batter and restart 2 After 12 Seconds the indicator light begins flashing green and blue signifying the Hexacopter is now in calibration mode Y...

Page 32: ...ylight Don t let it get too far away from you You must not fly closer than 30 meters to vehicles boats buildings or people You must not fly over any populous area such as beaches other people s backyards heavily populated parks or sports ovals where there is a game in progress If you are in controlled airspace which covers most Australian cities you must not fly higher than 400 feet 120 meters You...

Page 33: ... Charger had determined cells are too low to charge safely Consult manual with charger 1 Replace or recover battery NOTE We recommend replacement as recovering batteries can cause additional damage and batteries no not always preform as before over discharging Can not ARM motors and controller is synced with Hexacopter 1 Wrong battery connected to Hexacopter or low battery 2 Controller had been ch...

Page 34: ...the same channel as the transmitter 1 Check the 2S battery is charged and connected then check the black white cable connecting the video out line and transmitter are together 2 Check the black antenna is connected if it has been damaged replace 3 Press V1 V2 to cycle between the two AV inputs 4 The back of the LCD screen has 4 dip switches to adjust the frequency take note of its current setting ...

Page 35: ...Date Time Start End Location Wind Weather conditions Flight purpose Comments maintenance Flight Log ...

Page 36: ...66 Greens Rd Dandenong Sth 3175 Australia Telephone 61 03 9215 2700 Facsimile 61 03 9215 2701 www silvan com au SILVAN NEW ZEALAND PTY LTD 22 Sunshine Avenue Te Rapa Hamilton 2001 New Zealand Telephone 64 07 8496030 Fax 64 07 8496070 www silvannz co nz ...

Reviews: