30
Flight Calibration
Flight calibration is process not often used which is meant for resolving minor flight instability. The outdoor calibration
process allows the Hexacopter fly and determine the level position. Unless advised to it is recommended to instead use
the prior
Hexacopter Gyroscope / compass binding procedure
which is a more accurate method.
Outdoor Flight calibration procedure for Mode 2 set controllers
1.
First power on the Controller then power connect the Hexacopter 4S
flight battery.
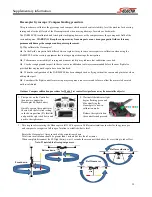
Quickly operate the controller as shown with the left stick resting in
the down position (0% throttle) then push the left stick to the bottom
right and hold for 12 seconds..
The Flight controller will start up then allow the motors to armwith the
indicator light becoming solid
●●●●
pink/red colour.
Continue holding the left stick in the lower right position
3.
Calibration is complete when the indicator light changes to
blue, red and green colour
Land the Hexacopter and allow the motors to disarm to
finalise. Disconnect the Flight batter and restart
●
●
●
●
●
●
2.
After 12 Seconds the indicator light begins flashing green
and blue signifying the Hexacopter is now in calibration
mode.
You can now take off and hover for calibration purposes. If
the Hexacopter drifts forward, backward, left or right you
may need to compensate with the right stick to prevent
collisions.
Supplementary information
Note:
If the Indicator Light becomes white an error has occurred. Land the Hexacopter, disconnect the 4S flight
battery, then repeat the calibration procedure.
WARNING: User’s are advised to instead use the alternative procedure for outdoor compass and gyroscope
calibration because an already unstable Hexacopter may not be safe for takeoff under flight calibration.
●
●
●
●
●
●


