INSTALLATION GUIDE | ROMAN SHADES
UPDATED
DEC
2021
3
®
Simple. Smart. Custom.
4.
PROGRAMMING AND USING YOUR REMOTE
MOTORIZED ROMAN SHADES
MOUNTING BATTERY PACK
WARNING:
DO NOT attempt to raise or lower your motorized shade with
your hands. This may cause permanent damage to the motor, and other
components in the headrail, which may not be covered under your warranty.
Your shade’s motor and remote(s) are pre-programmed at the factory,
and are ready to use once the shade is installed. Look for the tag with two
numbers on the back of each bottom rail. This indicates which channel and
remote your shade is programmed to.
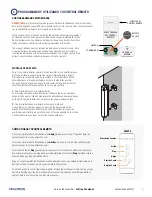
All you have to do is install the battery in the remote. Open the battery
compartment at the bottom of the remote and insert the lithium battery into
the round slot, positive side up. Slide the battery cover back onto the remote.
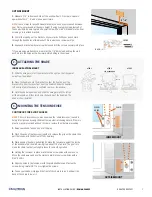
For 1) outside mount and for 2) inside mount with a shallow windowsill,
you won’t have room behind the headrail to attach the battery pack. You
can either 1) attach the battery pack to the wall near the window, or 2)
vertically inside the shallow windowsill, below the headrail, and as far back
as possible. Note: Be sure your placement of the battery pack allows for
uninterrupted operation of your shade and window.
1.
To attach battery pack for outside mount:
The most important thing to remember is to use a pencil and a level to make
sure your mounting clips are aligned when you attach them to the wall. Slide
the battery pack into place on the clips when ready.
2.
To attach battery pack for shallow inside mount:
With a pencil and a level, make sure the mounting clips are aligned vertically
when you attach them inside the windowsill, as far back as possible toward
the glass, so as not to interfere with the shade’s operation. Slide the battery
pack into place on the clips when ready.
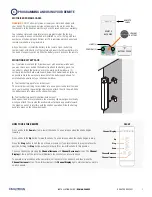
HOW TO USE THE REMOTE
Press and hold the
Down
button to lower the shade. You can release when the shade begins
lowering.
Press and hold the
Up
button to raise the shade. You can release when the shade begins raising.
Press the
Stop
button to halt the up or down movement. If you later choose to program a favorite
position, holding the
Stop
button will automatically lift or lower the shade to this position.
Choose a channel by pressing the
Channel Increase
and
Channel Decrease
buttons. The
Channel
Display
at the top of the remote will illuminate the channel you are currently on.
To operate all your shades at the same time, set the remote to Channel 5, and then press the
Channel Increase
button. This will illuminate all the
Channel Display
lights, which activates motors
on all channels.
FRONT
Channel Display
Channel Decrease
Channel Increase
Up
Stop
Down
REMOTE
BACKSIDE
BATTERY COVER
REMOTE
LABEL
LITHIUM
BATTERY
CONFIRM (C)
LIMIT (L)


