background image

9

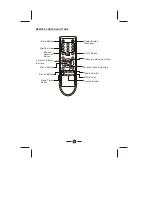
Remote Control Buttons

1.POWER (STANDBY) BUTTON (    ) 

Press this button to turn the TV on/off. 

2.MUTE BUTTON (    )

Press this button to temporarily cut off the sound output, press it again to 
restore the sound level.

3.DIGIT BUTTONS (0-9)

"

"

"

"

AIR Channel: 2-69
CATV Channel: 1-125

4. AV/TV BUTTON (AV/ TV)

Inputs can be set for TV or AV mode. Press this button to display external 
video signal such as DVD, VCR or VCD video player. AV will be displayed on
 the screen. Press this button again to switch back to TV signal from AV.

5. CHANNEL UP/DOWN BUTTONS (CH. +/-)

Press the Channel Up Button to select the channel forwards.
Press the Channel Down Button to select the chqnnel backwards.

6. VOLUME UP/DOWN BUTTONS (VOL.+/-)

Press /- Buttons to adjust sound level.

7. MENU BUTTON (MENU)

Press "MENU" button to display the OSD (On-Screen Display) menu for 
adjusting the image, sound and functions. Pressing this button again to out 
from the OSD.
Please refer to page 12-15 for the details.

8.SYS BUTTON (SYS.)

In TV mode press this button to display the system menu.
In AV mode press this button to select Auto. PAL/M. PAL/N. NTSC3.58. 
NTSC4.43 Picture mode.

If you want to select 0~99 program channel ,please press the digits buttons to
enter the program channel directly.
If your want to select 100-125 program channel, please press  --/---  button until
display  1--  on the top right screen, then enter the two latter program channel 
number.

Summary of Contents for SL2910PB

Page 1: ...29 COLOUR TELEVISION USER S MANUAL Model No SL2910PB Before operating this colour television please read these instruction completely ...

Page 2: ... Audio Output STEREO 3W 5W 2 Power Consumption AC 110 220V50 60Hz 150W Dimension 860 W x 399 D x 614 5 H mm Net Weight 41 2 kg REMOTE CONTROL Transmitting System Infrared Power Supply DC 3V 1 5 x 2 Dimension 28 W x 155 L x 45 D mm Net Weight 83 g Design and specifications are subject to change without prior notice ACCESSORY LIST l User s Manual x 1 l Remote Control Unit x 1 1 ...

Page 3: ...re of the TV when in high humidity environment 9 Do not place the TV nearwater For example a bathroom a beach etc 10 Do not obstruct the ventilation openings of the equipment with items such as newspapers tablecloth etc 11 Do not place the TV ona carpet sofa or bedding 12 Keep the TV away from heat sources such as radiators heaters stoves and other heat generating products 13 Do not place the TV i...

Page 4: ... socket located at the devices VCR DVB etc to this socket as well Only use the adaptor supplied with this product connect the AC plug to the socket at the back of the TV This TV must be operated only from the type of power source indicated on the marking label 3 1 Power Button 2 Power Indicator Remote Sensor 3 Speakers 4 Standby Button 5 AV TV Button 6 Menu Button 7 Volume Down Up Button 8 Channel...

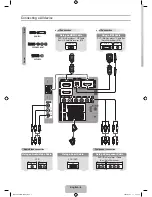
Page 5: ...y the set from one of the following sources An outdoor aerial A cable television network Plug the aerial or cable network input cable to the 75 coaxial socket on the rear of the television AV IN 1 VIDEO LEFT RIGHT VIDEO LEFT RIGHT VCR Decoder video game device Video disc player Camcorder Satellite receiver V L R V L R Front or side Audio Video Input ...

Page 6: ...etwork VIDEO LEFT RIGHT AV IN 2 AV OUT VIDEO LEFT RIGHT VCR Decoder video game device Video disc player Camcorder Satellite receiver VCR TV Amplifier V L R V L R V L R V L R L R L R YC YC LEFT RIGHT S VIDEO LEFT RIGHT YUV IN Y Cb Cr L R L R Y Cb Cr Y Cb Cr Connecting to the Audio Video Input Outputs ...

Page 7: ...lect the program number where the VCR channel is stored 4 Press the PLAY button on the VCR Audio Video insockets 1 Connect the audio video out sockets of the VCR to audio video in sockets of the set 2 Press the AV TVbutton to select AV 3 Press the PLAY button on the VCR The VCR playback picture appears on the screen Precautions when connecting to other equipments When using external equipment with...

Page 8: ...there are chargeable and non chargeable batteries Do not attempt to charge non chargeable batteries If the remote control unit is not used for a long period of time remove the batteries Precautions when using the remote control unit Do not drop the remote control unit Do not subject the remote control unit to physical shocks Keep the remote control unit dry Wetting itmay cause the unit to malfunct...

Page 9: ...V 0 3 CH RECALL Mute Button Digit Buttons Channel Selection Button Menu Button Sleep Timer Button Recall Button Power Button Standby AV TV Button Channel up down Buttons Volume up down Buttons Display Button Personal Presets Button MTS Button P P SYS System Button ...

Page 10: ...wards Press the Channel Down Button to select the chqnnel backwards 6 VOLUME UP DOWN BUTTONS VOL Press Volume Buttons to adjust sound level 7 MENU BUTTON MENU Press MENU button to display the OSD On Screen Display menu for adjusting the image sound and functions Pressing this button again to out from the OSD Please refer to page 12 15 for the details 8 SYS BUTTON SYS In TV mode press this button t...

Page 11: ...s the Sleep Timer button on your remote control to start setting the automatic sleep timer Press the button to adjust the time in increments of 15 minutes from 0 to 120 minutes When the preset time runs to 0 TV set will go into standby mode To switch off this function press this key step by step until OFF is displayed on the screen 13 MTS Multichannel Television Stereo OPTION You can select the re...

Page 12: ...e same as in TV mode except the install menu Picture Audio Option Clock TINT SHARP COLOR VOLUME LANGUAGE TREBLE BASS BALANCE CALENDAR GAME TIME OFF TIME ALARM BESPOKE TIME Preset 11 MODE CONTRAST LOTTERY BIOLOGY CLOCK SKIP ANTENNA AU TO SEARCH POSITION SURROUND ON TIME CORING BLACK STRETCH BRIGHT POSITION ...

Page 13: ...r of the screen Picture Menu Audio Menu Option Menu Clock Menu Preset Menu Exit You can select BRIGHT CONTRAST COLOR SHARP TINT CORING and BLACK STRETCH Option item by PROG Buttons and adjust the item which you select by VOL Buttons Picture menu BRIGHT 60 CONTRAST 80 COLOR 55 SHARP 50 TINT CORING ON BLACK STRETCH ON PICTURE 35 AUDIO VOLUME 02 TREBLE 50 BASS 50 BALANCE 00 MODE MEMORY SURROUND OFF 1...

Page 14: ...ring the game press VOL and VOL to shift the figure from left to right and vice versa When you start the game the color of the figure is green If you catch the snowflake thefigure will turn into white and the movement of the figure will slow down However the figure can be escaped from this state by receiving the umbrella If you catch a bomb the figure will turn to red and the game will over If you...

Page 15: ... numbers drawn for example 123 or 321 four coins will be received You will get five coins when three numbers are the same 4 LOTTERY Option Press the VOL button to enter into the lottery Press PROG Or PROG buttonto choose options The option chosen will have an arrowhead to instruct and will be highlighted in red Press VOL or VOL button to change the option of Range and Number values The number of R...

Page 16: ...The program selected by user which can switch automatically at the BESPOKE TIME CLOCK TIME ON TIME ALARM BESPOKE TIME POSITION OFF TIME _ _ _ _ _ _ _ _ _ _ _ _ _ _ _ _ _ _ _ _ PRESET POSITION 255 SKIP ON ANTENNA AUTO SEARCH 1 POSITION In this item you can store the channel number which are watching and change the channel number by VOL Buttons or number keys 2 SKIP You can set ON by VOL Buttons if ...

Page 17: ...rom automobiles trains high voltage transmission lines neon signs or another sources of interference Try redirecting or relocating your antenna to reduce the affects of the interference Change channels to confirm if the symptom is still present Try another channel Check antenna connections If using VCR check TV VCR button Adjust fine tuning control Probably local interference such as an appliance ...

Page 18: ...ction height or positionof the antenna Reflections from building or mountains might cause this phenomenon A highly directional antenna may improve the reception Check whether all the picture adjustments have been properly performed Enter into the Picture mode inside the menu to select a different picture set up Remote Control does not operate The picture is doubled or tripled GHOST Degraded colour...

Reviews: