background image

LD200 Manual 

Selectronic Australia


Getting Started Quickly 

If you want to get powered up quickly here are the 10 simple steps. 
1.


Familiarise yourself with the details in the first 6 pages on this manual. 

2.


Unpack the LD200 from the packaging. 

3.


Check unit for any damage that may have resulted during transport, if any 
damage is evident report this to your supplier immediately. 

4.


Make sure the LD200 ON/OFF switch (8) is in the off position. 

5.


Connect battery positive wire (red) (6) to battery positive or battery fuse. 

6.


Connect battery neg. wire (black) (7) to battery negative or battery fuse. 

7.


Plug a 230  - 240V appliance into inverter front power point (4) but do 
not switch on. 

8.


Turn ON/OFF switch (8) to ON. 

9.


LED (1) will illuminate. If no LEDs light, check for correct connection to 
battery. 

10.


You’re away. 


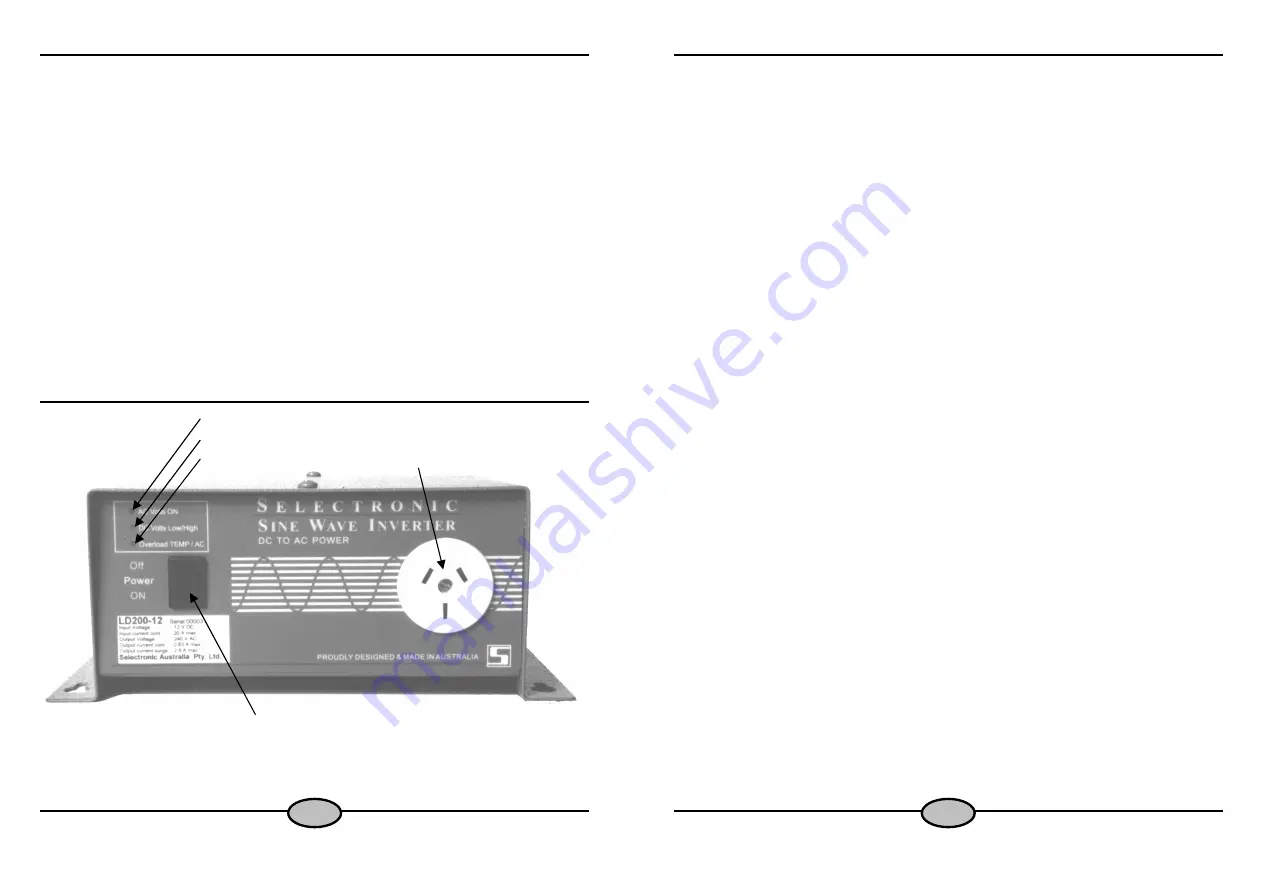
Parts Identification. 


LED (1) 


LED (2) 


LED (3) 


Socket Outlet (4) 


ON/OFF Switch (8) 

Positive (Red) Battery lead (6) can be viewed from the rear. 
Negative (Black) Battery Lead (7) can be viewed from the rear. 

LD200 Manual 

Selectronic Australia


Operation 

Three LEDs are provided on the front panel to indicate the operating Status 
of the LD200 Inverter. 

STATUS indicator LED’s 

LED 1, “ON”

. Indicates that the inverter is supplying power to the load.  

LED 2, DC Volts Low / DC Volts High.


“Flashing”

 If the inverter shuts down due to low battery voltage ( the battery 

is flat) then LED 2 will flash. Charge the battery by starting the vehicle or use 
a battery charger. When the battery is charged the battery voltage will rise, 
LED 2 will turn OFF and the inverter  re-activate. 

“Permanently ON” 

If the inverter shuts down due to high battery voltage 

then LED  2 will stay ON. When the battery voltage is reduced LED 2 will 
turn OFF and the inverter  re-activate. 

LED 3, Over temperature / AC Overload. 

“Flashing”

 If the inverter shuts down due to internal components getting too 

hot, then LED 3 will FLASH, and will  FLASH until the temperature has 
dropped to a safe level. LED 3 will then turn OFF and the inverter re-
activate. 


If  LED 3 is FLASHING regularly, either reduce the amount of load on 
the inverter or, if possible, move the inverter to a cooler location. 


“Permanently ON” 

If the inverter shuts down due to too much AC load 

being drawn from it then LED 3 will come ON. The inverter will remain in 
this condition for 1 minute after the AC load has been decreased to a safe 
level. 


If the inverter remains in this overload condition beyond one minute, 
switch 8 (ON /OFF Switch ) should be turned OFF and then back ON to 
re-activate the inverter. 


Summary of Contents for LD200-12

Page 1: ...LECTRONIC A S LD200 12 Operating Manual Serial No _____________________________ Purchase Date ______________ Note Your 2 Year Warranty can only be valid once your warranty card is completed and returned to Selectronic Australia USTRALIA ELECTRONIC A S ...

Page 2: ...nd Pointers Examples LD200 Manual Selectronic Australia 13 Selectronic Authorised Service Network Selectronic Australia Suite 5 20 Fletcher Road Mooroolbark Victoria 3138 Australia Ph 61 3 9727 6600 Fax 61 3 9727 6601 service selectronic com au Burley TV Service Rainbow Power Company 278 Edmondson Ave 1 Alternative Way Austral Nimbin NSW 2171 NSW 2480 Australia Australia Ph 02 9606 0279 Ph 02 6689...

Page 3: ...C 10 Amp Single Pole Powder Coated Zinc Steel LD200 Manual Selectronic Australia 1 Introduction Thank you for choosing to purchase the Selectronic LD200 True Sine Wave Inverter Many hours of Research and Development have gone into the LD200 to ensure this inverter provides you with many years of reliable service Warranty Card It is imperative that you complete your warranty card NOW Your LD200 is ...

Page 4: ...inverter is as lethal as mains electricity LD200 Manual Selectronic Australia 11 Product Warranty Conditions Warranty Selectronic Australia Pty Ltd warrants your inverter to be free from defects in materials and workmanship under normal use and service for an initial period of two 2 years Defective parts will be replaced or repaired free of charge within this period Conditions This warranty is app...

Page 5: ...battery clips the LD200 can be clipped directly to a vehicle battery When using battery clips ensure they have a tight grip around the battery post Wherever possible battery connections should be bolted If connecting the LD200 through a cigarette lighter socket the maximum power output of the LD200 will be severely restricted this practice should be avoided Check with your supplier or installer if...

Page 6: ...24 Volts 100 Ah This would not suit your 12 Volt LD200 LD200 Manual Selectronic Australia 9 3 Once a fortnight or as directed in your battery manufacturer check the specific gravity SG of each battery cell using a hydrometer to ensure that all cells are performing correctly and are properly charged Any serious imbalance should be reported to your system designer in case remedial action needs to be...

Page 7: ...bank Unbolt the stainless steel bolts and nuts of any corroded connections and thoroughly clean the joint with a wire brush or file taking extreme care not to short circuit any battery cells with any tools Re assemble and smear a small amount of Vaseline or similar grease over the surface of the joint to slow down any future corrosion LD200 Manual Selectronic Australia 5 Where batteries are joined...

Page 8: ...tor LED s LED 1 ON Indicates that the inverter is supplying power to the load LED 2 DC Volts Low DC Volts High Flashing If the inverter shuts down due to low battery voltage the battery is flat then LED 2 will flash Charge the battery by starting the vehicle or use a battery charger When the battery is charged the battery voltage will rise LED 2 will turn OFF and the inverter re activate Permanent...

Reviews: