background image

LD700-24 Manual 


Selectronic Australia


12 

Once  a  fortnight  or  as  directed  in  your  battery  manufacturer,  check  the 
specific gravity (SG) of each battery cell using a hydrometer, to ensure that 
all  cells  are  performing  correctly  and  are  properly  charged.  Any  serious 
imbalance  should  be  reported  to  your  system  designer  in  case  remedial 
action needs to be taken. 
 

Handy Hints 


It  is  very  important  that  you  become  familiar  with  the 
functioning of your inverter. From a distance, it is not always 
easy to know what if the inverter is On or in Sleep mode. An 
easy way to determine this is to plug a small child's night-light 
(neon type) into a power point that is easily visible, or replace 
this power point with a safety type with a neon indicator. This 
will  indicate  the  inverter's  operation  by  flashing  when  the 
inverter  is  in  SLEEP  mode  and  remaining  ON  when  the 
inverter is brought ON by a load. 


Summary of Contents for LD700-24

Page 1: ...700 24 Operating Manual Serial No _____________________________ Purchase Date ______________ Note Your warranty can only be valid once your warranty card is completed and returned to Selectronic Australia ...

Page 2: ...ion 6 Operation 7 STATUS Indicators 7 Demand Start Setting 9 Low Voltage Shutdown Setting 10 Maintenance 11 Inverter 11 Batteries 11 Handy Hint 12 Radio Frequency Interference 13 Fault Finding 14 Product Warranty Conditions 15 Specifications 16 Selectronic Service Network Back Cover Legend for Symbols Warnings and electrician s notes Hints and Pointers Examples ...

Page 3: ...rade practices act of your state or territory Returning you completed warranty card will enable us to register your warranty and avoid any possible delays should service be required If you have any comments about our product that will not fit on the warranty card please feel free to drop us a line Yes constructive criticism will also be welcome Installation 200mm 200mm 200mm LD700 24 Inverter Fron...

Page 4: ...motor start type is recommended See your system designer for details Warning As a matter of safety Selectronic strongly recommend that all fixed installations be designed and installed by appropriately qualified person The Solar Energy Industries Association in your state or territory can provide names of accredited system designers and installers All AC wiring MUST be carried out by an accredited...

Page 5: ...ll be severely restricted this practice should be avoided Check with your supplier or installer if you are unsure Do not use alligator clips in a moving vehicle Auxiliary Battery Earth to chassis LD700 24 Inverter Start Battery Earth to chassis Isolator Vehicle Alternator By incorporating an auxiliary battery in the manner above the starting battery should remain charged for vehicle starting see y...

Page 6: ...our rate This is how a deep cycle or storage battery would normally be rated 100Ah 100hr this means that when this battery is discharged over a period of 100 hours the battery has a capacity of 100Ah This in theory means 1 Amp for 100 hours although this would in practice result in a totally discharged battery that may not then recover To achieve maximum performance from your LD700 24 you must hav...

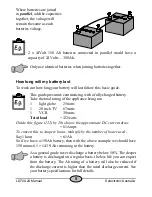
Page 7: ...the appliance being run 1 light globe 25watts 1 20 inch TV 67watts 1 VCR 30watts Total load 122watts Divide this figure 122 by 20 to know the approximate DC current draw 6 1Amps To convert this to Ampere hours multiply by the number of hours used Say 1 hour 6 1Ah So if we have a 150Ah battery then with the above example we should have 150 minus 6 1 143 9 Ah remaining in the battery As a general gu...

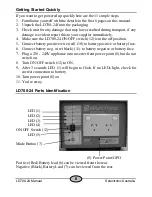
Page 8: ...off position 5 Connect battery positive wire red 10 to battery positive or battery fuse 6 Connect battery neg wire black 11 to battery negative or battery fuse 7 Plug a 230 240V appliance into inverter front power point 8 but do not switch on 8 Turn ON OFF switch 12 to ON 9 After 3 seconds LED 1 will begin to flash If no LEDs light check for correct connection to battery 10 Turn power point 8 on 1...

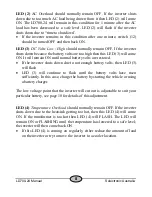
Page 9: ...adjustments to be made LED 1 Flashing indicated the LD700 24 is in Demand Start mode this indicates that no power is being drawn from the inverter so it has gone to SLEEP to save power LED 1 Stays ON the inverter has been commanded to provide power to the load e g a light switch has been turned on so it has gone from SLEEP mode to ON Once the load has been removed e g the light switch is turned of...

Page 10: ...lts are restored If the inverter shuts down due to not enough battery volts then LED 3 will flash LED 3 will continue to flash until the battery volts have risen sufficiently In this case charge the battery by starting the vehicle or using a battery charger The low voltage point that the inverter will cut out is adjustable to suit your particular battery see page 10 for details of this adjustment ...

Page 11: ...de button 7 down until LED 5 comes ON approximately 1 second indicating you are ready to adjust this setting The LD700 24 will leave the factory with a setting of 4 watts Now press the Mode button 7 until the desired value is sought LEDs 1 4 will return to Status after 20 seconds Demand Start Watts LED 1 LED 2 LED 3 LED 4 4 Watts 5 Watts 6 Watts 7 Watts Slow Flash Medium Flash Fast Flash ON ON ON ...

Page 12: ...re ready to adjust this setting Now press the Mode button 7 until the desired value is sought LEDs 1 4 will return to Status after 20 seconds Low Volts Cut out LED 1 LED 2 LED 3 LED 4 20 0 Volts 20 2 Volts 20 4 Volts 20 6 Volts 20 8 Volts Slow Flash Medium Flash Fast Flash Fastest Flash ON ON ON ON ON 21 0 Volts 21 2 Volts 21 4 Volts 21 6 Volts 21 8 Volts Slow Flash Medium Flash Fast Flash Fastest...

Page 13: ... manufacturers recommended maintenance Safety Hint When working on batteries of such high capacity it is essential that you wear protective clothing some form of eye protection and rubber soled work boots Please regard your batteries with a great deal of caution and if in any doubt entrust this work to your supplier installer 2 Check that the stainless steel inter connecting bolts are tight and ha...

Page 14: ...ds to be taken Handy Hints It is very important that you become familiar with the functioning of your inverter From a distance it is not always easy to know what if the inverter is On or in Sleep mode An easy way to determine this is to plug a small child s night light neon type into a power point that is easily visible or replace this power point with a safety type with a neon indicator This will...

Page 15: ...o the home if at all possible If this cannot be avoided run DC and AC in separate conduits separated by as much distance as practicable All DC wiring should also be kept as short as possible Connect battery negative to earth AM radios should be powered from their own self contained batteries and kept as far away as possible from AC or DC wiring within walls Make sure that your AM radio has maximum...

Page 16: ...epresent a small load despite being switched off at the appliance Check again to make sure that there are no appliances left ON the sequentially switch off appliances at the wall and by watching your night light as described in Handy Hint check to see if the LD700 24 returns to pulsing SLEEP mode after a 10 second delay Once you have found the offending appliance increase the sensitivity of the De...

Page 17: ...aveling time incurred Unless otherwise specified to the purchaser the benefits conferred by this voluntary warranty are additional to all other conditions warranties guarantees rights and remedies expressed or implied by the Trade Practices Act in your state or territory All installation and user conditions as set down in the instruction manual must be strictly adhered to failure to do so may void...

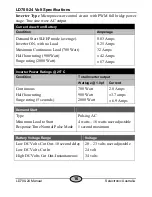
Page 18: ...ng 2000 Watt 0 03 Amps 0 25 Amps 32 Amps 42 Amps 87 Amps Inverter Power Ratings 25º C Condition Total Inverter output Wattage 1 0pf Current Continuous Half hour rating Surge rating 5 seconds 700 Watt 900 Watt 2000 Watt 2 8 Amps 3 7 amps 6 9 Amps Demand Start Type Minimum Load to Start Response Time Normal Pulse Mode Pulsing AC 4 watts 16 watts user adjustable 1 second maximum Battery Voltage Range...

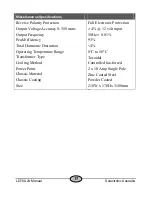
Page 19: ... Frequency Peak Efficiency Total Harmonic Distortion Operating Temperature Range Transformer Type Cooling Method Power Point Chassis Material Chassis Coating Size Full Electronic Protection 4 12 volt input 50Hz 0 01 93 4 0 C to 50º C Toroidal Controlled fan forced 2 x 10 Amp Single Pole Zinc Coated Steel Powder Coated 210W x 170H x 3100mm D ...

Page 20: ...Nimbin NSW 2171 NSW 2480 Australia Australia Ph 02 9606 0279 Ph 02 6689 1430 Fax 02 6689 1109 Solar Inverter Services Reid Technology 13 Thirteenth Ave Unit D 15 17 Saturn Place Sawtell North Harbour NSW Auckland 1330 2452 New Zealand Ph 02 66581733 Ph 9 489 8100 Fax 9 489 8585 psands reidtechnology co nz Suite 5 20 Fletcher Road Mooroolbark Victoria 3138 Australia Phone 61 3 9727 6600 Fax 61 3 97...

Reviews: