background image

Summary of Contents for SPPRO 2i Series

Page 1: ......

Page 2: ...Selectronic Australia 2023 ...

Page 3: ...em Battery longevity is paramount A combination of battery protection and the best charging methods are essential Monitoring configuration software should be user friendly with intuitive at a glance menu clarity The SP PRO has been designed with these and many other criteria in mind In addition to power conversion the SP PRO controls the operation of the entire energy system ensuring all sources o...

Page 4: ...ding a Backup Generator Solar Hybrid 29 Adding a Generator Off Grid Only 30 Communications 31 Communications Port Functions 31 Select live Remote Monitoring 32 SP PRO Ethernet Adaptor 32 Connecting to the Internet 32 Configure with SP LINK 33 Overview 33 Configuring the SP PRO for all System Configurations 33 Viewing Firmware and Setting Region 34 Commissioning 35 Introduction 35 Diagnostics Durin...

Page 5: ...t warranties and terms used in this Manual Installation Contains information relevant to the installers from unpacking the unit to configuring the settings of the SP PRO using SP LINK interface software Also see the SP LINK Manual contained in the SP LINK software for configuration settings and monitoring details Operation Includes information relevant to the user and covers the day to day operati...

Page 6: ... lithium iron phosphate LiFePO4 Managed battery Where the Battery Management System BMS communicates with the SP PRO Off Grid A battery based power system that is remote from the electricity grid Photovoltaic PV Conversion of light into electricity Powerchain A method for allowing the integration of up to four SP PROs in a single phase power system or four SP PROs per phase in a multi phase power ...

Page 7: ...ERT solar inverter Please note that any active export power comes from the AS NZS 4777 2 2020 compliant SCERT solar inverter and that the SP PRO does not export active power to the grid as per the requirements of AS NZS 4777 2 2020 appendix M Solar Hybrid Support and Grid Feed Systems Solar Hybrid is only applicable to AS NZS 4777 2 2020 compliant SP PRO models SPMC480 AU SPMC481 AU SPMC482 AU SPL...

Page 8: ...d reduce generator running costs When the generator is running the SP PRO will use the generator to power the site Load while using any additional generator capacity to charge the batteries When the site Loads are greater than the generator s output the SP PRO will add its power to the generator When the site Loads are reduced the SP PRO will return to battery charging The above operation happens ...

Page 9: ...quirements All DC wiring must be carried out by a suitably qualified person who is experienced with DC electrical circuits and who must understand high current low voltage circuits To ensure an efficient system installation cable sizing and voltage drop must be understood and the recommendations within this manual followed Selectronic Australia shall have no obligation as to any equipment which ha...

Page 10: ...ate safety isolation procedures Inverter may start automatically The SP PRO automatically starts and or restarts and may restore power at any time If a fault or overload is detected the SP PRO will shut down and may automatically attempt to restart at varying intervals of up to several hours Backup Generator may start automatically The SP PRO automatically starts and or restarts a backup generator...

Page 11: ...ding or enclosure from direct rain sun wind blown dust fungus and radiation to the night sky The SP PRO must be installed in a dry environment Pollution Degree 2 The SP PRO is designed to operate in a pollution degree 2 environment Normally only non conductive pollution occurs with occasional temporary conduction due to condensation expected Temperature The SP PRO is designed for an ambient operat...

Page 12: ...om top bottom and sides Minimum 150mm between each SP PRO or SP PRO and any solar inverter or solar controllers Installing in a covered location away from direct rain The SP PRO has an environmental rating of IP43 which makes it unsuitable for water spray that is greater than 60 degrees from the vertical or greater than 0 7 litres per minute Installing in a location shaded from direct sunlight Ins...

Page 13: ...solid timber brick masonry or other load bearing wall Do not mount directly to plaster Max temperature is ambient 30 C max weight is 45kg The display of the SP PRO should be at eye level There should be no obstructions to the clear passage of air Use the six M8 holes to mount the bracket Any wiring via the rear gland plate attached to mounting bracket can be wired in before mounting the SP PRO Ens...

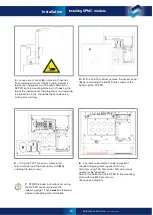
Page 14: ... remove the access cover A by unscrewing the two M5 Torx screws at the bottom of the SP PRO 5 Using the T20 Torx driver remove the terminal cover and the expansion card B by undoing the two screws 6 The lower gland plate can be removed if required to give greater access to wiring terminals using T25 Torx driver NB side screws need only be loosened Secure the bottom of the SP PRO to the mounting pl...

Page 15: ...is will likely void warranty b Installation of the included battery temperature sensor in non managed battery systems is imperative for correct and accurate charging Where a managed battery is installed the SP PRO reads the battery temperature from the battery s BMS The temperature sensor should remain connected to the expansion card and remain coiled up in the SP PRO Installing SPMC models The re...

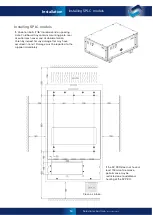
Page 16: ...te Cardboard tray contains mounting plate rear air outlet mesh cover and all documentation Carefully inspect for any damage that may have occurred in transit Damage must be reported to the supplier immediately If the SP PRO does not have at least 150mm of clearance performance may be restricted due to additional heating of the SP PRO Clean air intake ...

Page 17: ...ws at the bottom of the SP PRO Any wiring via the rear gland plate attached to mounting bracket can be roughed in before mounting the SP PRO 3 See diagram on previous page Choose a suitable weight bearing and temperature resistant surface to install the mounting plate Mounting must be to solid timber studs solid timber brick masonry or other load bearing wall Do not mount directly to plaster Max t...

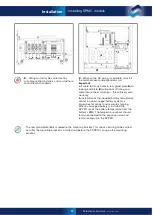
Page 18: ...y temperature sensor is imperative for correct and accurate battery charging Where a managed battery is installed the temperature sensor should remain connected to the expansion card and remain coiled up in the SP PRO Verify all connections are tight and have correct polarity Installing SPLC models 8 Wiring can only be carried out by suitably qualified installers and must adhere to all relevant st...

Page 19: ...e installation using three SPMC482 inverters the minimum battery cable size with a length of 2m 5m is 3 x 70mm2 or equivalent Failure to follow cable size recommendations will reduce inverter performance to the published specifications due to excessive voltage drops Battery Sense pre charge cable must be robust with solid insulation Do not use CAT5 or equivalent cable Battery Fusing Circuit Breake...

Page 20: ... Copper wiring must be used throughout Observe polarity of all battery wiring Reverse battery polarity will cause irreversible damage The SPLC1200 and SPLC1202 models do not contain an internal fuse or DC breaker The DC wiring must be fitted with appropriate fusing or circuit breakers Any fuse or circuit breaker must be located in a user accessible position and be in close proximity to the battery...

Page 21: ...ery positive will short circuit the battery bank It is recommended that both these wires be fused The polarity of these shunt sense leads is not important if they are configured to either Load or any of the input selections such as solar however polarity is important when using the shunt in dual mode that is where the shunt is used for both input and output measurement to obtain a net result In du...

Page 22: ...hroughout The SP PRO does not contain internal circuit breakers or fuses The AC wiring must be fitted with appropriate fusing or circuit breakers The AC cabling should be sized according to maximum demand through consumed by the AC Load and simultaneously consumed by consumed by the charging of batteries the SP PRO The SP PRO is fitted with terminals that are suitable for accepting up to 35mm2 50m...

Page 23: ...g currents are expected e g large motor loads a D curve circuit breaker CB may be required Residual Current Device RCD Type Recommendation The SP PRO produces a low distortion sine wave output via 50 60Hz isolation transformer This topology ensures that the output is sinusoidal and that there is no DC component associated with the SP PRO AC supply Standard type AC RCDs are suitable for use with an...

Page 24: ...stalled control wiring should be fed up through the appropriate gland and terminated to the SP PRO Expansion Card The minimum required is one pair of wires for a generator run signal which must be wired to one of the four relay outputs CAT5 type cabling or any multi conductor multi strand cable is suitable for all control wiring The Expansion Card can be plugged in and out of the SP PRO for ease o...

Page 25: ...o correct polarity tightness and that no cable insulation is caught in the terminals Give each cable a firm tug to ensure it is securely fitted When everything is secure attach the terminal cover plate and insert and secure the Expansion Card For SPMC1201 SPLC1200 SPLC1202 models Protective cover must be installed on the Expansion Card Close the Battery Sense pre charge circuit breaker fuses and w...

Page 26: ...anaged batteries Managed AC Coupled Preparation For full installation details see the following documents ABB UNO SCERT Managed AC Coupling IN0053 SP PRO ABB UNO Managed AC Coupling Fronius SCERT Managed AC Coupling IN0049 Installing a Fronius SCERT in a Managed AC Coupled system The SP LINK Site Configuration Wizard on page 2 will assist in the configuration of a Managed AC Coupled system Downloa...

Page 27: ...Solar Hybrid system with an existing grid connected PV system that is not an SCERT generic solar inverter then the generic inverter is normally connected to the grid side of the system see diagram below The generic inverter may be connected to the Load side of the SP PRO when the AC output of the generic inverter is less than the continuous rating of the SP PRO and the combined AC output of both t...

Page 28: ...ing Solar Power will not display in Select live monitoring battery state of charge will be correct Using generic AC Coupling AC Load data within Select live monitoring will not be accurate during the sunshine hours This will have no effect on battery state of charge The SP PRO will not export active power to the grid as per the requirements of AS NZS 4777 2 2200 appendix M When designing a generic...

Page 29: ...ny DC Coupled charging sources to the grid as per the requirements of AS NZS 4777 2 2200 appendix M DC Coupling cannot be used with a managed battery system Contact Selectronic for further details Failure to install a current shunt or charge stage linking will reduce the performance and result in non optimal operation of the system preventing accurate state of charge control or tracking For more d...

Page 30: ...ent protection Digital outputs x3 Maximum control voltage 60VDC Maximum control current 5mADC Analogue Inputs The 24V and 48V SP PRO inverters have two analogue inputs that are logged and that can be used to control a digital or relay output based on set input voltages Their logged data is included in the downloadable Performance Data download Analogue inputs are excellent for a pyranometer or ane...

Page 31: ...Generator Fault Input When active will either stop the generator or prevent it from starting Initial Stage Input Causes the battery charger in the SP PRO to drop to the Initial Stage Bulk Stage Input Causes the battery charger in the SP PRO to drop to the Bulk Stage Absorb Stage Input Causes the battery charger in the SP PRO to drop to the Absorb Stage Float Stage Input Causes the battery charger ...

Page 32: ...voltage reaches its charge target External AC Contactor Control Output Becomes active when the AC Source contactor opens Used to drive an external AC Source contactor or as an AC Source failure output AC Source in Tolerance Output Output becomes active when the AC Source voltage and frequency are in tolerance High Battery Alert Output Becomes active when the battery voltage reaches the Hi Battery ...

Page 33: ... PRO per phase With an external contactor transfer currents of up to 1 000A or 1 000A per phase are possible The diagrams below show the wiring for an external contactor in a single phase configuration and three phase configuration The 12V supply on the SP PRO Communications Card may be used as the relay supply when a relay with a 12V coil is used For more detailed information please see TN0057 SP...

Page 34: ...erator Backup kit is not required when adding a generator to an Off Grid system Adding a Generator Off Grid Only No extra hardware is required when adding a generator to an Off Grid system It is strongly recommended that a generator be incorporated in an Off Grid system to ensure availability of supply under unexpected conditions The SP PRO may be configured to automatically control a generator in...

Page 35: ...RS232 DB9 port or the Internal RS232 port RJ45 Decide which connection is most convenient for your installation then configure the SP PRO accordingly The default configuration is the External RS232 port DB9 See Appendix A Specifications for RS232 pinouts USB B Port USB type B Provides USB communications with the Windows computer running SP LINK via the supplied USB cable SP LINK software is free a...

Page 36: ...r access which can be turned on and off as required For more information go to select live SP PRO Ethernet Adaptor Connecting to a LAN Using the optional Ethernet Adaptor stock code 005081 the SP PRO can be connected into a Local Area Network LAN Any Windows computer that is running SP LINK and is connected to the same LAN can have access to the SP PRO For more info see IN0031 SP PRO Ethernet Adap...

Page 37: ...ng and running the latest version of SP LINK all standard system configurations can be quickly and easily created and configured into the SP PRO Simply run the Site Configuration Wizard enter in the system details and SP LINK will validate the combination of system components and create a site file with a configuration for the SP PRO Next add any custom functions to the configuration settings save...

Page 38: ...irmware version in the Communications Card within the SP PRO To view and set the region and grid interface settings Click Configuration Settings Get SP PRO s Configuration To view the connect and disconnect voltage and frequency limits click Configuration Settings AC Source AC Input To view the region setting and the grid voltage power reduction settings click Configuration Settings AC Source Powe...

Page 39: ...numbers and serial numbers Model Serial Check the physical location of the SP PRO s in relation to all items listed in Preparation on page 8 Check all main battery connections are correct and tight and that insulation is not clamped in the terminal Checks include the following Battery interconnects Battery connections to battery Connections to battery fuses or CBs Connection to intermediate termin...

Page 40: ...he workers to their managers Turn off the AC Source circuit breaker Connect SP LINK to System Manager L1 Manager via a USB lead to a Windows computer running SP LINK Leave the inverters in idle Item to check Result Go to Powerchain Inverter Assignments in SP LINK and check that all the inverters in the system appear on the list Double click on each inverter serial number to ensure each inverter is...

Page 41: ...age reads correctly The External AC Source contactor has turned ON The AC Load voltage reads the same as in the Data View Now AC Source Voltage Repeat for L2 and L3 in a multi phase system Connect a Load to L1 phase only on the SP PRO Turn the site loads off to the other phases Check the Load power with an AC clamp meter Check the AC Source power in Data View Now AC Source Power L1 This should be ...

Page 42: ...ge at the battery terminals DC Inverter Voltage Midpoint Voltage where mid point is connected otherwise ignore should be half the Sense Voltage Midpoint Error should be 5 unless battery bank needs to be equalised Put a Load on the system In Data View Now in the System Manager L1 Manager read and record the Battery Current Also read and record Battery Voltage Back in Data View Technical Data read a...

Page 43: ...will be displayed Click Service Settings Reset Counters button Wait 2 minutes then read and record Link 1 see relevant Managed AC Coupled Installation note for acceptable error rate Repeat for L2 and L3 in a three phase or split phase system L1 L2 L3 For Selectronic Certified Solar inverter 2 Repeat above for 2 then read and record Link 2 see relevant Managed AC Coupled Installation note for accep...

Page 44: ... incorporating DC Coupled renewable energy the following items should be verified Common System Checks on page 35 should be completed first Refer to relevant document s referred to in DC Couple Charge Controller Preparation on page 25 and ensure the system has first been installed and commissioned according to these document s Turn on the DC supply to the SP PRO Long press the ON button so that on...

Page 45: ...h a short press on the SP PRO front panel Generator button If generator does not start then check control wiring and SP PRO configuration settings For manual start generator start the generator manually In SP LINK click Data View Now Check the AC Source Voltage and AC Source Frequency before the SP PRO syncs to the generator Record results Volts Frequency Check that the SP PRO syncs to the generat...

Page 46: ...he set limits It is normal operation for this to flicker slightly This LED is always off with an external AC Source contactor 3 AC Load When illuminated this shows the presence of AC voltage ready to supply site loads This is powered directly from the inverter AC output or AC supply Indicators 1 2 3 will operate without any DC connection to the SP PRO An external AC supply will activate the AC byp...

Page 47: ...d Immediate attention required Flashing Red Unit fault To determine specific reason for the attention indicator see in SP LINK Data View Now Attention Required 9 Battery Fuel Gauge These indicate the battery State of Charge SoC When the battery SoC is equal to the Shutdown SoC in Configuration Settings Inverter then only the bottom LED is on At 100 SoC all LEDs are green Top Indicator Flashing Red...

Page 48: ...nerator or long term grid outage To use the AC Coupled Low DC Recovery feature follow these simple steps 1 Wait until the sun is up and there is enough sunlight to charge the batteries 2 Turn off all the site loads connected to the SP PRO If this is not done then the AC Coupled Low DC Recovery mode will exit within 5 seconds 3 Long press ON button twice The SP PRO will go into AC Coupled Low DC Re...

Page 49: ...tage charge cycle Initial Bulk Absorption Float short term and long term and Equalise Shutdown on low battery voltage low battery state of charge or both Two stage battery temperature compensation of charging voltage CAN bus to interface with managed battery systems for precise and coordinated control of battery charge and discharge currents The SP PRO may be configured to use grid power or to aut...

Page 50: ...o the Initial charge voltage then holds this voltage for a set time before starting the Bulk stage When in the Initial charge phase the Initial Bulk indicator will flash Bulk The SP PRO charges at the Bulk charging current until the battery voltage rises to the Bulk charge voltage then holds this voltage for a set length of time before starting the Absorption stage In Bulk charge mode the Initial ...

Page 51: ...47 Selectronic Australia Rev 41 Dec 2022 Operation SP PRO Operation ...

Page 52: ...imit point This will also help protect the battery from overheating If temperature compensation is set to 0 0 mV C cell no temperature compensation will be applied When a Lithium battery or managed battery type is configured no temperature compensation will be applied and the temperature compensation configuration settings will be disabled The temperature compensated charge voltage target and char...

Page 53: ...ge the generator will be automatically started by the SP PRO as required to supply the Load and charge the battery bank As part of the installation the SP PRO settings are configured to automatically run the generator during a grid outage to Limit the depth of battery discharge for maximum battery life Deliver energy efficiently by supplying sustained large site loads direct from the generator Loa...

Page 54: ...average Load kWh check that this is within the system design parameters An increase in the site Loads may mean a longer generator run time or extra energy taken from the grid Solar indicates how much energy is being provided by your installed PV If this is lower than expected then there maybe an issue with your PV panels or solar controller Grid import indicates how much energy taken from the grid...

Page 55: ...aution Do not dispose of batteries in a fire The batteries may explode Caution Do not open or damage batteries Released electrolyte is harmful to the skin and eyes It may be toxic Caution A battery can present a risk of electrical shock and high short circuit current The following precautions should be observed when working on batteries Remove watches rings or other metal objects Use tools with in...

Page 56: ...r an alert Pressing this button will silence the alarm for this instance only The alarm will sound again with a new alert condition 2 Alarms Overtemp Yellow SP PRO is approaching an over temperature condition due to high site Loads high ambient temperatures or obstructed cooling air flow Red SP PRO has shut down due to an over temperature condition caused by high site Loads high ambient temperatur...

Page 57: ...ed There is a generator fault Solution Check the Generator Available signal Check the generator and clear the fault Try to start the generator manually 5 ON Steady Red Inverter shut down See Troubleshooting with SP LINK on page 53 Flashing Red Poor battery connection See solution in 3 Battery Indicator this section Slow Flashing Red Inverter is not configured and will not start Configure inverter ...

Page 58: ...if a fault is indicated go to SP LINK Data View Now Attention Required and contact the supplier for further instructions Battery Problems Batteries are very dangerous Please read the safety information provided by the battery supplier Battery does not charge properly Check that the battery charging requirements are correctly set up in the SP PRO Check that the solar regulator is correctly set up C...

Page 59: ...in Load power setting in the Generator Auto Run may need adjustment 3 The generator stops and starts many times a day The Load during late night and early morning periods is higher than expected but not high enough to keep the generator running permanently There may be multiple starts and stops as the battery becomes discharged and is partly recharged Increase the generator minimum run time to inc...

Page 60: ...tons B and inverter will reset To reset inverter and restore factory defaults press and hold buttons B as shown below All indicators will go off Whilst continuing to hold B press C to select from following options Press C once All LEDS green Reset to factory defaults Press C twice All LEDS OFF Reset without setting factory defaults Release all buttons wait 10 sec until display is stable Your reset...

Page 61: ...ronic converter systems and equipment Part 1 General C tick Australia Product Specifications Selectronic reserves the right to change specifications without notice All ratings are at 25 C and nominal battery voltage unless otherwise stated The product is specified to a maximum altitude of 2 000 metres The RS232 ports are wired as DTE with their pinouts listed in the table below Signal RS232 Port 1...

Page 62: ...t Power of the SP PRO AC transfer time no break If grid fails 0 0 03 seconds Battery charger type Temperature compensated 5 stage power factor corrected with dual stage Float Efficiency DC consumption idle 6W ON with no Load 25W 33W 26W 35W 43W 43W 89W 90W Peak efficiency all modes 95 95 95 95 5 96 96 5 97 2 97 2 10 Load 90 90 5 90 5 91 91 91 5 93 3 94 8 20 Load 92 5 93 93 94 94 94 95 8 96 8 50 Lo...

Page 63: ...attery type Any Flow battery technology is suitable provided it is approved for the intended application SP PRO charger settings must be configured to suit battery manufacturer s specifications Use the Custom Battery setting within the SP PRO SP Pro Series Specifications SPMC240 SPMC241 SPMC480 SPMC481 SPMC482 SPMC1201 SPLC1200 SPLC1202 Features Powerchain Included Connect multiple SP PROs into on...

Page 64: ...Contents Doc O10003 Part 004122 Rev 41 Dec 2022 ...

Reviews: