GENERAL
Two different types of direct vent conversion systems
are described here. One is through an existing factory
built metal chimney going through the ceiling. The other
is through the wall of an existing masonry chimney. Follow
the appropriate directions for your situation.
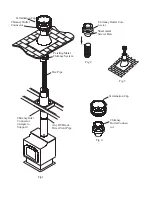
A typical direct vent conversion to a factory built metal
chimney is shown in Figure 1. The concept of direct vent
conversion is to connect an adapter to an Underwriters
Laboratories listed 4” aluminum flex pipe for direct vent
gas appliances. (Selkirk Model AFCL is an example of a
UL listed flex pipe or 4” stainless steel flex pipe for
Direct-Temp for Pellet Stoves applications. Selkirk
Model SFCL is an example of a UL listed stainless steel
flex pipe). The flex is then passed down through the center
of the existing metal chimney system.
The Chimney Inlet Connector is then attached to the bottom
of the flex pipe. Both the Outlet Connector and Inlet
Connector are attached to the existing chimney with sheet
metal screws. The appliance is then connected to the
chimney with appropriate black direct vent pipe, and an
adjustable length section.
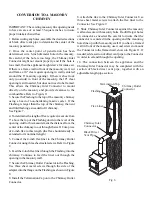
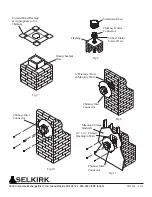
A typical conversion to an existing masonry chimney is
shown in Figure 6. For installation through the wall of an
existing masonry chimney, a Chimney Outlet Connector
and Flashing are used at the top of the masonry chimney.
The flex pipe liner is connected to the adapter and is
passed down the chimney and out through the masonry
wall. This is attached to the Chimney Inlet Connector
which in turn is attached to the masonry wall and is then
connected to the direct vent pipe leading to the appliance.
MODEL DT DIRECT VENT INSTALLATION
INSTRUCTION SUPPLEMENT
ADAPTING MODEL DT TO FACTORY BUILT AND MASONRY CHIMNEYS
CONVERSION TO A FACTORY BUILT
METAL CHIMNEY
1. Remove the existing chimney cap.
2. Measure the distance from the top end of the chimney
to the bottom of the ceiling support, add 3-inches to this
measurement, and cut a section of flex pipe to that length
(the flex should already be extended to its normal length).
3. Connect the end of the flex pipe section to the underside
of the Chimney Outlet Connector you have selected, using
three sheet metal screws. Refer to Figure 2.
4. Pass the flex pipe down through the center of the
chimney system, and center the Outlet Connector on the
top of the chimney pipe. Drill four 1/8-inch diameter holes
through the adapter, and into the chimney top. Insure
that you are in fact, drilling into the metal on the chimney.
Install the Termination Cap onto the Outlet Connector.
Refer to Figures 3 and 4.
5. Pull the flex pipe down through the ceiling support
box, until it protrudes approximately 3-inches. Connect
the flex pipe to the Chimney Inlet Connector by slipping
it into the sleeve on the top side of the Connector. Use
three sheet metal screws, to assemble these two parts.
6. Push the flex pipe back up into the ceiling support,
center the Chimney Inlet Connector, and attach it to the
support box, or decorative sleeve for double wall solid
packed pipe, with the sheet metal screws furnished. The
holes in the connector are pre-punched. Refer to Figure
5.
7. The connection between the appliance and the Chimney
Inlet Connector may be completed with sections of black
direct vent pipe, together with an adjustable length.
4DT-MCK (Masonry Chimney Conversion Kit
)
4DT-CCK (Factory-Built Chimney Conversion Kit)
DIRECT-TEMP
®
WARNING
!
Failure to follow the instructions could cause
FIRE, CARBON MONOXIDE POISONING, OR DEATH.
If
you are unsure of installation requirements, call the Phone
Number listed on the instructions or visit www.selkirkcorp.com


