11
76mm
(3”) min.
WALL BAND
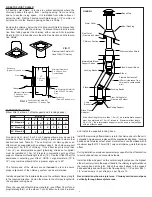
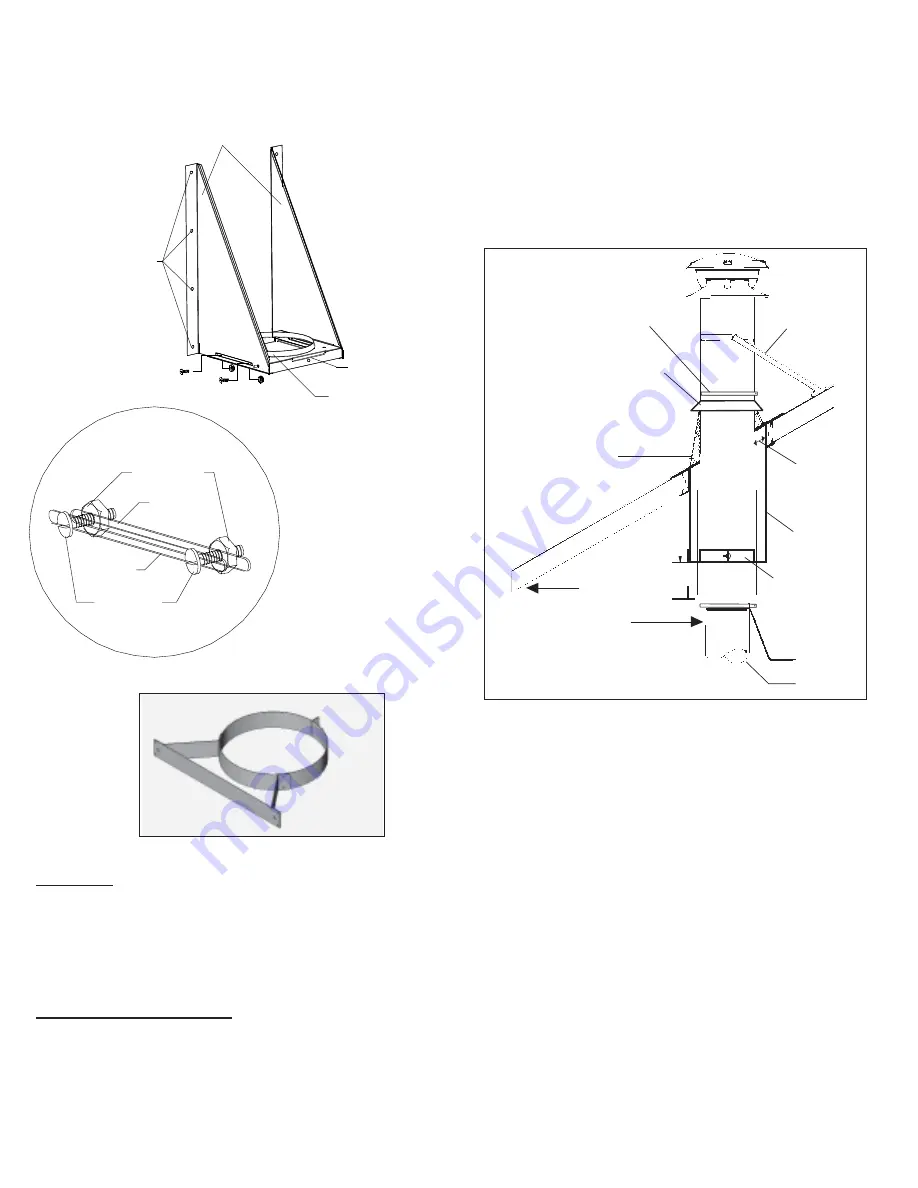
The Wall Band is used along an outside wall at 8 ft intervals for lateral
stability. Secure the Wall Band bracket to the wall using two 6d or 2”
spiral nails. For concrete walls use suitable masonry fasteners.The nut
and bolt supplied will fasten the band around the chimney.
NOTE:
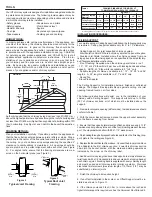
Inverting the brackets (brackets mounted above the support
plate) can be accomplished by inserting extra bolts through the oblong
slots of the support side brackets and the support plate as per Figures
21 and 22. Secure with nuts. In this position, the range of adjustability
is limited to 5” from the wall.
Nuts
Slot on
Support
Bracket
Support Brackets
Pre-Punched
Holes of Support
Bracket
Support Plate
w/ Flange Up
Slot for Tee Cap
Bracket
Slot on
Support
Plate
Bolts
FIG. 22- SLOT AREAS
WITH BOLTS AND NUTS
ASSEMBLY OF SUPPORT
BRACKET AND
SUPPORT PLATE
FIG. 21- FRONT VIEW OF
WALL SUPPORT
ASSEMBLY WITH
BRACKETS MOUNTED
ABOVE THE SUPPORT
PLATE
Wall Band
Figure 23
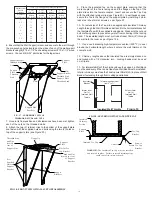
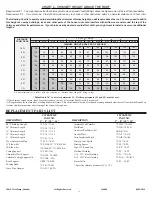
- After framing in your opening to the dimensions specified above and
in Table 1, slide the Cathedral Support Box into the joist/rafter open-
ing. Once the box is at the desired location, ensure the box is level
and plumb. Nail the box to the framing using four 2” spiral nails or
equivalent per side. The excess material sticking above the roof can
either be trimmed off before attaching the box to the framing or, after it
is installed the corners can be cut and the excess material folded
down onto the roof deck.
- Install the Support Band on a chimney length at the desiredposition
by tightening the support band with the bolt and nut. Secure the band
to the chimney outer casing by screwing four stainless steel sheet
metal screws through the support band and into the outer casing.
- Lower the chimney length down through the opening in the bottom
of the support box, so that the Support Band makes contact with the
bottom of the Support Box (see Figure 24).
-Cathedral Ceiling Support /w 4 painted ceiling trim angles
-Roof Flashing w/ Storm Collar
CATHEDRAL CEILING SUPPORT
A Cathedral Ceiling Support is available for
5” and 6” diameters chim-
ney only. For other diameters, a roof support can be used to suspend
the chimney below the roof. To complete a proper Cathedral Ceiling
Support installation, the folllowing parts may be required:
NOTE: The male coupler of the chimney length must be pointing
upwards as per the arrow on the chimney label.
- The bottom chimney length should protrude into the living space so that
proper clearances are maintained at the adapter (see Figure 24).
- The Cathedral Ceiling Support Box is manufactured to an overall
outer dimension of 12” x 12” (305mm x 305mm). Therefore, the sug-
gested framing to fit the box is 12-1/4” x 12-1/4” (311 x 311mm).
The following instructions will assist you in the installation of your
chimney with a Cathedral Ceiling Support. This support will hold up
to 30’ of chimney, of which 15’ can be suspended below the box.
Chimney joints made below the support must be secured with lock-
ing bands.
-Suitable lengths of chimney
-Stove Pipe Adapter
-Trim Collar
-Round Top
Flashing
Minimum
50mm 2”
air space
clearance
Roof
Brace Kit
Storm Collar
Locking
Band
Stove
Pipe
Adapter
Follow
Appliance
Instructions
for proper
connector
clearance
Support
Band
Cathedral
Ceiling
Support
Flue Pipe
Round Top
Figure 24
Summary of Contents for ULTRA-TEMP UT
Page 3: ...3 CERTIFICATIONLABELS ...


