Page 13
With a new chimney installation, the chimney should be inspected
at least once every 2 weeks during the heating season to deter-
mine if a creosote or soot buildup has occured. When familiar with
the appliance and chimney characteristics, the chimney should be
inspected at least once every 2 months during the heating season.
If creosote or soot has accumulated, it should be removed to
reduce the risk of a chimney fire. Depending on the rate of buildup,
as you learn what is going on in the chimney, you can adjust your
cleaning schedule.
If you have any doubts about your ability to clean the
chimney, or if the deposits are very heavy and hard to remove, call
a certified chimney sweep. Do not try to burn them off.
If chemical cleaner is used to assist in cleaning your chimney,
make sure it is a product which is non corrosive to the chimney
liner. The optimal method for cleaning a chimney is by a
mechanical brushing of the chimney in conjunction with a
complete evaluation of the system by a certified chimney sweep.
The National Fire Code of Canada states: “Every chimney flue
and flue pipe shall be inspected and cleaned annually or as
often as maybe necessary, to keep the chimney and flue pipe
free from dangerous accumulations of combustible deposits”.
CHIMNEY FIRES AND WHAT TO DO ABOUT THEM:
Your Selkirk chimney is not intended or designed for use as a
combustion or fire chamber. If the fire in your appliance has
gotten out of control, or if you suspect a chimney fire for any
reason, follow these steps:
1. Immediately close all dampers and/or air entrance to your
appliance.
2. Alert your family to the possible danger.
3. Inspect your appliance and chimney for possible fires, if in
doubt, alert your Fire Department.
4. Do not use salt or water on the fire. Salt is corrosive and water
will cause a dangerous steam explosion. You may be able to
control the fire by using ashes, sand or baking soda, since baking
soda is an ingredient used for dry chemical fire extinguishers.
5. Do not continue to use your appliance until it and your chimney
have been thoroughly inspected by a certified service technician.
6. After a chimney fire, when it is safe to do so, check internal
locations such as the attic and under the roof and keep watching
for two or three hours. There may be delayed smoldering and
subsequent ignition even if the fire inside the chimney has been
controlled.
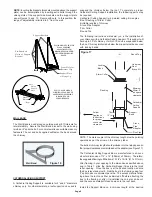
The Anchor Plate can be used for adapting the UT chimney to a
“Listed” Factory-Built Fireplace certified for use with Model UT.
Follow the installation instructions accompanying the fireplace.
NOTE: It is of utmost importance that the Anchor Plate be installed
in accordance with the manufacturers installation instructions
accompanying the “listed” Factory-Built Fireplace.
MODEL UT ANCHOR PLATE
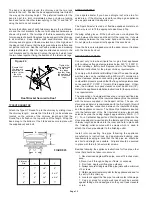
CHIMNEY OPERATION AND MAINTENANCE:
The need for chimney maintenance depends on the kind of ap-
pliance and how it is operated. Gas and oil-burning appliances
need very little, but wood-burning appliances may need a great
deal of chimney maintenance.
IMPORTANT
Burning wood produces creosote, soot, and fly ash which tend to
collect in chimney flue and on termination parts causing reduced
flow of gases through the chimney. Check top weekly for exces-
sive accumulation of these normal combustion products and clean
as necessary. If the spark arrester becomes clogged with creo-
sote, it should be cleaned or replaced.
®
www.selkirkcorp.com
Selkirk Canada Corporation
P.O. Box 526, Depot 1
Hamilton, ON L8L 7X6
Toll Free: 1.888.SELKIRK (735.5475)
Info@selkirkcanada.com
Selkirk Corporation
5030 Corporate Exchange Blvd.
Grand Rapids, MI 49512
Toll Free: 1.800.433.6341
Info@selkirkcorp.com

