Page 6
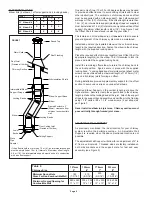
X X X X
X X X X
X X X
127mm 152mm 178mm 203mm
183
(7-3/16”)
210
(8-3/16”)
233
(9-3/16”)
259
(10-3/16”)
280 x 280
11” x 11”
305 x 305
12” x 12”
330 x 330
13” x 13”
356 x 356
14” x 14”
Table 3
Table 4
Chimney Size 5” 6” 7” 8”
Minimum Framed Opening for
Combustible Wall
Minimum Round Hole
Diam. For Non-Combustible Wall
The female end of the elbows are not
lanced
in order to ensure
proper alignment of the chimney system can be maintained.
Install and position the insulated elbow on the vertical chimney
length in the required direction. Fasten the elbow to the chimney
length with the supplied locking band.
Place the required offset chimney length(s) (see Offset Chart for
appropriate length(s)) on the elbow. Turn it clockwise to lock it in
place and install the supplied locking band.
Install the remaining offset elbow to return the chimney back to
the vertical position. Again secure in place with the supplied
locking band. *Locking bands and/or stainless steel sheet metal
screws can be utilised with a maximum length of 12.70mm (1/2”)
only on all chimney joints forming an offset.
During installation provide supplementary support for the offset
section to avoid undue stress on connected elbows.
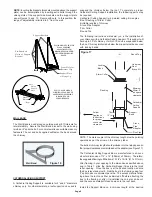
Install an Elbow Support on the vertical length just above the
highest elbow. Securely clamp the support band to the chimney
length just above the locking band at the joint. Attach the support
straps to the support band assembly and nail them to the framing
using 1-1/2” nails or #8 x 1-1/2” wood screws (2 per straps) as
per Figure 7.
Never install an elbow in a joist area. Chimney sections must
pass vertically through framed joist areas.
ELBOW INSTALLATION
Elbow Kits (2 elbows, 1 offset support and 4 locking bands).
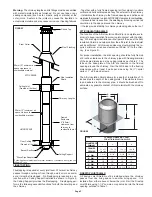
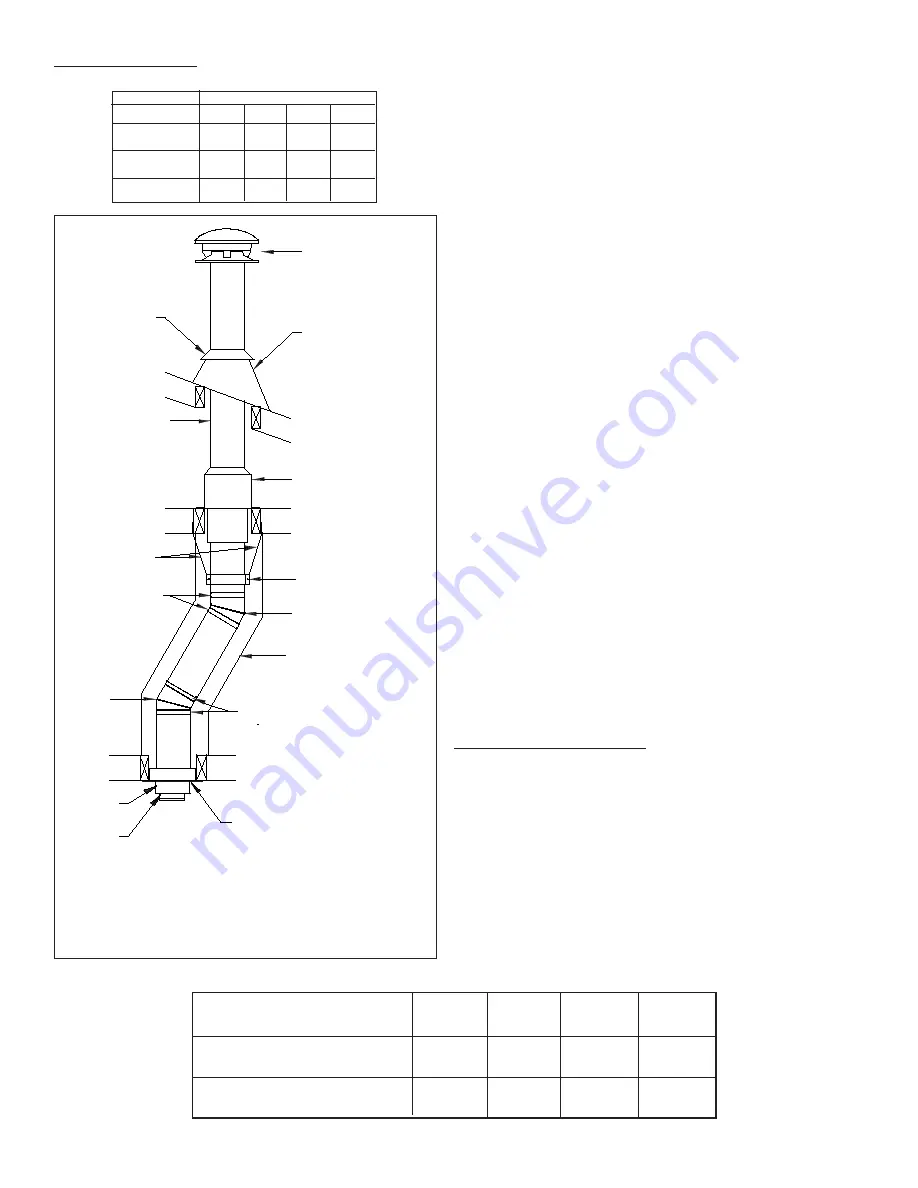
FIGURE 7
Attic Insulation Shield
Storm Collar
Elbow
Locking Bands
Intermediate/Elbow
Support Straps
Locking Bands
Elbow
Ceiling Support
Roof Flashing
If the offset length is more than 1.2m (4’), an intermediate support
must be employed at 1.2m (4’) intervals. Maximum offset length
4.8 m (16’), the intermediate support must be used in conjunction
with an offset support.
Round Top
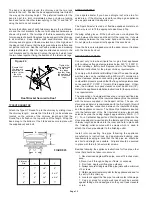
ADJUSTABLE W ALL SUPPOR T
As previously mentioned, the ideal location for your chimney
system is within the building envelope. An Adjustable Wall
Support is required when the above mentioned location is not
possible.
The adjustable Wall Support will allow for an adjustment of 2” to
6” from a vertical wall. Threaded studs are factory installed on
both side brackets and the support plate for fast and easy
assembly (see Figure 9).
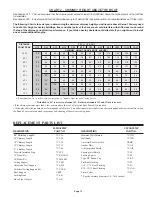
One pair only of (two) 15 or 30 or 45 degree elbows may be used
to provide an offset in order to avoid cutting of joists and to clear
other obstructions. The vertical run of chimney above an offset
must be supported with an elbow support. Each elbow support
will support 10m (30’) of chimney. If the offset length is more than
1.2m (4’), an intermediate support (plumbing straps not supplied)
must be installed at 1.2m (4’) intervals in conjunction with an offset
support. Maximum offset length is 4.8m (16’). See Figure 7 and
the Offset Chart for assistance in selecting your offset.
15° Elbow Kit
30° Elbow Kit
45° Elbow Kit
MODEL UT
Framed Enclosure 2”
(50mm) clearance from
chimney to combustible
wall
Elbow Support Band
Roof Joist
(Framed all 4 sides)
Chimney Section
Lower
Bucket
Stove
Pipe
Adapter
Floor, Ceiling Joist
(Framed all 4 sides)
5” 6” 7” 8”

