background image

Model 0200 – POP-0120 Rev 0 

508.366.1488 | www.semshred.com 


Operation


Controls 

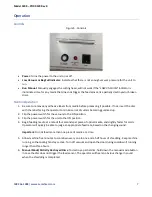
Figure 5 - Controls 


Power:

 Turns the power to the unit on or off. 


Low Vacuum or Bag Full Indicator:

 Indicates that there is not enough vacuum pressure for the unit to 

run. 


Run Manual:

 Manually engages the cutting head, will not work if the “LOW VACUUM” indicator is 

illuminated. Use for any media that does not trigger the feed sensor, like partially destroyed or broken 
discs.  

Normal Operation 

1.


Be sure to remove any adhesive labels from media before processing if possible. If not, insert the disc 
with the label facing the operator to minimize risk of cutters becoming gummed up.  

2.


Flip the power switch for the vacuum to the ON position. 

3.


Flip the power switch for the unit to the ON position.  

4.


Begin feeding media at a rate of four seconds per piece of optical media, and slightly faster for cards. 
Operator will quickly be able to judge an appropriate feed rate, based on the changing sound.  

Important:

 Do not feed more than one piece of media at a time.  

5.


Allow machine five minutes to cool down every one to one and a half hours of shredding. Keep machine 
running so the cooling fan stays active. Turn off vacuum and open the door during cooldown if running 
longer than three hours.  

6.


Manual Mode/Partially Destroyed Discs:

 To destroy a partial disc, hold down the manual mode button 

in case the disc does not trigger the feed sensor. The operator will hear an obvious change in sound 
when the shredding is completed.  


Summary of Contents for 0200 OMD

Page 1: ...SD Model 0200 OMD SSD C POP 0120 Rev 0 Created 2 27 19 ECN 00452 For sales service parts and customer support contact us SECURITY ENGINEERED MACHINERY 5 Walkup Drive Westborough MA 01581 info semshred...

Page 2: ...s referred to in this collateral SEM does not warrant that the equipment will work properly in all environments and applications and makes no warranty or representation either implied or expressed wit...

Page 3: ...nts Safety 4 Overview 4 Unpacking and Installation 5 Without Cabinet 5 With Cabinet 6 Operation 7 Controls 7 Normal Operation 7 Maintenance 8 Tools 8 Access Cutting Head 8 Cleaning 8 Lubrication 8 Cha...

Page 4: ...r ties near the unit Overview Intended Use Attractive and easy to use the Model 0200 OMD SSD has been evaluated by the NSA and meets the requirements of DIN 66399 O 6 NIST SP 800 88 Guidelines for Med...

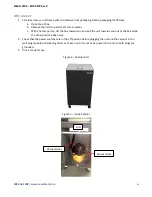
Page 5: ...o the opening in the rear of the unit See figure 1 below May use any existing vacuum provided you have a tool with a 1 1 4 round nozzle 3 Check that the power switches are in the off position before p...

Page 6: ...another person tilt the box toward you and pull the unit towards you out of the box while the other pulls the box away 2 Check that the power switches are in the off position before plugging the unit...

Page 7: ...mmed up 2 Flip the power switch for the vacuum to the ON position 3 Flip the power switch for the unit to the ON position 4 Begin feeding media at a rate of four seconds per piece of optical media and...

Page 8: ...any rogue particles inside the cabinet Every 4 6 months Vacuum or shake out any particles that have built up inside the unit Yearly or as needed Replace vacuum filter Lubrication This unit does not re...

Page 9: ...to remove the top of the cabinet Parts Service and More Description SEM PN Vacuum Bag 3 pack 300 45634417 Vacuum Filter 9034100 Replacement Fuse 10A 0200FUSE For sales service parts and customer supp...

Reviews: