background image

9

COMPRESSOR FEATURES

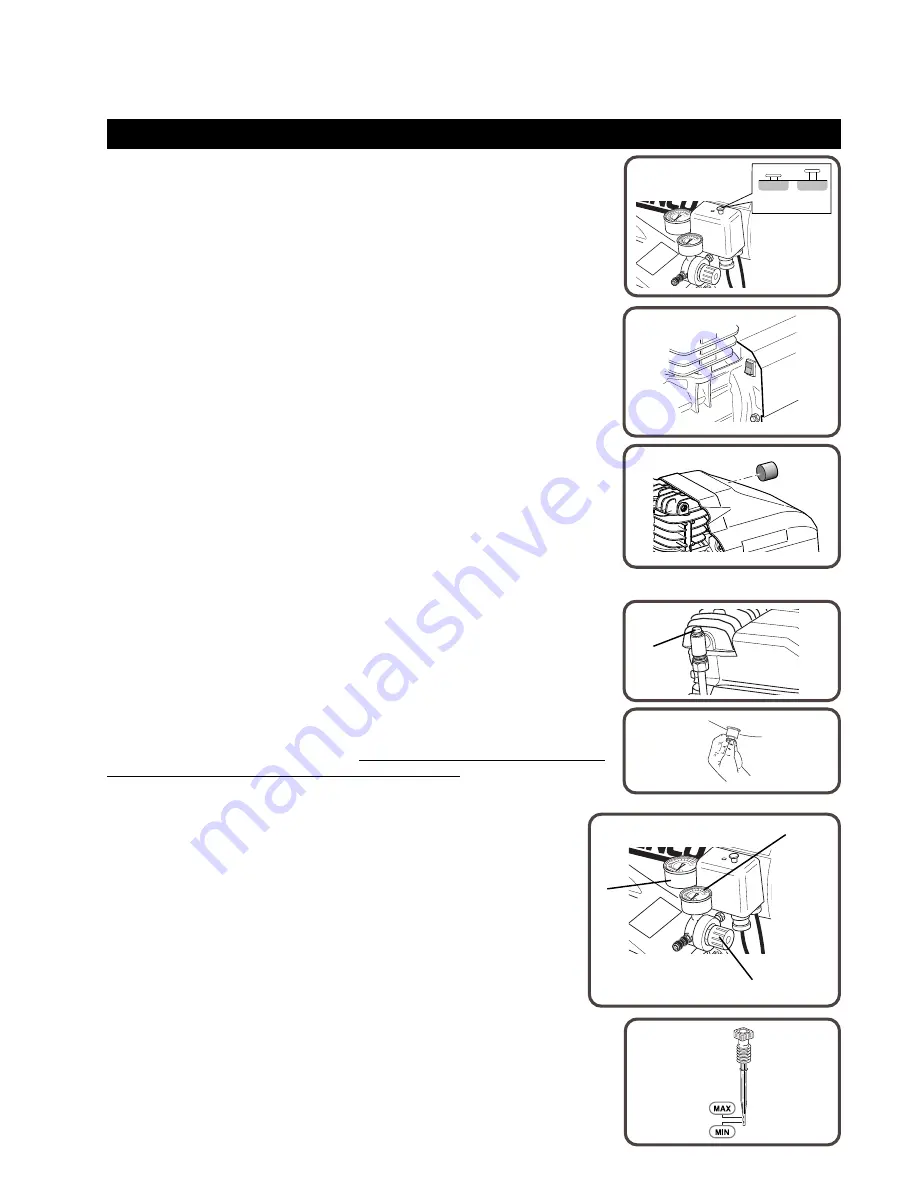
1) MOTOR/PRESSURE SWITCH: This switch is used to start or stop the air
compressor. Moving the switch to the “Auto” (On) position will provide automatic
power to the pressure switch which will allow the motor to start when the air tank
pressure is below the factory set “cut-in” pressure. When in the Start/ Stop Option,
the pressure switch stops the motor when the air tank pressure reaches the factor
set “cut out” pressure. For safety purposes, this switch also has a pressure release
valve located on the side of the switch designed to automatically release compressed
air from the air compressor pump head and its discharge line when the air compressor
reaches “cut-out” pressure or is shut off. This allows the motor to restart freely. Moving
the switch to the “Off” position will remove power from the pressure switch and stop
the air compressor.

2)  MOTOR THERMAL OVERLOAD: The electric motor has a manual thermal
overload protector. If the motor overheats for any reason, the thermal overload will
cut off power, thus preventing the motor from being damaged. Wait until the motor is
cool before pressing the thermal overload button to reset and begin working again.

3) AIR INTAKE FILTER: This filter is designed to clean air coming into the pump. To
ensure the pump continually receives a clean, cool, dry air supply this filter must
always be clean and ventilation opening free from obstructions. The filter can be
removed for cleaning by using warm, soapy water. Rinse the filter and air dry. Replace
filter when necessary.

4) AIR COMPRESSOR PUMP: To compress air, the pistons move up and down in
the cylinders. On the downstroke, air is drawn in through the air intake valves while
the exhaust valves remain closed. On the upstroke, air is compressed, the intake
valves close and compressed air is forced out through the exhaust valves, into the
discharge line, through the check valve and into the air tank.

5) SAFETY RELIEF VALVE: This valve is designed to prevent system failures by
relieving pressure from the system when the compressed air reaches a predetermined
level. The valve is preset by the manufacturer and must not be modified in any way.
To verify the valve is working properly, pull on the ring. Air pressure should escape.
When the ring is released, it will reseat.

6) AIR TANK DRAIN VALVE: The drain valve is used to remove moisture from the air
tank(s) after the air compressor is shut off. NEVER attempt to open the drain valve
when more than 10 PSI of air pressure is in the air tank!
 To open the drain valve,
turn the knob counterclockwise.

7) AIR TANK PRESSURE GAUGE: The air tank pressure gauge indicates the
reserve air pressure in the air tank (s).

8) OUTLET PRESSURE GAUGE: The outlet pressure gauge indicates the air
pressure available at the outlet side of the regulator. This pressure is controlled
by the regulator and is always less or equal to the air tank pressure.

9) PRESSURE REGULATOR: The air pressure coming from the air tank is
controlled by the regulator knob. Turn the pressure regulation knob clockwise to
increase discharge pressure, and counterclockwise to decrease discharge
pressure.

10) OIL DIPSTICK: The dipstick will register the amount of oil in the pump. Oil level
should be checked on a daily basis to ensure it does not exceed the maximum
notch or fall below the minimum notch on the dipstick

1

2

3

10

6

5

7

8

9

OFF

ON

Summary of Contents for PC 2001

Page 1: ...r the safe use of this compressor are included in this manual PC 1001 Electric Air Compressor Document FN1001 Issued 5 30 A Questions Comments call SENCO S toll free Action line 1 888 222 8144 or e ma...

Page 2: ...5 BREATHING 6 BURNS 6 FLYING OBJECTS 6 MOVING PARTS 7 NEGLIGENCE 7 AIR COMPRESSOR DAMAGE 7 COMPRESSOR FEATURES 8 PREPARATION 10 INITIAL SET UP 10 LOCATION 10 ELECTRICAL 10 OPERATION 11 PRE START CHECK...

Page 3: ...ot avoided WILL result in death or serious injury WARNING Indicates a potentially hazardous situation which if not avoided COULD result in death or serious injury CAUTION Indicates a potentially hazar...

Page 4: ...electrical cords to lay in water or in such a position where water could come in contact with them Do not touch plug with wet hands Do not pull on the electrical cord to disconnect from the outlet Nev...

Page 5: ...ble dust gases or other combustible materials If spraying flammable material locate the air compressor at least 20 feet away from the spray area An additional hose may be required Never place objects...

Page 6: ...from the air compressor either directly or from a breathing device connected to the air compressor Operate air compressor only in a well ventilated area Follow all safety instructions provided with t...

Page 7: ...restart at any time Do not operate without protective covers guards Replace damaged covers guards before using the air compressor Never allow children or adolescents to operate this air compressor St...

Page 8: ...ressor Pump 5 Safety Relief Valve 6 Air tank drain valve 7 Tank Pressure Gauge 8 Outlet Pressure Gauge 9 Pressure Regulator 10 Oil Dipstick 11 Oil Drain 12 Discharge Line 13 115 Volt Electric Power Co...

Page 9: ...tons move up and down in the cylinders On the downstroke air is drawn in through the air intake valves while the exhaust valves remain closed On the upstroke air is compressed the intake valves close...

Page 10: ...sary do not connect the grounding wire to either flat blade terminal The wire with insulation having an outer surface that is green with or without yellow stripes is the grounding wire WARNING This pr...

Page 11: ...less pressure and clockwise for more pressure 6 If you notice any unusual noise or vibration stop the air compressor and refer to Troubleshooting SHUTDOWN 1 To stop the air compressor move the lever...

Page 12: ...e Plug cord into grounded outlet Move switch to AUTO position Turn air compressor off wait until motor is cool then press motor thermal overload red button firmly until click is heard Replace fuse or...

Page 13: ...city of the air compressor Either use a smaller tool or a larger air compressor REMEDY Remove clean or replace REMEDY Replace REMEDY Operate safety relief valve manually by pulling on ring If it still...

Page 14: ...st pressure regulator knob to proper setting or replace Clean or replace Check for leaks and repair Replace with larger hose or connectors Check the accessory air requirement If it is higher than the...

Page 15: ...linder Steel sleeve inserts Valves Reed Single Head Aluminum Filter Canister Motor Pressure Switch Setting Cut out 116 PSI Cut in 87 PSI Controls Start stop Air tank Capacity 4 3 gallons Performance C...

Page 16: ...improper storage or damages resulting during shipping 4 Deviation from operating instructions specifications and maintenance schedules 5 Labor charges loss or damage resulting from improper operation...

Reviews: