background image

5

 

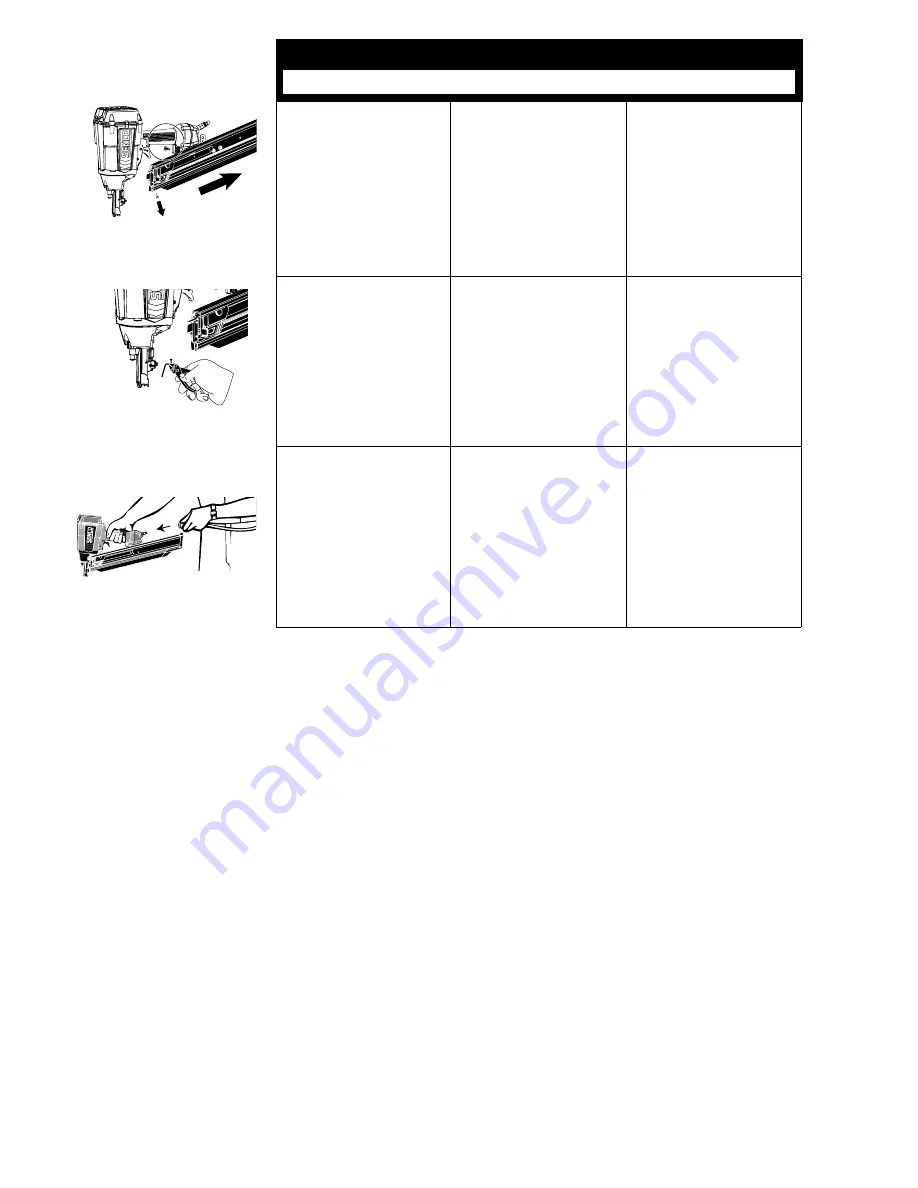
Connect air supply and replace 

fasteners. Pull feeder shoe back.

 

Conecte la línea de aire y reem-

place los clavos. Tire la zapata 
del alimentador.

 Reconnectez la conduite d’air 

comprimé et rechargez le maga-
sin. Tirez le poussoir en arrière.

 

Clear jammed fastener from 

guide body.

    Reattach the magazine and fas-

ten magazine mounting screw.

 

Libre el sujetador de la placa 

de nariz.

    Vuelva a colocar el cargador y 

apriete el tornillo de montaje del 
cargador.

 

Extrayez le clou coincé du front  

de l’appareil.

   Remettez le magasin en place 

et resserrez sa vis de fixation 

sur l’outil.

R

 

Remove the screw at the back 

of the tool and remove the 
magazine.


SN952XP:

 Also remove screw 

from bottom of magazine as 
shown.

English

Español

Français

Tool Use

Uso de la Herramienta Utilisation de l’Outil

 

Retire el tornillo de la parte 

trasera de la herramienta y 

extraiga el cargador.


SN952XP:

 También, retire el 

tornillo del fondo del cargador.

 

Enlevez la vis à l’arrière de l’outil 
et sortez le magasin.


SN952XP:

 Aussi, enlevez la vis 

du fond le magasin.

SN952XP

ONLY

Summary of Contents for SN902XP

Page 1: ...00 543 4596 or e mail toolprof senco com www senco com Warnings for the safe use of this tool are included in this manual Los avisos para el uso seguro de esta herramienta est n incluidos en este manu...

Page 2: ...enda todas estas in strucciones cuidadosamente RESPONSABILIT S DE L EMPLOYEUR L employeur doit faire ap pliquer les consignes de s curit et toutes les autres instructions qui accompag nent cet outil t...

Page 3: ...avec forte productivit Pull feeder shoe back Tire la zapata del alimentador Tirez le poussoir en arri re R R 1 2 This tool is equipped with a firing mode selection switch To adjust the firing mode se...

Page 4: ...when precise fastener placement is required Read the Customer Satisfaction and Safety Reminder CSSR in the tool and fastener boxes for safety information regard ing the Contact Actuation and Sequenti...

Page 5: ...tornillo de montaje del cargador Extrayez le clou coinc du front de l appareil Remettez le magasin en place et resserrez sa vis de fixation sur l outil R Remove the screw at the back of the tool and...

Page 6: ...ceite neum tico SENCO en la entrada de aire dos veces al d a dependiendo en la frecuencia de uso 5 A 10 Gotas Otros aceites pueden da ar los anillos en O y otras piezas de la herramienta Avec une bure...

Page 7: ...priete los tornillos Limpi la herramienta o instale el Juego de Partes YK0445 SN902XP YK0768 SN952XP S NTOMA SOLUCI N Otros problemas P ngase en contacto con SENCO English Espa ol Fran ais Troubleshoo...

Page 8: ...3 2 9mm 148 3 8mm Fastener Range F U L L ROU N D H E A D SN902XP Fastener Range F U L L ROU N D H E A D SN952XP 260 6 6mm 2 50mm 301 7 6mm 3 1 4 83mm MIN MAX 120 3 1mm 260 6 6mm 2 3 8 60mm MIN 162 4 1...

Page 9: ...Width Main Body 70 120 psi 5 2 scfm 3 8 in NPT 7 4 lbs 62 69 11 64 in 20 30 in 4 50 in 4 8 8 3 bar 147 2 liter min 3 8 in NPT 3 35 kg 62 69 295 7 mm 515 6 mm 114 3 mm 70 120 psi 7 9 scfm 3 8 in NPT 8...

Page 10: ...ectores Anteojos De Seguridad Manometros Lubricantes Reguladores Filtros Para mas informacion un pour recevoir un catalogo completo ilus trado de los Accesorios SENCO pregunte a su representante pour...

Page 11: ...gs seals driver blades piston stops piston driver assembly and fuel stems 2 This warranty does not cover parts damaged due to normal wear misapplication misuse accidents operation at other than recomm...

Page 12: ...NOTES...

Reviews: