EN-6
EN
Electric Shaver
SMS 3011BL / SMS 3012GR / SMS 3013RD / SMS 3014TQ
Revision 02/2015
Copyright © 2015, Fast ČR, a.s.
CHARGING THE ELECTRIC SHAVER
•
Charge, use and store the electric shaver at an ambient temperature of 5–35 °C .
•
Make sure that the switch A
6
is set to the OFF position before charging the shaver . The electric
shaver can be charged from a power socket or via a computer equipped with an appropriate USB
interface .
•
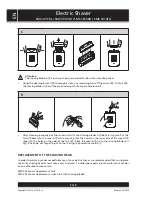
Connect the electric shaver to a power source:
A. Connecting to a power socket
Connect one end of the USB cable A
qa
to the power adapter A
0
, connect the other end to the USB
socket A
9
on the underside of the electric shaver . Connect the power adapter A
0
to an electrical
power socket (100–240 V) .
B. Connecting to a computer
Connect one end of the USB cable A
qa
to the USB socket A
9
located on the underside of the
electric shaver and connect the other end to the computer .
•
After connecting the electric shaver to a functioning power source, the red LED charging indicator
A
8
will be lit . A complete charge takes approximately 8 hours .
Note:
If you are charging the electric shaver for the first time or if you have not used it for a long time
then a complete charge requires at least 15 hours .
•
Disconnect the charged electric shaver from the power source . The red LED charging indicator A
8
will turn off . A fully charged electric shaver will run for approximately 45 minutes . The operating
time may vary depending on the type of facial hair, etc .
Attention:
Do not leave the electric shaver connected to a charging source for longer than 24 hours . If you
regularly charge the electric shaver for longer than 10 hours then this will negatively impact the
battery capacity .
Do not use an electric shaver that is charging . Wait until it is charged .
USING THE ELECTRIC SHAVER
1 . Remove the shaving foil protective cover A
1
.
2 . To turn on the electric shaver, press the safety lock A
7
while at the same time sliding the switch
A
6
upwards to the ON position .
3 . Place the foil A
2
of the electric shaver on to your skin and make circular and direct motions against
the direction of beard growth . Hold it perpendicular to the skin that you are shaving while using
your other hand to keep the skin taut . Do not moisten the skin before or while shaving, and do not
use a shaving cream or gel .

