- 6 -
03/2021
Copyright © 2021, Fast ČR, a.s.
EN
Electric Shaver
User's manual
■
Prior to using this appliance, please read the user's manual thoroughly, even in cases,
when one has already familiarised themselves with previous use of similar types of
appliances. Only use the appliance in the manner described in this user’s manual.
Keep this user's manual in a safe place where it can be easily retrieved for future use.
In the event that you hand this appliance over to somebody else, make sure to also
include this user's manual.
■
Carefully unpack the appliance and take care not to throw away any part of
the packaging before you find all its parts. We recommend saving the original
cardboard box, packaging material, purchase receipt and responsibility statement
of the vendor or warranty card for at least the duration of the legal liability
for unsatisfactory performance or quality. In the event of transportation, we
recommend that you pack the appliance in the original box from the manufacturer.
DESCRIPTION OF THE ELECTRIC SHAVER AND ITS
ACCESSORIES
A1
Cutters
A2
Shaving head with cutter holder
A3
On/Off switch
A4
Display
A5
Power cord connection socket
A6
Trimming attachment
A7
Power adapter
A8
Power cord plug
A9
Cleaning brush
A10
Protective cover
A11
Cloth bag
B1
Battery level indicator
B2
Need to recharge / charging
indicator
B3
Lock indicator
PURPOSE OF USE
■
The electric shaver is intended exclusively for dry shaving of beards and trimming
of sideburns, moustaches or smaller whiskers. The electric shaver is not intended for
wet shaving or for cutting synthetic hair or animal fur.
■
The electric shaver is intended for domestic use and is not intended for business
activities or other professional areas of use.
CHARGING
■
The electric shaver has a built-in battery that enables its cordless operation.
Note
:
Before first use or after not using it for a long time, first allow the electric
shaver battery to fully charge without turning it on.
■
Check that the electric shaver is turned off. Insert the power adapter plug into the
socket on the electric shaver and plug the power adapter into a power socket.
■
The battery will start charging when connected to mains power. The lightning bolt
symbol
B2
will start flashing on the display.
■
The charging time differs depending on the current battery power level. If the
battery is completely discharged (flat), the charge may take up to 90 minutes.
■
When the battery is fully charged, the symbol
B1
will be permanently lit on the
display. Disconnect the fully charged electric shaver from the power adapter and
disconnect the power adapter from the power socket.
Attention:
Do not leave the electric shaver connected to the power grid for
longer than is necessary to charge it.
■
A fully charged battery will provide approximately 60 minutes of cordless operation.
Then it is necessary to charge the battery again.
DIRECT DRIVE TECHNOLOGY
■
If the battery of the electric shaver is discharged (flat) or if it is discharged during
cordless operation, the shaver can be plugged into mains power and can continue
to be used. This is enabled by
DIRECT DRIVE
technology used on the electric shaver.
Therefore, it is not necessary to wait for a minimum charge.
RECOMMENDATIONS FOR EXTENDING THE LIFETIME OF THE
BATTERY
■
In order for the built-in battery to serve you as long as possible, charge, use and store
the electric shaver in a dry environment at an ambient temperature of 15–35 °C.
Lower or higher temperatures have a negative impact on the lifespan of the battery.
■
Do not wait for the battery to become completely flat. It is better to charge the
battery before it is completely flat.
■
When the electric shaver is not used for an extended period of time, charge it at
least once every 6 months.
OPERATION
SHAVING
■
Turn on the electric shaver by pressing the switch
A3
.
■
Hold the electric shaver at a right angle to the skin surface and in short circular
motions glide the shaving head over the skin on the face, moving against the
growth direction of facial hair. Apply appropriate pressure to the skin. Do not push
too hard.
■
Tension the skin with your free hand when shaving hard to reach places such as, for
example, on the chin. In this way you will achieve better shaving results.
Note
:
It may take your skin and facial hair two to three weeks to become
accustomed to the new way of shaving. During this period, we
recommend using the electric shaver every day.
Note
:
In the event that the electric shaver heats up significantly during use,
allow it to cool down for at least 30 minutes.
■
When you have finished shaving, clean the electric shaver according to the
instructions in chapter Cleaning and maintenance.
TRIMMING
■
For trimming sideburns or clipping moustaches or goatees, use the trimming
attachment
A6
.
■
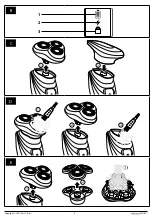
Grasp the shaving head
A2
and pull it upwards to slide it out of the body of the
electric shaver. In its place, slide in the trimming attachment (fig.
C
).
■
Turn on the electric shaver by pressing the switch
A3
. Hold the blades of the
trimming attachment at a right angle to the respective part of the skin.
■
When you have finished trimming, remove the trimming attachment and clean it
according to the instructions in chapter Cleaning and maintenance.
LOW BATTERY POWER INDICATION
■
When the lightning symbol
B2
starts flashing on the display while the electric
shaver is used, this means that the battery is almost discharged (flat). If this happens,
turn off the electric shaver, plug it into mains power and continue using it.
TRAVEL LOCK
■
The travel lock prevents the electric shaver from being turned on accidentally, e.g.
while travelling.
■
Activate the travel lock by pressing and holding down the button
A3
until the lock
symbol
B3
is shown on the display. The On/Off switch
A3
does not react to being
pressed.
■
To deactivate the travel lock, again press and hold down button
A3
. The lock symbol
will first start flashing and then turn off. Now the electric shaver is again ready for
use.
CLEANING AND MAINTENANCE
■
For hygiene reasons, clean the electric shaver after every use. Regular cleaning is
also important to ensure the correct operation of the electric shaver and to extend
the lifespan of the cutters.
■
Turn off the electric shaver before cleaning it. Never clean the electric shaver when
it is charging and connected to the power supply.
■
For cleaning, do not use brushes with hard bristles, cleaning products with an
abrasive effect, solvents, etc. Otherwise, the cleaned surface may be damaged.
CLEANING THE ELECTRIC SHAVER AND ADAPTER
■
The electric shaver unit can be cleaned using a clean dry cloth. In the event that it is
very dirty, you can use a lightly dampened cloth. Then thoroughly wipe the cleaned
surface dry.
■
To clean the power adapter and the power cord, use a clean, dry cloth.
CLEANING THE SHAVING HEAD
■
Use the cleaning brush
A9
to remove all beard and whisker remains from the
shaving head and cutters.
■
Pull the shaving head upwards to remove it from the body of the electric shaver.
Use the cleaning brush to remove any grime and whisker remains from the shaving
head mounting area (fig.
D
).
For quick and easy cleaning, after being removed from the body
of the electric shaver, the shaving head can be rinsed under
a water tap.
Warning:
Always remove the shaving head from the body of the electric
shaver before washing it.
The body of the electric shaver is not intended to be washed using
water. There is a risk of serious injury by electrical shock!
■
Open the shaving head itself and rinse out and insides with lukewarm running water
(fig.
E
). Leave the parts of the shaving head to dry naturally and then reassemble
everything and mount it on the body of the electric shaver.


