- 8 -
09/2020
Copyright © 2020, Fast ČR, a.s.
Warning:
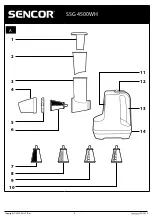
Do not use fingers or other items to push food in. Always use the
pusher
A1
designed for this purpose.
The maximum continuous operating time is 2 minutes. Before
turning it on again, allow the appliance to cool down for at least 5
minutes. After performing 10 such cycles, allow the appliance to
cool down for at least 30 minutes.
■
The pusher is intended for gradually moving the ingredients into the area of
the attachment. Always insert the individual pieces of ingredients, and with
appropriate force gently push down on the pusher. During operation, ensure
that the ingredients are passing through the attachment by looking into the feed
tube. Never fill the feed tube up to its top edge with ingredients. Processing large
amounts of ingredients at once may overload the motor unit.
■
To turn off the appliance, set the switch
A12
to the OFF position.
USEFUL TIPS
■
Check the suitability of the individual attachments for specific food types in the
SELECTING ATTACHMENTS table.
■
To achieve the best possible results, process fresh not overly ripened fruit. The same
applies to vegetables.
■
Softer fruit such as strawberries can be put into the freezer for a few minutes prior
to processing.
■
Semi-hard cheese will be processed better if placed it in a refrigerator over night or
in a freezer for 30 minutes.
■
We do not recommend processing soft or already grated cheese as this could clog
up the feed tube.
■
When using the fine grating cone
A7
or the slicing cone for long straight slices
A9
,
push the ingredients through the feed tube gently. When using the coarse grating
cone
A6
or the slicing cone for thick wavy slices
A10
, it is necessary to push the
ingredients through with greater force.
REMOVING THE SET FROM THE APPLIANCE
■
Remove the outlet spout
A4
and the pushers
A1
and
A2
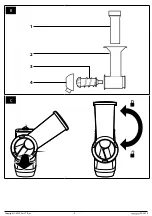
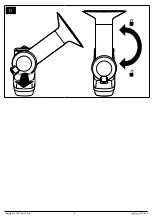
from the set. Turn the feed
tube clockwise and slide it out of the hole in the motor unit (fig.
B
).
MAKING ICE CREAM
■
The ice cream making set (fig.
B
) is intended for processing almost all types of fruits,
or alternatively vegetables or yoghurt.
■
The set is not intended for processing ice cubes for ice slurry.
PREPARING INGREDIENTS
■
Carefully wash the selected ingredients. Remove all stems, tops, stones and, if
necessary also thicker peels. Peel citrus fruits, remove the white pulp and kernels.
■
Cut the ingredients into pieces that will fit into the entry hole of the feed tube.
■
Always allow the ingredients to become deep frozen at least 12-24 hours before
making the ice cream.
ASSEMBLING THE APPLIANCE
■
Place the motor unit
A14
on an even dry and stable surface.
■
Insert the screw bolt
B3
into the feed tube
B2
.
■
Attach the outlet spout
B4
on to the screw bolt by seating it on the screw bolt and
turning it anticlockwise to secure it in position.
■
Once assembled in this way, tilt the set clockwise (fig.
D
and slide it into the hole
A11
in the motor unit) Then turn the feed tube anticlockwise so that it slides into
its place in the hole.
OPERATION
■
Take the prepared ingredients out of the freezer and allow them to partially defrost
to room temperature. The time necessary for defrosting depends on the contents
and the water:pulp ratio, freezing temperature and the size of the given ingredients.
The more watery the ingredients, the shorter the time (approx. 5 minutes) and the
more dense the ingredients, the longer the time (approx. 20 minutes) needed for
defrosting.
Attention:
Do not process the ingredients immediately after removing them
from the freezer!
■
Insert the power plug into an electrical power socket. Underneath the outlet spout,
place a suitable container, which will catch the ice cream.
■
Set the switch
A12
to the ON position and start to gradually insert the ingredients
into the feed tube opening. Use the supplied pusher to push ingredients through
the feed tube
B1
.
Warning:
Do not use fingers or other items to push in the ingredients.
Always use the
pusher
B1
designed for this purpose.
The maximum continuous operating time is 2 minutes. Before
turning it on again, allow the appliance to cool down for at least 5
minutes. After performing 10 such cycles, allow the appliance to
cool down for at least 30 minutes.
The pusher is intended for gradually moving the ingredients into the area of the screw
bolt. Always insert the individual pieces of ingredients, and with appropriate force
gently push down on the pusher. During operation, ensure that the ingredients are
passing through the attachment by looking into the feed tube. Never fill the feed tube
up to its top edge with ingredients. Processing large amounts of ingredients at once
may overload the motor unit.
■
To turn off the appliance, set the switch
A12
to the OFF position.
USEFUL TIPS
■
We recommend processing fresh and ripe fruits or vegetables. This will make better
tasting ice cream.
■
When processing multiple types of ingredients, the ingredients must thoroughly
blended together (become homogenised) and the created blend must have
characteristic ice cream consistency. If the created blend is breaking off in parts, the
ingredients are still very frozen.
■
Ingredients such as cream or yoghurt must always be frozen before being processed.
■
You can grate chocolate, coconut, etc. on to the prepared ice cream.
REMOVING THE SET FROM THE APPLIANCE
■
Take the pusher
B1
out of the set. Turn the feed tube clockwise and slide it out of the
hole in the motor unit (fig.
C
).
■
Remove the outlet spout
B4
from the screw bolt by turning it clockwise. Then take
the screw bolt out of the feed tube.
TROUBLESHOOTING
PROBLEM
POSSIBLE SOLUTION
When the appliance is
started using switch
A12
, it runs only
intermittently or it does
not start up at all
Turn off the appliance and disconnect it from the
power socket and wait for the rotating parts to come to
a stop. Check that you have assembled the appliance
correctly according to the instructions in chapter
ASSEMBLING THE APPLIANCE.
The appliance will not
start.
Unless there is a power outage, evidently the switch
A12
or power cord is faulty. Contact the supplier or
professional service centre.
The feed tube keeps
clogging up.
The ingredients that are processed are too big. Cut the
food into smaller pieces.
You are inserting the ingredients too quickly into the
feed tube or pushing down too hard on the pusher.
Insert the ingredients more slowly and push gently on
the pusher.
Pieces of food may have become stuck to the
attachment and clogged the feed tube. If this happens,
turn off the appliance and disconnect it from the power
socket and wait for the rotating parts to come to a stop.
Remove the feed tube and the attachment, and clean
everything according to the instructions in chapter
Cleaning and maintenance.
It is necessary to exert
greater force to push the
ingredients
through the feed tube
Harder ingredients such as potatoes or hard cheese
need to be pushed through the feed tube with greater
force. This is completely normal. Take a 5-minute break
after every 2 minutes of operation.
CLEANING AND MAINTENANCE
Attention:
Prior to any cleaning or maintenance, always disconnect the
appliance from the power grid.
Note:
Certain types of food such as carrot, may cause discolouration of plastic
parts of the appliance.
If this occurs, dip a kitchen paper towel in a small amount of cooking oil
and apply it on to the
discoloured part of the appliance as soon as possible. Then clean this part
according to the procedure described below.
The discolouration of the accessories has not effect on the function of the
appliance and does not constitute grounds for making a claim.
■
If the appliance is used for an extended period of time, it is possible that the motor
unit may be hot to touch. Allow it to cool down before cleaning it.
■
Clean the appliance and its parts immediately after every use.
■
Disassemble the grating set or the ice cream making set into its individual parts as
described in the respective chapter. Disassemble the sets into their individual parts
and carefully clean away any food remains, wash in warm water with dish washing
detergent and rinse under clean running water. Then allow them to dry naturally
or dry them out thoroughly using a wiping cloth. Do not use abrasive cleaning
products.

