
- 3 -
Revision 03/2022
Copyright © 2022, Fast ČR, a.s.
• Prior to using this appliance, please read the user's manual
thoroughly, even in cases, when one has already familiarised
themselves with previous use of similar types of appliances. Only use
the appliance in the manner described in this user’s manual. Keep this
user's manual in a safe place where it can be easily retrieved for future
use. In the event that you hand this appliance over to somebody else,
make sure to also include this user's manual.
• Carefully unpack the appliance and take care not to throw away any
part of the packaging before you find all its parts. We recommend
saving the original cardboard box, packaging material, purchase
receipt and responsibility statement of the vendor or warranty card for
at least the duration of the legal liability for unsatisfactory performance
or quality. In the event of transportation, we recommend that you pack
the appliance in the original box from the manufacturer.
. . . . . . . . . . . . . . . . . . . . . . . . . . . . . . . . . . . . . . . . . . . . . . . . . . . . . . . . . . . . . . . . . . . .
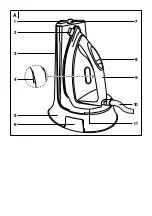
DESCRIPTION OF THE APPLIANCE
A1
Water tank cap
A2
Iron holders
A3
Base unit with water tank and
iron rest pad
A4
Steam release button
A5
Steam hose wind-up
compartment
A6
Steam hose holders
A7
Lock/release iron from the
base unit
A8
Display and the control
buttons
A9
Handle
A10
Steam hose
A11
Iron rest pad
. . . . . . . . . . . . . . . . . . . . . . . . . . . . . . . . . . . . . . . . . . . . . . . . . . . . . . . . . . . . . . . . . . . .
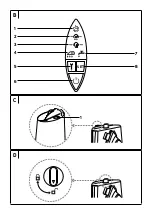
B1
Automatic iron shut-off
indicator
B2
ECO mode indicator
B3
Steam ironing indicator
Flashing – heating up
Lit – temperature reached
B4
Low water level in tank
indicator
B5
Iron cleaning button
B6
Main switch
B7
Iron descaling/cleaning
indicator
B8
SET button for toggling
between high steam mode
and ECO mode with less
steam
. . . . . . . . . . . . . . . . . . . . . . . . . . . . . . . . . . . . . . . . . . . . . . . . . . . . . . . . . . . . . . . . . . . .
C1
Filling hole
. . . . . . . . . . . . . . . . . . . . . . . . . . . . . . . . . . . . . . . . . . . . . . . . . . . . . . . . . . . . . . . . . . . .
BEFORE FIRST USE
• Before first use, remove all packaging or protective materials including
promotion stickers and labels from the iron and the base unit.
• Wipe the iron's soleplate with a lightly dampened cloth before first use
and then wipe dry. Using a dry or lightly dampened cloth, also clean
the outer parts of the iron and then wipe it dry.
• Clean the surface of the base unit using a soft cloth.
Warning:
Never submerge the iron and the power cord of the
base unit in water or any other liquid!
. . . . . . . . . . . . . . . . . . . . . . . . . . . . . . . . . . . . . . . . . . . . . . . . . . . . . . . . . . . . . . . . . . . .
FILLING THE WATER TANK
• The water tank on the base unit is intended to be filled with tap water.
Limescale deposits may quickly form if you live in an area with hard or
very hard water. To extend the lifetime of the iron, it is recommended
to mix the tap water with distilled water. The ratio of distilled water to
tap water is as follows:
–
1:1 for medium hard water
–
2:1 for hard water
–
3:1 for very hard water
Note:
Your local water utility will provide information about the
water hardness in your area.
Warning:
Never add water softeners, vinegar, starch, descaling
agents, perfumes or other additives to the water.
• Prior to filling the water tank with water, the base unit must be
disconnected from the power socket and located on a stable and
horizontal surface.
• Prepare a suitable container and fill it up with water. Tilt open the cap
of the filling opening and slowly pour the water from the container into
the filling opening of the water tank. Make sure that the water level
does not rise above the maximum water level mark on the water tank.
• After filling the water tank, close the filling hole cap. In the event that
you spilled any water while filling, thoroughly dry everything that is
wet.
. . . . . . . . . . . . . . . . . . . . . . . . . . . . . . . . . . . . . . . . . . . . . . . . . . . . . . . . . . . . . . . . . . . .
TURNING ON
• Connect the power cord of the base unit to a power socket and press
the main switch on the iron. The indicator
will be lit on the
display and the iron is ready for use.
. . . . . . . . . . . . . . . . . . . . . . . . . . . . . . . . . . . . . . . . . . . . . . . . . . . . . . . . . . . . . . . . . . . .
REMOVING THE IRON FROM THE BASE UNIT
• To take the iron off the base unit, it is necessary to first release the iron
by turning the lock/release safety towards the open padlock symbol.
The iron can be taken off the base unit before or after it is turned on.
. . . . . . . . . . . . . . . . . . . . . . . . . . . . . . . . . . . . . . . . . . . . . . . . . . . . . . . . . . . . . . . . . . . .
IRONING WITH STEAM
Warning:
In order to iron with steam, the water tank must be
filled with a sufficient amount of water.
Note:
The iron is equipped with electronic temperature control,
which enables the ironing of all types of fabrics that are
suitable for ironing and in whatever order and without the
need to set the temperature or garment class.
• The iron is equipped with the following two steam output intensity
levels that are toggled using the SET: button.
ECO
The ECO mode is intended for sufficient steam output for
standard ironing with low power use; it uses less steam and
saves power without affecting the ironing result.
This mode is intended for maximum steam output for
demanding or vertical ironing.
• Press the
SET
button to select the steam mode
ECO
or
and
wait until the indicator of the selected mode remains permanently lit.
• Holding down the steam button on the iron will start releasing steam
while ironing.
EN Steam generator
User's manual


