Sandwich Maker with Removable Plates
SSM 9300
EN
EN-7
2011
10/2011
BEFORE FIRST USE
1) Remove the Sandwich Maker from the packing material.
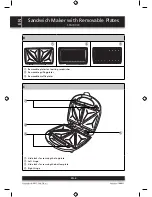
2) Wipe the removable baking plates B
1
, B
2
, B
3
with a wet cloth or sponge and dry completely
with a paper towel of dry cloth.
3) We recommended you allow the sandwich maker to run empty for 5–7 minutes before fi rst use for
each pair of baking plates, so that any odours present are removed from the plates.
Note:
When fi rst turned on, there may be light smoke emitted. This is due to the heating of internal
components and it will pass in a moment.
REPLACING BAKING PLATES
1) Before replacing the baking plates disconnect the sandwich maker from the el. power supply and
allow it to cool down.
2) REMOVING THE BAKING PLATES:
Move locks C
3
towards the handle A
3
to release the bottom baking plate and then remove it. In
the same way release and remove the top plate.
3) INSERTING THE BAKING PLATES:
Slide the bottom edge of the baking plate under the left and right hinge C
2
and C
4
. Fold the
plate down and push in towards the casing of the sandwich maker until you hear an audible click.
Now the plate is secured in the correct position by locks C
3
. In the same way attach the top plate.
Always use plate of the same type.
USING THE SANDWICH MAKER
1) Select a suitable type of plate for the type of food that you wish to prepare and insert it into the
sandwich maker, see chapter Replacing baking plates. Coat the baking plates with a little butter or
cooking oil.
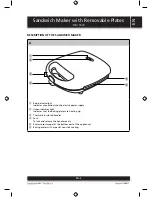
2) Connect the Sandwich Maker to a power supply. Both indicator lights on the top panel will light up.
Red indicator light A
1
indicates connection into the electric power supply. Green indicator light
A
2
indicates that the baking plates are heating up.
3) Close the Sandwich Maker for more effective pre-heating of the baking plates.
4) Prepare the food you wish to cook before the plates heat up.
5) When the baking plates are heated to the operating temperature, the Green indicator light A
2
is
turned off.
Note:
The heating indicator light turns on and off. This shows that the operating temperature of bak-
ing plates is maintained.
Open the Sandwich Maker and place the prepared food on the bottom plate. Using the handle A
3
close and press the top baking plate on to the bottom plate. Secure handles A
3
with the lock A
4
.
Note:
If you insert too much food or pieces that are too large into the sandwich maker, then it will
not be possible to close it. In such a case it will be necessary to remove some of the food or to
cut the food into smaller pieces. Do not force the sandwich maker shut, as this may damage it.


