05/2017
- 8 -
Copyright © 2017, Fast ČR, a.s.
QUICK GUIDE TO PROCESSING INGREDIENTS
Attachment type
Ingredients
Maximum
load
Processing
time
Speed
selection
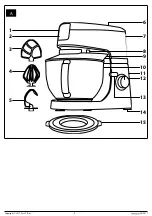
Balloon whisk
A4
Egg whites
12 pcs
4 min
5–6
Balloon whisk
A4
Whipping cream
1l
6–8 min
5–6
Beater
A3
Cake dough
2.2l
6 min
3–4
Kneading hook
A5
Bread dough
Pizza dough
0.8l
4–5 min
MIN to 2
Note:
The above processing times are only a reference.
When whipping egg whites, the bowl
A10
and the beater
A4
must be perfectly
clean and dry. Even a small amount of fat may cause the egg whites not be
whipped to the desired snowy consistency.
Whipping cream should be cooled to a temperature of 6 °C prior to being
whipped.
Prior to processing them, allow the ingredients used for making various doughs
to rest at room temperature.
GRINDING MEAT, MAKING SAUSAGES AND KEBABS, AND
MAKING COOKIES
ASSEMBLING AND DISASSEMBLING THE MEAT GRINDER
1. Insert the screw shaft
B5
into the grinding chamber
B4
with the cogged wheel entering
first.
2. Place the grinding blade
B6
on to the shaft
B5
(with the edge facing outwards from the
chamber) and on to it attach a grinding plate
B8
,
B9
or
B10
depending on the preferred
the grind. Make sure that the notch in the grinding chamber
B4
slides into the groove in
the grinding plate.
Attention:
When attaching the blade
B6
, be very careful not to injure yourself on the
sharp edge.
3. Place the screw ring
B7
on to the grinding chamber
B4
and tighten it securely by
screwing it clockwise. Place the stainless steel hopper
B2
on to the feed tube
B3
.
4. Make sure that the food processor is turned off and disconnected from the power socket.
The multi-function head
A7
must be tilted down in the horizontal position and the whisk,
beater or kneading attachments must be removed. Remove the front cover
A2
from the
multi-function head
A7
. Place the assembled attachment against the attachment hub
so that the feed tube
B3
is tilted to the right at an angle of approximately 45° from the
vertical axis and secure the attachment in vertical position by turning it anticlockwise.
The attachment is locked in place when the button
A1
slides out. This is accompanied by
an audible click.
5. When disassembling the meat grinder, first remove the hopper
B2
. Then press the button
A1
and remove the meat grinder by turning it clockwise. After removing the grinder, put
the cover
A2
back in its place.
6. When disassembling the meat grinder into its individual parts, proceed in the reverse
sequence.
USING THE MEAT GRINDER
1. First prepare the meat for grinding in the following way. Remove all bones, tendons,
cartilage and cut the meat into 2 × 2 × 6 cm size pieces that will freely pass through the
feed tube
B3
.
Attention:
Do not process frozen meat. Allow it to defrost before grinding it.
2. Make sure that the food processor is correctly assembled and that the speed control
knob
A12
is set to the OFF position.
3. Place the bowl
A10
or another suitable container under the meat grinder. Insert the
power plug into a power socket.
4. Use the speed control knob to set the desired speed. We recommend to initially set speed
3 and then increase it as required. Gradually place the meat pieces into the feed tube
B3
and push them in using the pusher
B1
. Take care not to clog up the feed tube
B3
by
a large amount of meat. Do not process more than 5 kg of meat per batch. The processing
time is only several minutes.
Attention:
Do not use fingers or other items to push the meat in. Always use the pusher
B1
designed for this purpose.
5. The ground meat will fall into the prepared bowl. The meat that remains in the grinding
chamber
B4
can be removed by grinding a slice of bread or a bread roll.
6. To turn off the food processor, set the speed control knob
A12
to the OFF position.
7. Clean out the meat grinder after each use according to the instructions in chapter
Cleaning and maintenance.
ASSEMBLING AND DISASSEMBLING THE SAUSAGE STUFFER ATTACHMENT
1. Proceed in the same way as when assembling the meat grinder, only with the difference
that instead of the grinding blade
B6
and the grinding plate
B8
,
B9
or
B10
, only parts
B11
a
B12
are used.
2. Place the separator
B11
on to the screw shaft so that the notch in the grinding chamber
B4
fits into the groove in the separator
B11
. Place the sausage stuffer attachment
B12
on
to the separator
B11
and complete the entire sausage stuffer assembly by screwing the
screw ring
B7
on to the grinding chamber
B4
. Place the stainless steel hopper
B2
on to
the feed tube
B3
.
3. Attach the attachment to the food processor in the same way as described in point 4 in
chapter Assembling and disassembling the meat grinder.
4. When disassembling, first remove the hopper
B2
. Then press the button
A1
and remove
the attachment by turning it clockwise. After removing the attachment, put the cover
A2
back in its place.
5. When disassembling the attachment into its individual parts, proceed in the reverse
sequence.
USING THE SAUSAGE STUFFER ATTACHMENT
1. Make sure that the food processor is correctly assembled and that the speed control
knob
A12
is set to the OFF position. Insert the power plug into a power socket.
2. Prepare a sausage casing that you will stuff with ground meat and allow it to soak in
lukewarm water for approx. 10 minutes. Place the ground meat mixture on to the hopper
B2
. Take the sausage casing out of the water and skewer or tie up one end and slide the
other end like a sock on to the sausage stuffer attachment
B12
.
3. Use the speed control knob
A12
to set the desired speed. We recommend to initially set
the lowest speed and then increase it as required. With one hand hold the sausage casing
on the attachment
B12
and use the other hand to push the ground meat mixture with
the pusher
B1
through the feed tube
B3
. If the sausage casing sticks to the attachment
B12
, it is necessary to moisten it with water again.
Attention:
Do not use fingers or other items to push the ground meat in. Always use the
pusher
B1
designed for this purpose.
4. To turn off the appliance, set the speed control knob
A12
to the OFF position.
5. Clean out the individual parts of the attachment after each use according to the
instructions in chapter Cleaning and maintenance.
ASSEMBLING AND DISASSEMBLING THE KEBAB MAKER ATTACHMENT
1. Proceed in the same way as when assembling the meat grinder, only with the difference
that instead of the grinding blade
B6
and the grinding plate
B8
,
B9
or
B10
, only parts
B13
a
B14
are used.
2. Place the moulder
B13
on to the screw shaft
B5
so that the notch in the grinding chamber
B4
fits into the groove in the moulder
B13
. Place the kebab moulder attachment
B13
on to the conical attachment
B14
and complete the entire kebab maker assembly by
screwing the screw ring
B7
on to the grinding chamber
B4
. Place the stainless steel
hopper
B2
on to the feed tube
B3
.
3. Attach the attachment to the food processor in the same way as described in point 4 in
chapter Assembling and disassembling the meat grinder.
4. When disassembling, first remove the hopper
B2
. Then press the button
A1
and remove
the attachment by turning it clockwise. After removing the attachment, put the cover
A2
back in its place.
5. When disassembling the attachment into its individual parts, proceed in the reverse
sequence.
USING THE KEBAB MAKER ATTACHMENT
1. Make sure that the food processor is correctly assembled and that the speed control
knob
A12
is set to the OFF position. Insert the power plug into a power socket.
2. Place the prepared kebab meat mixture on to the hopper
B2
. Use the speed control knob
A12
to set the desired speed. We recommend to initially set the lowest speed and then
increase it as required. Using the pusher
B1
, push the mixture through the feed tube
B3
. The result will be a hollow meat tube that is then cut into smaller pieces. The kebab
is a traditional meal from the Middle East made predominantly from ground meat and
whole grain wheat.
Attention:
Do not use fingers or other items to push the ground meat in. Always use the
pusher
B1
designed for this purpose.
3. To turn off the appliance, set the speed control knob
A12
to the OFF position.
4. Clean out the individual parts of the attachment after each use according to the
instructions in chapter Cleaning and maintenance.
ASSEMBLING AND DISASSEMBLING THE COOKIE MAKER ATTACHMENT
1. Proceed in the same way as when assembling the meat grinder, only with the difference
that instead of the grinding blade
B6
and the grinding plate
B8
,
B9
or
B10
only parts
B11
,
B15
and
B16
are used.
2. Place the separator
B11
on to the screw shaft so that the notch in the grinding chamber
B4
fits into the groove in the separator
B11
. Insert the cookie maker holder
B16
into
the screw ring
B7
. Screw the screw ring
B7
clockwise on to the grinding chamber
B4
.
Complete the assembly by inserting the cookie maker
B15
into the holder
B16
and
attaching the hopper
B2
to the feed tube
B3
.
3. Attach the attachment to the food processor in the same way as described in point 4 in
chapter Assembling and disassembling the meat grinder.
4. When disassembling
, first remove the hopper
B2
. Then press the button
A1
and remove
the attachment by turning it clockwise. After removing the attachment, put the cover
A2
back in its place.
5. When disassembling the attachment into its individual parts, proceed in the reverse
sequence.


