8
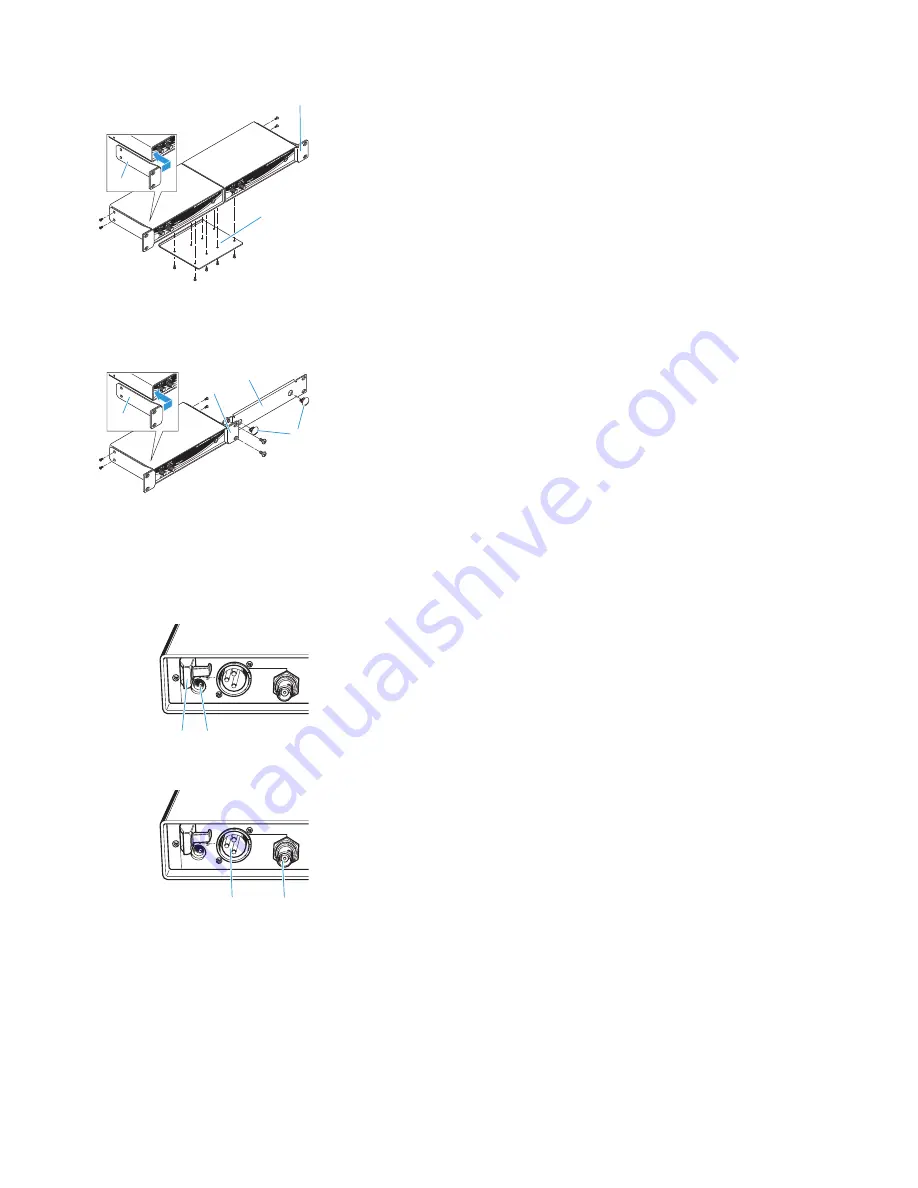
To mount
two
central units into a rack:
왘
Place the two central units side by side upside-down onto a flat surface.
왘
Align the jointing plate
over the holes in the bottom sides of the central
units.
왘
Secure the jointing plate
to the central units using eight of the supplied
recessed head screws (M 3x6).
왘
Hook the two rack mount “ears”
the front panels of the central units.
왘
Secure the rack mount “ears” to the central units using two of the sup-
plied recessed head screws (M 3x6) respectively.
왘
Slide the central units into the 19” rack.
왘
Secure the rack mount “ears” to the rack.
To mount only
one
central unit into a rack:
왘
Hook the two rack mount “ears”
to the front panel of the central unit.
왘
Secure the rack mount “ears” to the central unit using two of the supplied
recessed head screws (M 3x6) respectively.
왘
Secure the blanking plate
to one of the rack mount “ears”
using two
of the supplied recessed head screws (M 6x10).
왘
If you are not front mounting the BNC output connector, insert the two
blanking plugs
into the holes of the blanking plate.
왘
Slide the central unit into the 19” rack.
왘
Secure the rack mount “ears” to the rack.
Connecting the mains unit
왘
Connect the supplied mains unit to the socket
(DC IN). Use the cable
grip
to secure the power supply DC cable.
왘
Connect the suitable adapter to the mains unit
.
왘
Connect the mains unit
to the mains.
The device switches on automatically.
Connecting the amplifier
The audio outputs are available as a balanced XLR-3M output
and an
unbalanced BNC output
, allowing you to simultaneously connect two
devices (amplifier, etc.). Both outputs deliver the same output voltage, are
short-circuit proof and decoupled from each other.
왘
Connect the amplifier/mixing console to the balanced XLR-3M output
or the unbalanced BNC output
.
For details on balanced or unbalanced connection, see “Connector assign-
ment” on page 15.
0
9
9
9
9
8
A
AF OUT
BAL/UNBAL
DC IN
12V/150mA
LEV 6dBu MAX
AF OUT
BAL/UNBAL
DC IN
12V/150mA
LEV 6dBu MAX


