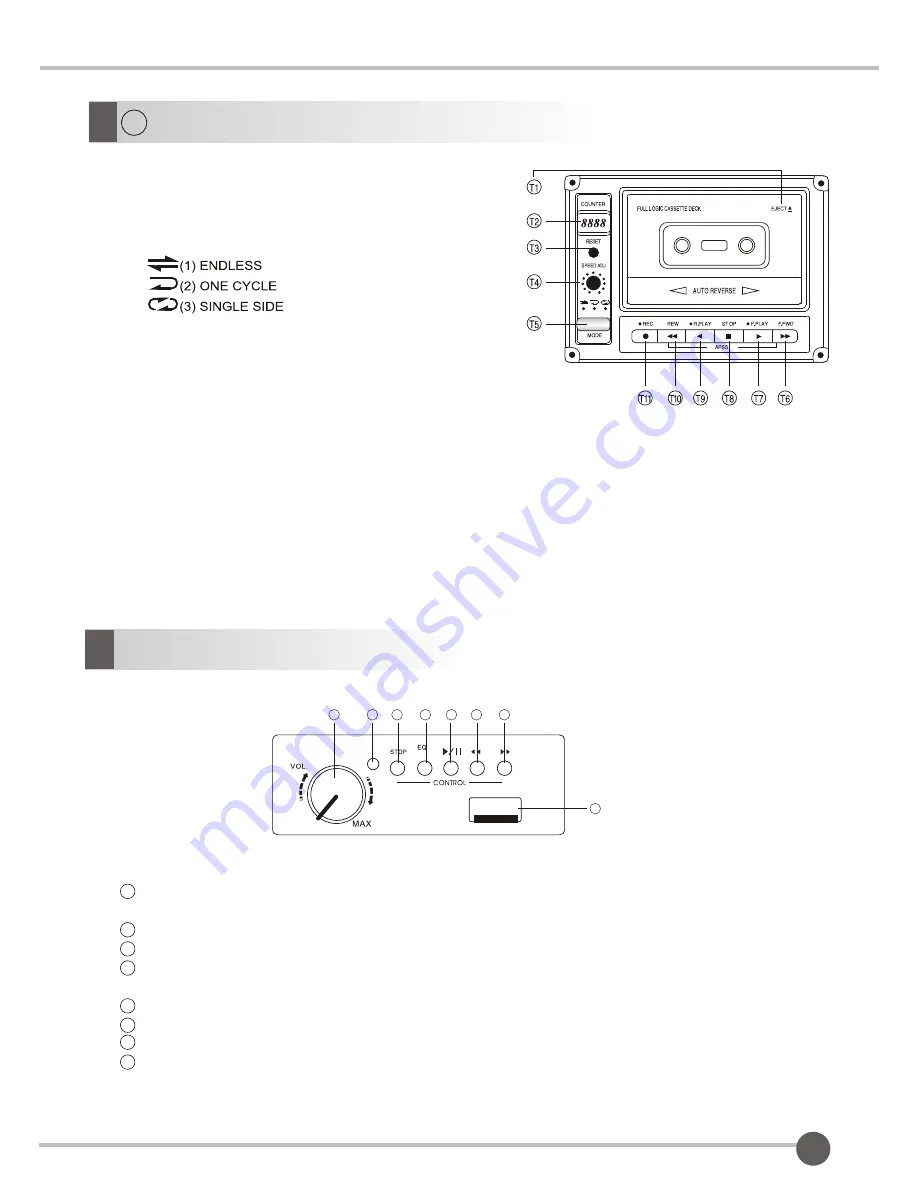
T / Tape Location of Controls
T1. EJECT MODE: To slot TAPE or draw it out.
T2. DIGITAL COUNTER: 4digit LCD counter with back light.
T3. RESET MODE: Reset the 4 digit counter.
T4. SPEED ADJUSTMENT: Fast to play mode.
T5. PLAY MODE SELECTOR:
T6. FAST FORWARD PLAY MODE: Fast to play when pressing
this mode.
T7. FORWARD PLAY MODE: To play forward mode by pressing.
T8. STOP MODE: Removing disc before press stop while it is playing.
T9. REVERSE SIDE MODE: To play reverse side mode by pressed stop mode.
T10. REWIND MODE: Rewind tape play mode.
T11. RECORD MODE
NOTE ON UNIT OPERATION:
Make sure the recorder is turned off by pressing the stop mode before turning off the main
power switch control. The cassette operating switch is the second switch located on the right hand
side, turn anti-clockwise to reduce volume and switch off.
4
B. Volume, Tone Quality and Mater Control Panel
LINE OUT : To connect CD, tape, mixer or external other audio device on the amplifier to send the signal.
BASS: Rotate volume knob clockwise to increase bass to desired level.
TREBLE: Rotate volume knob clockwise to increase treble to desired level.
LINE IN (MIN/ MAX): External audio input jack.
Wired Microphone Volume (MIC 1): Rotate volume knob clockwise to increase volume up to the desired
level by MIC 1.
Wired Microphone Volume (MIC 2): Rotate volume knob clockwise to increase volume up to the desired
level by MIC 2.
LINE IN (Audio signal volume knob): external audio signal input jack.
Wired Microphone Jack (MIC 1): Insert wired microphone into the MIC1 for signal output (MIC1).
Wired Microphone Jack (MIC 2: Insert wired microphone into the MIC1 for signal output (MIC2).
Balanced Input XLR Jack for MIC 2.
B1.
B2.
B3.
B4.
B5.
B6.
B7.
B8.
B9.
B10.
C. Power Descriptions
(AC/DC)
ON
CHG.
OFF
ON
AC / DC POWER SWITCH INDICATOR: The red indicator will flash once the main power is switched on.
LOW BATTERY: The batteries are due for recharge once the yellow indicator is on.
The red indicator will flash until no battery to yellow light.
CHARGING INDICATOR: Recharging starts (
Ⅱ
)
the green light indicator flashes on the unit back.
Turn off wireless receiver and CD or Cassette when turn it to the CHG. Position.
DC INPUT: DC power input jack, power switch(
Ⅱ
)
batteries need 24V~30V / 4.5A to be move.
POWER SWITCH:(
Ⅰ
)
ON / POWER ON (O) OFF / POWER OFF, make sure the unit is fully turned off to
prevent current leakage when not in use. (
Ⅱ
) The Green flashing lights will be switched off once the batteries
are fully charged.
AC
POWER OUTLET: The power voltage of 90-264V switching power supply.
FUSE (20mm x 5A):
Note: To Obtain the optional rechargeable batteries. Make sure to recharge the
batteries before using them. The unit cannot be used to rechargeable batteries other than those specifically
designed for it.
‧
Lead Acid battery 12V /4.5A (2 pieces).
C1.
C2.
C3.
C4.
C5.
C6.
C7.
3
USB-mp3 Player Disk
1 Power ON/ OFF/ VOL: Turn it clockwise to high volume up which is turning it on or turn it to
anticlockwise to reduce volume until off position.
2 Error LED indicator: The red light indicator will flash on while it is error reading or playing.
3 Stop: Stop playing songs while it is on playing mode or stop all.
4 EQ/ Repeat: To choosing jazz/ pop/ classic/ rock equalizer mode or 3 seconds to the single repeat and
repeat all music songs by pressing up.
5 Play/ Pause: Start to play or pause to play.
6 Forward mode: Press button to forward search music songs.
7 Rewind mode: Press button to rewind search music songs.
8 USB connection port: Insert any USB device; the USB device must be compatible to USB mass storage
device.
ON
OFF
Error
Repeat
MP3
MP3
DIGITAL AUDIO PLAYER
1
2
3
4
5
6
7
8
Multipurpose Wireless Portable PA Amplifier System
EP-2001 / H series


