background image


13 


Interconnecting Long Push Poles and Case 

Part Number 

Description 

143265 

Ø 3/16" x 60"L (Ø 5mm x 150cm) Push Pole 

143266 

Ø 1/4" x 60"L (Ø 6mm x 150cm) Push Pole 

143268 

Ø 5/16" x 60"L (Ø 8mm x 150cm) Push Pole 

143269 

Ø 3/8" x 60"L (Ø 9mm x 150cm) Push Pole 

143261 

Push Pole Quiver 


Summary of Contents for JAWS 2.0

Page 1: ...Operator Manual Basic and Ultimate Kits ...

Page 2: ...2 ...

Page 3: ...attery Status 8 Power Saving Modes 8 Battery Charging 9 Operation with AC Mains Power 10 Securing with a Lanyard 11 Spare Parts 11 JAWS Ultimate Kit Accessories 12 Interchangeable Jaw Sets 12 Retrieval Accessories 12 Interconnecting Long Push Poles and Case 13 Specifications 14 Care 14 Warranty 15 Appendix 16 Using the Accessories 16 Contact Us 22 ...

Page 4: ...l hex key spare screws JAWS Ultimate Kit Contents JAWS 2 0 HD grabber JAWS 2 0 HD display controller AC adapter charger operator manual 50ft 15m power video cable 50ft 15m extension cable Jaw Sets fork and tine flat serrated short serrated sampling cups curved serrated needle nose tool adapter Tools 2 snares sm lg 2 magnets sm lg Storage Case 4 hooks sm med lg xl Push Poles 40 push poles 60in 150c...

Page 5: ...deeper than 50 feet 15m in water or any other liquid Additional depth is attainable with a longer main cable Do not force JAWS into openings smaller than its diameter Use only the supplied battery power pack as the JAWS power source Keep the battery power pack away from high heat and equipment that produces sparks Replace any damaged or defective battery Do not submerge battery power pack Use only...

Page 6: ...nnect cable to power pack 4 Attach push rod or other rodding accessories to manipulate the tool into position for grabbing Powering the System ON Press in the switch and release to start the system the status LED will blink Green while starting The video will display after 15 seconds The status LED will change to Blue indicating the system is ready OFF Press in the switch for 2 seconds to power do...

Page 7: ...7 HD Display Controller Switch Status LED Cable Connector HDMI Output Power Connector Battery Access Folding Stand 20 Mount For Lanyard 20 Mount For Lanyard ...

Page 8: ...tery Status Press the switch to the left to display the battery condition on the status LED 100 3 Green blinks 80 2 Green blinks 60 1 Yellow blink 40 1 Red blink 20 1 long Red blink Power Saving Modes After 10 minutes of no switch activity the system will dim the video display The status LED will blink Blue Moving the switch will awaken the system After 20 minutes of no switch activity the system ...

Page 9: ...ully seated The LEDs in the status window will provide status information and the charger will automatically begin charging Green flashing Battery charging Green solid Battery fully charged Red Error Note The battery does not charge while installed in the controller Follow instructions below to charge battery Open the battery compartment by loosening the two screws on the controller back cover Pop...

Page 10: ...k on the HD Display Controller Connect the adapter to the mains AC power outlet Power on the system see Powering the System section The AC adapter will power only the tool system the battery will not charge if installed The system will use AC power if available first and only use battery when AC is not present Restarting the system is necessary when changing power sources ...

Page 11: ...en using with a lanyard be sure to use only safety break away lanyards Spare Parts Part Number Description 154701 JAWS HD Grabber 154900 JAWS HD Display Controller 154740 Power Video Cable 50ft 15m 154730 Extension Cable 50ft 15m 154703 154795 154796 154705 154707 Operator Guide Rechargeable Battery Battery Charger Basic Kit Carrying Case AC Adapter ...

Page 12: ...43204 Large Snare 143220 Adjustable Elbow 143230 Tee Handle 143210 Hook Small 143270 Hook Medium 143280 Hook Large 143290 Hook Extra Large 140890 Rubber Flex Joint 143297 Spring Flex Joint 143396 Hoist Lifting Ring 143356 Plastic Vial for spare parts 143240 Ø 5 16 x 6 L Ø 8mm x 15cm Push Pole 143250 Ø 5 16 x 12 L Ø 8mm x 30cm Push Pole 153235 Ø 3 16 x 16 L Ø 5mm x 40cm Push Pole 153236 Ø 1 4 x 16 ...

Page 13: ... and Case Part Number Description 143265 Ø 3 16 x 60 L Ø 5mm x 150cm Push Pole 143266 Ø 1 4 x 60 L Ø 6mm x 150cm Push Pole 143268 Ø 5 16 x 60 L Ø 8mm x 150cm Push Pole 143269 Ø 3 8 x 60 L Ø 9mm x 150cm Push Pole 143261 Push Pole Quiver ...

Page 14: ... Weight 0 8lb 36Kg Remote Grabber Tool 3 1lb 1 4Kg Battery Power Pack 0 7lb 0 32Kg Cable Jaw Opening 2 75in 70mm maximum Power 15 watts 12Vdc rechargeable NiMH battery Depth Rating 100ft 30m maximum of water Care Clean with mild soap and water do not use solvents Oil linkage periodically after cleaning Check cable for damage replace if jacket is breached Keep battery charged ready for use ...

Page 15: ...CULAR PURPOSE DESCRIPTION QUALITY PRODUCTIVENESS OR OTHERWISE This Warranty applies only to the original purchaser and cannot be assigned or transferred to any third party without express written consent of SNI The warranty does not apply to expendable items or normal wear and tear or failure due to overheating or radiation exposure Additionally SNI assumes no responsibility either expressed or im...

Page 16: ...llowing are some helpful tips and hints on how to maximize the value of your JAWS 2 0 investment 1 Adjustable elbow PN 143220 Left Connecting a push pole to the adjustable elbow Use your finger tip to compress the spring loader locking pin Slide male fitting into the mating adaptor until seated and spring loaded locking pin pops into place Right Adjusting the elbow s position and tightening with h...

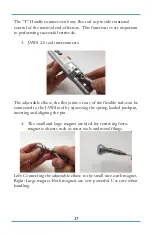
Page 17: ...able elbow the flex joints or any of the flexible rods can be connected to the JAWS tool by squeezing the spring loaded pushpin inserting and aligning the pin 4 The small and large magnet are ideal for retrieving ferro magnetic objects such as most tools and metal filings Left Connecting the adjustable elbow to the small rare earth magnet Right Large magnet Both magnets are very powerful Use care ...

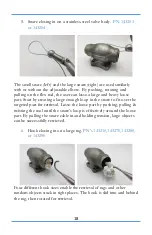
Page 18: ...op in the snare to fit over the targeted part for retrieval Lasso the loose part by pushing pulling twisting the tool until the snare s loop is effectively around the loose part By pulling the snare cable in and holding tension large objects can be successfully retrieved 6 Hook closing in on a large rag PN s 143210 143270 143280 or 143290 Four different hook sizes enable the retrieval of rags and ...

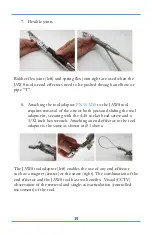
Page 19: ...s and sliding the tool adaptor in securing with the 4 40 socket head screw and a 3 32 inch hex wrench Attaching an end effector to the tool adaptor is the same as shown in 1 above The JAWS tool adaptor left enables the use of any end effector such as a magnet center or the snare right The combination of the end effector and the JAWS tool has two benefits Visual CCTV observation of the retrieval an...

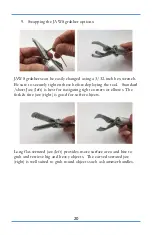
Page 20: ...fore deploying the tool Standard short Jaw left is best for navigating tight corners or elbows The fork tine jaw right is good for softer objects Long flat serrated jaw left provides more surface area and bite to grab and retrieve big and heavy objects The curved serrated jaw right is well suited to grab round objects such as hammer handles ...

Page 21: ...21 Good luck retrieving Call us for technical support ...

Page 22: ... Sensor Networks Inc Contact Us 1 814 466 7207 customercare sensornetworksinc com SensorNetworksInc com Sensor Networks Inc 176 500 Technology Drive Boalsburg PA 16827 USA PN 154703A 2018 by Sensor Networks Inc All rights reserved ...

Reviews: