MX-7000 Installation and operation manual
P a g e
| 33
Section 7 MX-7000 Setup
A complete security system requires that the MX-7000 Multiplex Control Center be setup to work with the
configuration of installed transponders and sensors. Since the layout and requirements of each facility are
different, each installation requires some site-specific setup.
It is recommended that all initial setup, adjustments and testing be accomplished in your shop. Outdoor
security systems are normally installed over large areas with fences and locked gates making access for
adjustment and troubleshooting difficult and time consuming. Initial testing in your shop facilitates setup
and adjustment since all equipment can be located in very close proximity.
The following initial setup and adjustment procedure assumes that the work is being accomplished in your
shop. If initial setup and adjustment in the field is required, the procedure should be changed to match the
field conditions.
NOTE: During these procedures, the words processor and transponder are often used to
describe the field units. Processor describes the complete field-installed sensor device. The
transponder is the addressable PCB inside the processor, which handles communications with
the MX-7000.
Initial procedures
•
Check each unit for physical damage, and for loose parts and connectors.
•
Remove the top cover of the MX-7000 by removing the two screws and sliding the cover toward
the rear of the unit. Ensure that all modules, loop cards, audio and power cards are securely in
place and that all connectors and wiring are in place.
•
Remove the covers from the processors as applicable to your installation. Choose one processor
that will be your primary test unit.
NOTE: Refer to the manual of each type of processor for detailed instructions.
•
Arrange enough workbench space for the MX-7000 and several of the processors side by side.
•
For a copper wire loop, use the specified interconnect cable.
•
For a fiber optic loop use approximately 10 feet of 18 AWG twisted-pair wire for power, and 10
foot fiber optic patch cables for data and audio connections.
•
Make the MX-7000 power connections.
MX-7000 system setup
The MX-7000 setup functions control system operation and display. The MX-7000 contains a default
configuration which can be used for most installations.
Initial power up
•
Apply AC power to the MX-7000.
•
Connect the backup battery (if used).
NOTE: To power down the MX-7000, first disconnect the battery then the AC power.
Setting up the MX-7000
1. On the touchscreen, select Setup.
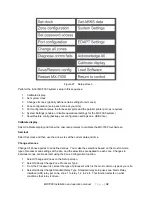
2. Enter the system password (default 0000) and then select Setup (Figure 27 illustrates the
Setup screen).

