

STC-HD133DV
OSD Remote Control
User Guide
6
Rev 1.0
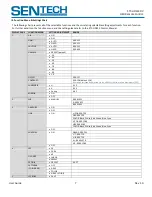
II. Operating the OSD Menu Remote Control
(
Default Settings
)
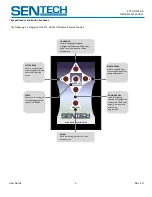
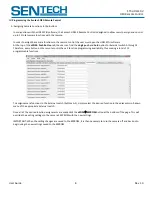
First plug the pin jack of the remote control into the STC-HD133 camera to begin using the OSD Remote Control. Press the
MENU
[A]
button to initiate the OSD (On Screen Display) menu.
Press the
UP [B]
or
DOWN [F]
button to toggle through the function menu and the page numbers.
NOTE:
In order to change page numbers, the user must toggle through the entire function menu until the appropriate page
number is attained.
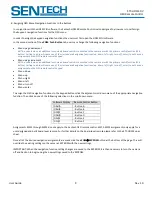
To adjust a function setting, highlight the function that is to be changed. Press the
RIGHT ARROW [E]
button to highlight the
existing function setting. Then press the
UP [B]
or
DOWN [F]
button to toggle through the available setting options for the
function. Once the desired setting adjustment is highlighted, simply push the
LEFT ARROW [C]
button to return to the function
menu.
NOTE:
It is not necessary to press the
ENTER [D]
button to save the settings adjustment.
When all of the desired setting adjustments are made, toggle to Page 5 of the OSD menu. At the EEPROM function press the
RIGHT ARROW [E]
button to highlight SAVE. Push the
ENTER [D]
button and a prompt will appear on the screen. If you want to
save all the setting changes to the EEPROM of the camera press the
ENTER [D]
button again. If you are not ready to save all of the
setting changes to the EEPROM press the
LEFT ARROW [C]
button to return to the function menu.


