background image

10 


3


Data Logger 

The NP15 has an internal data logger for 2,000 points. 

3.1


Storing Data 

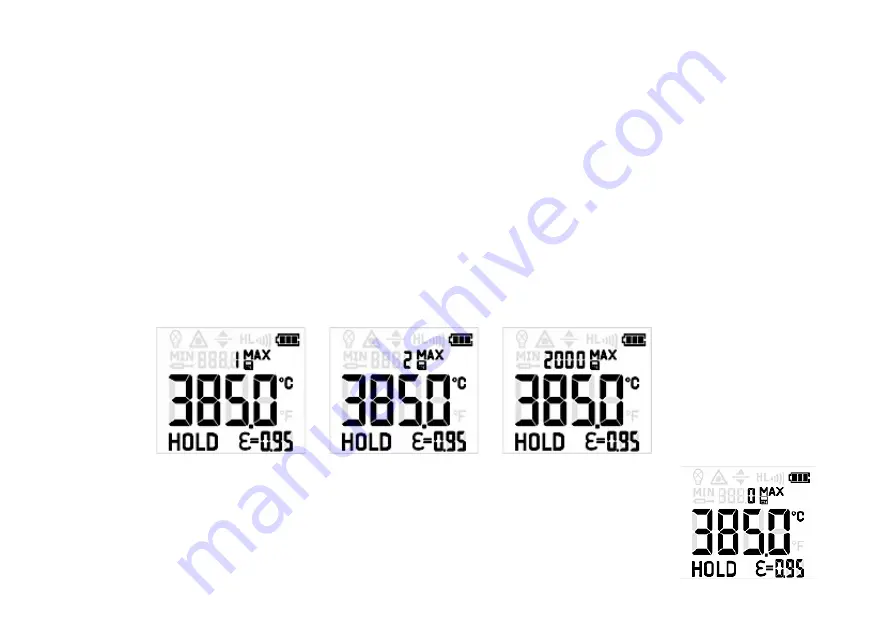
Press the trigger to turn on the unit and then release the trigger to enter to [

HOLD mode

], and press the DOWN [

button, there will be a number #; MAX/disk icon appear above the current temperature result. The number # indicate 
the memory position. You can choose the memory position from 1~2,000 with the UP[ 


]/DOWN[ 


] button. 

Press the MODE button [  ○  ] can save the Max temperature of this measurement to the current position. 
 

3.2


Recall of Data 

In [

Measurement mode

], keep the trigger pressed and then press the MODE button [  ○  ] to recall the saved data. 

The data logger position # and MAX/disc icon (flashing) will be shown in the display. Users can choose the memory 
position by press the UP

  ] 

/ DOWN

  ]

 button. 


3.3


Reset of the Data Logger 

Please press the DOWN 

  ]

button during the [

HOLD mode

]. Select logger   

position 0 and press MODE button [  ○  ] again. Three buzzer signals confirm 
the successful reset. 

Summary of Contents for NP15 Series

Page 1: ......

Page 2: ...ions 4 2 Measurement 4 2 1 Basic Operation 4 2 2 Battery Installation 4 2 3 Hold Function 5 2 4 Laser Sighting 5 2 5 Display Backlight 5 2 6 Unit Settings 5 Emissivity 6 Max Min TC Probe 7 High Low Alarm 7 Temperature Unit 9 Offset 9 3 Data Logger 10 3 1 Storing Data 10 3 2 Recall of Data 10 3 3 Reset of the Data Logger 10 Note Read the manual carefully before the initial start up The producer res...

Page 3: ...m E Battery symbol F C F unit G IR temperature H Emissivity I Hold mode J TCK temperature 1 2 Display Up Laser With this button you can setup the laser or increase the chosen value or read MAX MIN result in HOLD mode Down Display backlight With this button toyou can setup the backlight or reduce the chosen value Mode Button In HOLD mode each time you press it you will enter to another function set...

Page 4: ...splay will show the current temperature value Switch Off The unit will automatically switch off after 7 seconds if no button is pressed 2 2 Battery Installation The NP15 is equipped a 9V alkaline battery If the battery is low the battery symbol will appear in the display Please exchange the battery immediately if the symbol is flashing 1 2 3 4 5 6 Removing the battery cover Replace the battery Lif...

Page 5: ...activate deactivate the display backlight 2 6 Unit Settings You can setup the emissivity max min TCK display high low alarm temperature unit offset and trigger lock by pressing the MODE button in HOLD mode The respective function will be flashing in the display With the UP and DOWN buttons you can change parameters or activate deactivate functions To save the settings you have to press the MODE bu...

Page 6: ...ctivate functions Emissivity ε In HOLD mode press the MODE button to set the emissivity 1 Emissivity ε flashing 2 Press UP or DOWN button to increase reduce the emissivity 3 To save the setting press the MODE button again will also switch to the Max Min TC Probe function press MODE button ε Emissivity MAX MIN H High Alarm ON High Alarm Value L Low Alarm ON Low Alarm Value ºC ºF Temperature Unit Of...

Page 7: ...e displayed and continued measurement without pulling the trigger if a probe is connected To save the setting press the MODE button again will also switch to the High Alarm function High Low Alarm 1 High Alarm In HOLD mode press the MODE button until enter the High Alarm mode To activate deactivate High Alarm please press the UP or DOWN button if the H is shown in the display The High Alarm functi...

Page 8: ...s the MODE button until enter the Low Alarm mode To activate deactivate Low Alarm please press the UP or DOWN button if the L is shown in the display The Low Alarm function is activated as soon as the display shows the sign L After pressing MODE button again the Low Alarm value can be adjusted using the UP or DOWN To save the setting press the MODE button again will also switch to the Temperature ...

Page 9: ...il enter the temperature Offset mode Then press the UP or DOWN button to setup the temperature offset value 10 Press the MODE button again will also return to the Trigger Lock function or the trigger Trigger Lock In HOLD mode press the MODE button repeatedly until enter the Trigger Lock mode LOCH and press the UP or DOWN button to toggle between ON or OFF To save the setting press the MODE button ...

Page 10: ...000 with the UP DOWN button Press the MODE button can save the Max temperature of this measurement to the current position 3 2 Recall of Data In Measurement mode keep the trigger pressed and then press the MODE button to recall the saved data The data logger position and MAX disc icon flashing will be shown in the display Users can choose the memory position by press the UP DOWN button 3 3 Reset o...

Page 11: ...number your computer set open the device manager Start Settings Control Panel System Hardware Device Manager In the category Ports COM LPT you can find the Infrared Thermometer Adapter DR 6 x only if the NP15 is plugged in In parenthesis the COM Port number is shown 4 3 STonline software 1 Please connect the NP15 to your PC and start STonline software and open at first Menu Setup S Interface Setti...

Page 12: ...y time using the control elements of the temperature axis 4 Stop the measurement To stop the current measurement please press the menu Measurement M Stop The save data File F Save Diagram opens an explorer window to select destination and file name 5 Diagram setting The menu item settings Diagram A Settings enable the settings for data diagram Color temperature graph and digital display Initial Ti...

Page 13: ...ter 1 5 C 20 to 19 9 C 2 5 C 30 to 20 1 C H1 H2 H3 0 5 of reading 2ºC Repeatability LT LR 0 5 of reading or 0 5ºC whichever is greater H1 H2 H3 0 3 of reading 1ºC Configurations Real time Hold Max Min Alarm Functions HIGH LOW alarm audible visible Data Logger 2 000 points LCD Backlight green and red blue alarm Digital Interface Input Mini USB Type K 40ºC 400ºC accuracy 1 or 1ºC whichever is greate...

Page 14: ... liable for any special incidental or consequential damages whether in contract tort or otherwise If a failure occurs during the warranty period the product will be replaced calibrated or repaired without further charges The freight costs will be paid by the sender The manufacturer reserves the right to exchange components of the product instead of repairing it If the failure results from misuse n...

Reviews: