background image

Step 2: Review the EM3000 Specifications


5


Doc 6001536, Rev C 

Step 2: Review the EM3000 Specifications 


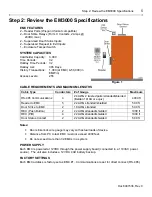
EMC FEATURES 

2 – Reader Ports (Wiegand format compatible) 
2 – Door Strike Relays (Form C Contacts, 2 Amps @ 
 28VDC 

max.) 

2 – Supervised Door Status Inputs 
2 – Supervised Request to Exit Inputs 
1 – Enclosure Tamper Switch 


SYSTEM CAPACITIES 

Cardholder Capacity: 

3,000 

Time Periods: 


  32 

Holiday Time Periods:  32 
Holiday List:   


365 Days 

History Transactions:  


1,000 (at EMC) & 50,000 (in 
EMWin) 

Access Levels: 

255 


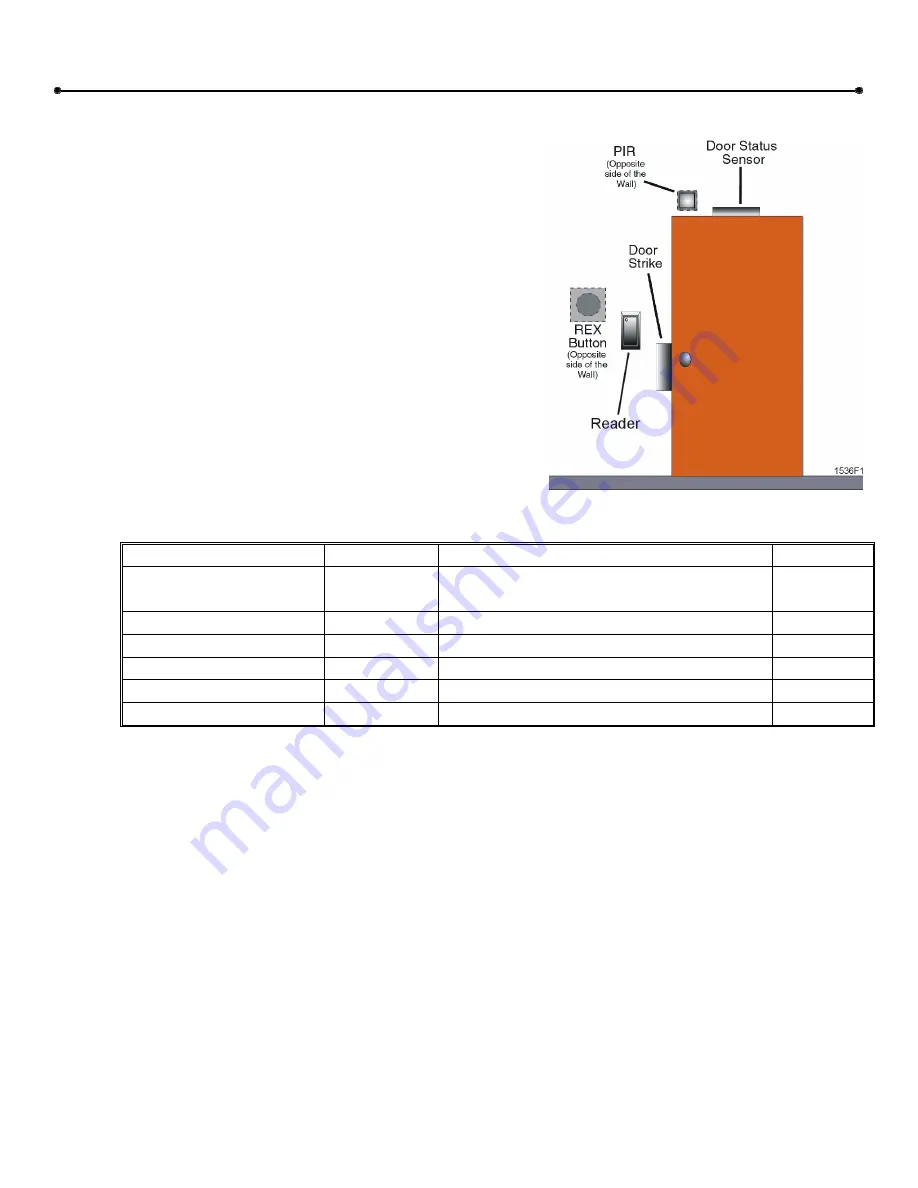
Figure 1 

CABLE REQUIREMENTS AND MAXIMUM LENGTHS 

Cable Type 

Conductors  # of Gauge 

Maximum 

RS-485 Communications


4


24 AWG 2 twisted pairs/stranded/shielded 
(Belden 1419A or equiv.) 

4000 ft 

Reader to EMC 

22 AWG stranded/shielded 

500 ft. 

Door Strike to EMC 

18 AWG stranded 

500 ft. 

REX (Push Button) 

22 AWG stranded/shielded 

1000 ft. 

REX (PIR) 

22 AWG stranded/shielded 

1000 ft. 

Door Status Contact 

22 AWG stranded/shielded 

500 ft. 


Notes:


Door strike/lock wire gauge may vary with actual loads of device. 


Distance from PC to last EMC must not exceed 4000 feet. 


Do not exceed more than 32 EMCs in a system. 


POWER SUPPLY 

Each EMC is powered at 12VDC through the power supply board (connected to a 110VAC power 
source).  The unit also includes a 12VDC, 4AH battery backup. 


FACTORY SETTINGS 

Each EMC address is factory-set as EMC #1.  Communications are set for direct connect (RS-485). 


Summary of Contents for EM3000

Page 1: ...Doc 6001536 Rev C EM3000 Access Control System Installation Instructions EM3000 Controller EMC ...

Page 2: ...__________________________________________________________________14 Installing the Reader and Door Lock_____________________________________________________________14 Running Cable to Dedicated PC ________________________________________________________________16 Wiring the EMC_____________________________________________________________________________16 Step 5 Power and Test the EM3000 System__...

Page 3: ...tures capacities and cable requirements and maximum lengths Refer to page 5 Step 3 Defines Access Control and explains how to plan for your system installation Refer to page 6 Step 4 Identifies the specific connections for each component Refer to page 10 Step 5 Outlines the proper sequence of events for powering up the system Refer to page 21 Step 6 Explains what you need to know about adding mult...

Page 4: ...0035 1 Controller Board EMC SN1110226 1 Battery Rechargeable 12V 4AH SN5900058 1 Documentation Package Installation SN1700036 1 Installation Instructions This Manual SN6001536 1 Quick Installation Guide SN6001540 1 Screwdriver SN4700000 1 SOFTWARE COMMUNICATIONS KIT SN7000405 1 RS 485 Kit Converter Power Supply Instructions SN8100294 1 RS 485 Converter SN8100302 1 Power Supply 12VDC 100 mA SN53000...

Page 5: ...S 485 Communications 4 24 AWG 2 twisted pairs stranded shielded Belden 1419A or equiv 4000 ft Reader to EMC 5 22 AWG stranded shielded 500 ft Door Strike to EMC 2 18 AWG stranded 500 ft REX Push Button 2 22 AWGstranded shielded 1000 ft REX PIR 4 22 AWGstranded shielded 1000 ft Door Status Contact 2 22 AWGstranded shielded 500 ft Notes Door strike lock wire gauge may vary with actual loads of devic...

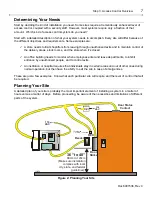
Page 6: ...ontrol environment can vary by the number of units in a system and the number of doors that can be monitored Likewise the equipment or elements in an access control point may vary due to the level of security needed or the kind of access allowed HOW THE SYSTEM WORKS On the system level the EM3000 software runs the access control system by communicating instructions from the computer through an RS ...

Page 7: ... when employees enter and leave departments to inhibit entrance by unauthorized people and to control exits An institution or hospital requires that individuals stay in certain areas and out of other ones during normal operation but then have the ability to exit the site in case of emergencies These are just a few examples Know what each particular site will require and the level of control that w...

Page 8: ...location that is dry safe from large temperature variations and most importantly secure from the unexpected e g vandalism The recommended installation locations are 1 Telephone PBX rooms 2 Computer rooms 3 A wall near one of the Readers protected area 4 Above a false ceiling The EMC is rated for indoor installation only Figure 3 EMC To keep your EMC working properly place where the temperature ran...

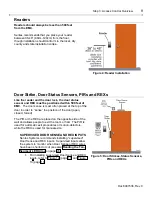
Page 9: ...t the top of the door in order to sense the position of the door open closed forced The PIR or the REX are placed on the opposite side of the wall and allows people to exit the room or hall The PIR is used for automatic exit procedures or motion detectors while the REX is used for manual exits SUPERVISED DOOR SENSE AND REX INPUTS Sentex Systems recommends installing supervised Door Sense and REX i...

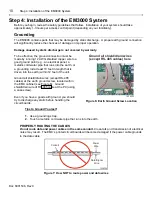
Page 10: ...d at least 10 feet in length that is driven into the earth within 12 feet of the unit Ground all shield drain wires except RS 485 cables at the earth ground screw located within the EMC cabinet see Figure 6 Ground shield drain wire of RS 485 cable at the PC using a case screw Even if you have a good earth ground you should try to discharge any static before handling the circuit boards Ground all s...

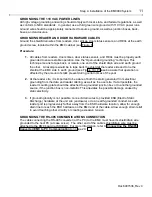
Page 11: ... affected by the amount of static present during certain times of the year 2 At the reader site it is important to be aware of both the static generated from electrical grounding from the data and reader cabling as well as the user site If at all possible the reader mounting plate should be attached to a grounded junction box or to another grounded source if the junction box is non metallic This a...

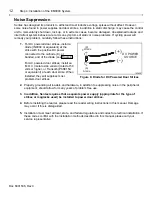
Page 12: ...door strikes install an M O V metal oxide varistor rated at 50 volts or higher or Transorb P6KE15A or equivalent at each door strike When installed they will suppress most problem door strikes DC POWER SOURCE A Anode K Cathode 1536F5 Figure 8 Diode for DC Powered Door Strikes 2 Properly grounding all readers and hardware in addition to suppressing noise in the peripheral equipment should allow for...

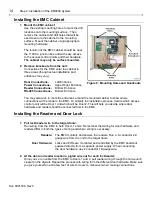
Page 13: ...nts Make sure that your locations are also safe from temperature variations environmental changes and access from outsiders 4 Review reader and door hardware materials for mounting requirement Will you require special tools when installing your system When installing a reader always follow the instructions outlined in the reader s instruction guide s 5 Prep and cut door frames for lock and door se...

Page 14: ...connections will be made to the EMC To simplify the installation process decide which access control point will be Door 1 and which will be Door 2 This will help you decide where door hardware and reader should be connected first to the EMC Installing the Reader and Door Lock 1 Pull lock reader wire to the target doors Run wiring from the EMC to both Doors 1 and 2 Remember that wiring for door har...

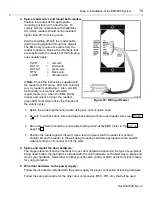
Page 15: ...e duration of the unlock cycle Figure 10 Wiring a Reader Splice the wires together and secure using wire nuts or splice caps Be sure to cut back drain wires and tape back along with non used reader wires see Figure 10 Drain wire shield should be connected at earth ground at the EMC refer to Figure 6 on page 10 Position the reader against the wall Use a level to assure that the reader is mounted st...

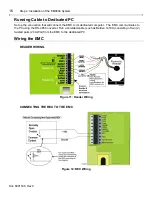
Page 16: ...ll connect the EMC to its dedicated computer The EMC communicates to the PC using the RS 485 Converter Run a shielded cable such as Belden 1419A consisting of two 2 twisted pairs 24 AWG from the EMC to the dedicated PC Wiring the EMC READER WIRING Figure 11 Reader Wiring CONNECTING THE REX TO THE EMC Figure 12 REX Wiring ...

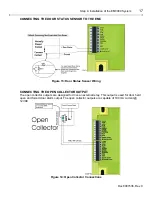
Page 17: ... Figure 13 Door Status Sensor Wiring CONNECTING THE OPEN COLLECTOR OUTPUT The open collector outputs are designed to drive an external relay This output is used for door held open and forced door alarm output The open collector outputs are capable of 100 mA current 12VDC Figure 14 Open Collector Connections ...

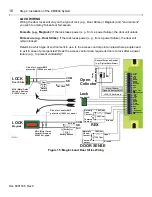
Page 18: ...nt vandalism COM COM N O N O N C N C Not Used Not Used LOCK Door Strike LOCK Maglock Diode for Counter EMF protection 1N4004 or equiv Diode for Counter EMF protection 1N4004 or equiv MOV Metal Oxide Varistor Siemens S10K30 or equiv MOV Metal Oxide Varistor Siemens S10K30 or equiv Door Strike P S Battery Backed Door Strike P S Battery Backed General Purpose Output e g Digital Auto Dialer Externally...

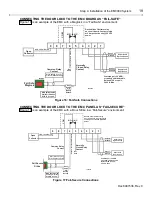
Page 19: ...WG stranded shielded cable Belden 8728 or equiv 2 000 ft Max 1536F13 Sense 2 Ground Sense 1 Ground Figure 16 Fail Safe Connections CONNECTING THE DOOR LOCK TO THE EMC PANEL AS FAIL SECURE Figure 17 is an example of the EMC with a Door Strike in a Fail Secure environment 9 8 7 6 5 4 3 2 1 Open Collector Common Relay Contact Normally Closed Relay Contact 12V 100 mA max Normally Open Relay Contact No...

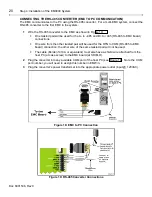
Page 20: ...nections One wire from the other twisted pair will be used for the RTN to COM RS 485 to EMC board connection the other wire of the same twisted pair will not be used The cable Belden 1419A or equivalent must also have a shield wire attached from the host PC at case screw to the EMC board at SHIELD 2 Plug the converter into any available COM port of the host PC see Figure 18 Note the COM port numbe...

Page 21: ...s LED see Figure 21 will light with an amber greenish glow to indicate that 110VAC is present and the supply is operating properly Do not attempt to connect the 110 VAC junction box to the 12 VDC power supply unless you are a qualified electrician All connections from the 110VAC junction box to the 12 VDC power supply should meet National Electrician Code NEC High voltage accidents can be fatal to...

Page 22: ...he negative terminal of the battery Red wire to positive Black wire to negative 2 If the power supply s status LED glows red only the battery is supplying power to the system 110VAC is not present 3 Place the battery inside the cabinet in the lower right corner as seen in Figure 22 Red Black 1536F27 Power Supply Board Battery Status LED Figure 21 Battery Backup Connections Figure 22 Battery Placem...

Page 23: ...trike to its power supply and to the EMC board Also check the wiring from the REX to the EMC board 3 Perform this set of steps for each EMC you have installed After completing hookup of the EMC use the EMWin software to verify all other functions Refer to the EMWin User s Guide EMC Power Up Checklist The EMC Red Power Indicator must be ON right most indicator on LED array on front of board see Fig...

Page 24: ...s For more information on supervised inputs refer to Supervised Door Sense and REX Inputs on page 9 LED CONDITION STATUS ON Circuit is normal active OFF Circuit is normal inactive Slow Approx 2 flashes second Fault condition Open circuit cable is cut Moderate Approx 4 flashes second Fault condition Short circuit cable is shorted Fast Approx 6 7 flashes second Input is configured for supervision in...

Page 25: ...nit 1 Connect each EMC by wiring from P8 from the first EMC board to P7 in the next EMC board This format can be repeated in up to 32 total units The total cable length from the PC to the last EMC in the system must not exceed 4000 feet 2 Move the W2 jumper to TOUT for all units except the last one Last Unit W2 jumper in TIN position All Other Units WS jumper in TOUT position Figure 25 Communicati...

Page 26: ...tes over an RS 485 serial direct connection The address DIP switch SW1 is located at the upper right of the board Set each EMC DIP switch uniquely in sequential order from 1 to 32 starting with the first EMC the one connected to the RS 485 converter at the PC EMC 1 in Figure 25 Figure 26 EMC Dip Switches Factory Setting ...

Page 27: ...wer supply Check wiring from power supply to EMC You may have a possible polarity problem Be sure that the plus lead from the power supply is inserted into the plus power connection point on the EMC board Likewise check that the negative power supply is inserted into the ground connection point on the EMC board Problem 2 Cards are not being read Card reader will beep when successfully read and sen...

Page 28: ...20 25 Check EMC DIP switch setting 26 In multi EMC system EMCs addressed as EMC 1 26 No communication between PC and EMC No communication between EMC and other EMCs Most common error is DIP Switch is programmed up side down 26 Com1 error Port being used Disable all auto loading background programs e g Palm Pilot or Phone Link Check DIP switch setting for EMC address number 26 Check communication w...

Page 29: ...nd Door Forced Open in Transaction Monitor In Config Doors Door Properties turn off Contacts Used and Request to Exit Used Check Door status wiring 17 Alarm ON If termination of EMWin occurs during download Turn Alarm ON then Turn Alarm OFF Configure Door Description does not match Door Names In Config Wizard re assign doors after Door Name change EMWin windows open in odd sizes Set Default Window...

Page 30: ...tion has not been activated or is not in the database Add this card to the system INVALID TIME USE Cardholder has presented their card outside of the scheduled Time Period Select another Access Level that has the desired time schedule INVALID DAY USE The Cardholder has tried to gain entry during an invalid day Select the appropriate Access Level that best suits their schedule INVALID CARD READER T...

Page 31: ...considered N O if the normal condition of the circuit is not completed or in the open state For N O push buttons pushing the button completes or Closes the circuit For N O Door Strikes the N O condition will lock the door When the circuit is closed the door will unlock Normally Closed N C A device is considered N C if the normal condition of the circuit is completed or in the Closed state For alar...

Page 32: ...nformation may not be distributed without the prior written consent of Sentex Systems The software and firmware included in the Sentex Systems product as they relate to this documentation are also protected by copyright and contain information proprietary to Sentex Systems FOR TECHNICAL SUPPORT OR TO ORDER REPLACEMENT PARTS Call our toll free number 800 528 2806 Installation and service informatio...

Reviews: