


- 54 -
10)
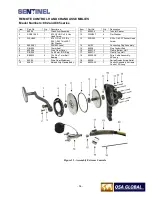
Remove the crank arm from the control crank assembly by removing the 5/16 inch hex bolt and washer.
While wearing safety glasses, carefully remove the control crank assembly from the handle or frame by unscrewing
the four bind head screws from the stop nuts.
Separate the two halves of the control crank housing.
CAUTION
Ensure the cable adapters stay in the bottom control crank housing during separation. Care should be taken to avoid
losing control of the tensioned wear strip that may fly out during separation of the control crank housing.
This is the
reason why safety glasses must be worn.
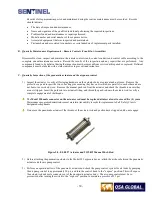
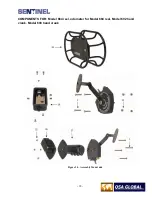
Disassemble and degrease the drive wheel, wear strip, the two cable adapters, the two brake jaws, the two halves of
the control crank housing and brake bearing. The wheel bearings may be left in the control crank housing during
cleaning, but care should be taken not to lose the spacer rings that fit between the wheel bearings and the drive
wheel as applicable. Clean and inspect all parts for damage or wear and replace as necessary.
If applicable, remove the reset knob of the odometer by loosening the two Allen set screws, then remove the
odometer cover by removing the two bind head screws that fasten it to the mounting plate. Do not disassemble the
odometer.
Clean the helical gear of the odometer with solvent using a brush to dislodge any material between the gear teeth.
Check the odometer for proper operation: turning the gear should turn the odometer but the odometer shaft should
still be able to turn when the gear is held fixed (for zeroing the odometer).
Clean the drive wheel in solvent using a brush to dislodge any dirt between gear teeth. Inspect the drive wheel's
gear teeth looking for broken or bent teeth. If the drive wheel has broken or bent teeth, use a file to grind the tooth
flush with the drive wheel. Up to three consecutive teeth can be missing from the drive wheel before a replacement
is required.
Light rust may be removed from the wear strip using fine sandpaper and machine oil.
Lightly grease the drive wheel hub, wheel bearings and the wear strip before reassembling.
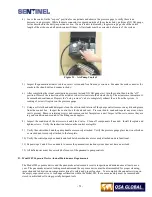
Place one of the cable adapters in the lower control crank housing. Place one end of the wear strip against the cable
adapter then fit the rest in the track of the housing. Fit the other cable adapter in place to retain the wear strip.
Summary of Contents for 989
Page 1: ...MAN 037 October 2017 ...


