8
Cleaning
All parts can be cleaned with a brush and a neutral detergent.
Make sure no detergents get into the pond water when doing
so. Carefully rinse all cleaned parts with clean tap water before
you reassemble the pump and put it back into operation in the
pond. You can immerse the impeller unit (3.5) and the motor
block (3.3) in a decalcifier for stainless steel components if the
pump should have become strongly calcified. Please follow the
instructions for use of the decalcifier.
Maintenance
The mechanical components of the
sera pond pumps PP
can
be largely dismantled and replaced. The motor block (3.3) is en-
capsulated in plastics for electrical isolation and therefore can-
not be repaired.
Change the impeller unit (3.5):
First screw off the variable hose connector (3.2). Loosen the
screws (3.1.1) by a half turn with a screwdriver while simultane-
ously pressing them down. Then take off the upper half of the
pond basket (3.1.2). Loosen the screws of the holder (3.1.4) of
the pump. Remove the pump from the lower pump basket
(3.1.3).
Take the motor block out of the pump cover. Loosen the
4 screws that attach the holder plate (3.6) to the motor block
(3.3) with a Philips screwdriver. Take off the socket plate. You
can now pull the impeller unit (3.5) out of the pump and insert
the new impeller unit. Make sure the seals are correctly in place
when reassembling the unit.
Care of your pump during the winter:
Protect the
sera pond pump PP
from freezing! Remove the
pump from your pond in autumn. Clean and dry the pump com-
pletely (including the impeller unit) and very lightly grease all
metal parts.
Important:
To ensure optimal performance and life
span, clean the pump and store in a dry place if not in use and
do not leave it in water if switched off for longer periods. (If you
have used a material other than Vaseline for greasing you must
carefully remove it before using the pump again).
SAFETY PRECAUTIONS
• These pumps are not for use with swimming pools!
•
sera pond pumps PP
should be installed according to your
local electrical installation code. Please contact an electri-
cian.
• Always check that the motor connection and plug are intact
before using.
• Mains supply must correspond to the data on the type plate.
• The circuit to which the pump is connected must be secured
with a circuit breaker (FI / RCD ground fault interrupter,
30 mA).
• The electrical connection should be located in a moisture-
free area and should be at least 2 m (6.6 ft.) away from the
pond’s edge.
• Keep the electrical connections dry!
• Never transport the pump by means of the electrical cord!
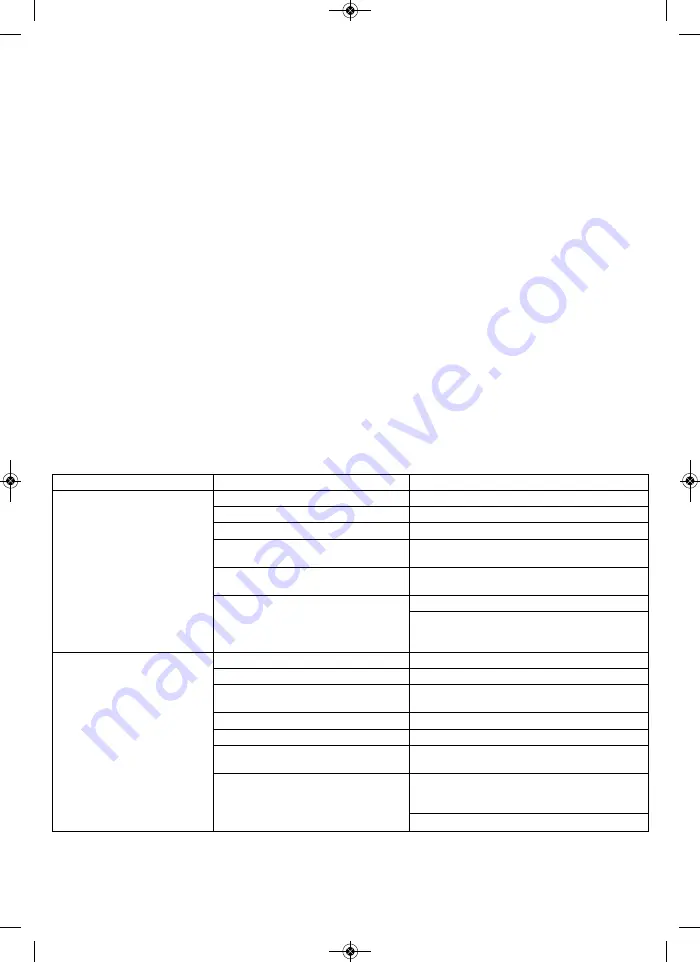
Problem
Possible cause
Possible solution
No water delivery
Power supply interrupted
Plug in the plug, check fuse
Cable defect
Not repairable
Motor block defect
Not repairable
Pump calcified, short circuit rotor unit
Dismantle and decalcify pump
(3.5.2) seized up
Short circuit rotor jammed by sand
Dismantle and clean pump, change
position according to information for use
Pump draws in air
Remove leakage in the hose system
Pump is placed too closely underneath the
water surface and draws in air
→
place in a deeper position
Pump performance too low
Pump cover clogged
Clean pump cover
Hose diameter too small
Use hose with a larger diameter
Variable hose connector not adapted
Saw off too small diameters
to hose
Hose too long
Shorten hose
Pond filter clogged
Clean pond filter
Pond filter placed too high
Place pond filter in a lower position, possibly
dig it in partially
Pump draws in air
Pump is placed too closely underneath the
water surface and draws in air
→
place in a deeper position
Remove leakage in the hose system
Troubleshooting
sera pond PP Teichp GBI INT WIN:A5 05.03.2010 13:50 Seite 8


