Page 4
PUMP ASSEMBLY
WASH ALL PARTS PROPERLY
BEFORE USE.
See page 6.
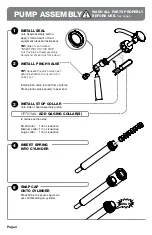
INSTALL SEAL
onto head assembly piston.
Apply small amount of food
equipment lubricant inside seal.
TIP:
Side of seal marked
“INSERT PISTON THIS SIDE”
must face top of head assembly.
Flared end of seal must face down.
1
INSTALL PINCH VALVE
TIP:
Squeeze the pinch valve open
before installation to ensure it isn’t
stuck shut.
Install pinch valve into bottom of piston.
Press pinch valve securely to seal end.
2
SNAP!
INSTALL SEAL
onto head assembly piston.
Apply small amount of food
equipment lubricant inside seal.
TIP:
Side of seal marked
“INSERT PISTON THIS SIDE”
must face top of head assembly.
Flared end of seal must face down.
1
INSTALL STOP COLLAR
onto side of head assembly piston.
3
OPTIONAL:
ADD GAGING COLLAR(S)
to reduce portion size.
Small collar:
1/8 oz reduction
Medium collar: 1/4 oz reduction
Large collar:
1/2 oz reduction
INSERT SPRING
INTO CYLINDER
4
SNAP CAP
ONTO CYLINDER
Press firmly to secure cap down
over all threading on cylinder.
5


