Install SIM card and memory card
Under the battery, memory card should be inserted in the
left slot. Pull the card down as instructed, lift the card cap
and insert the memory card, put down the cap and fasten
it. SIM card is installed at the arrow point above the
memory cardin accordingly.
The device does not support hot plug, please reset the
system after accident hot-plug(refer to Figure 2).
Attention
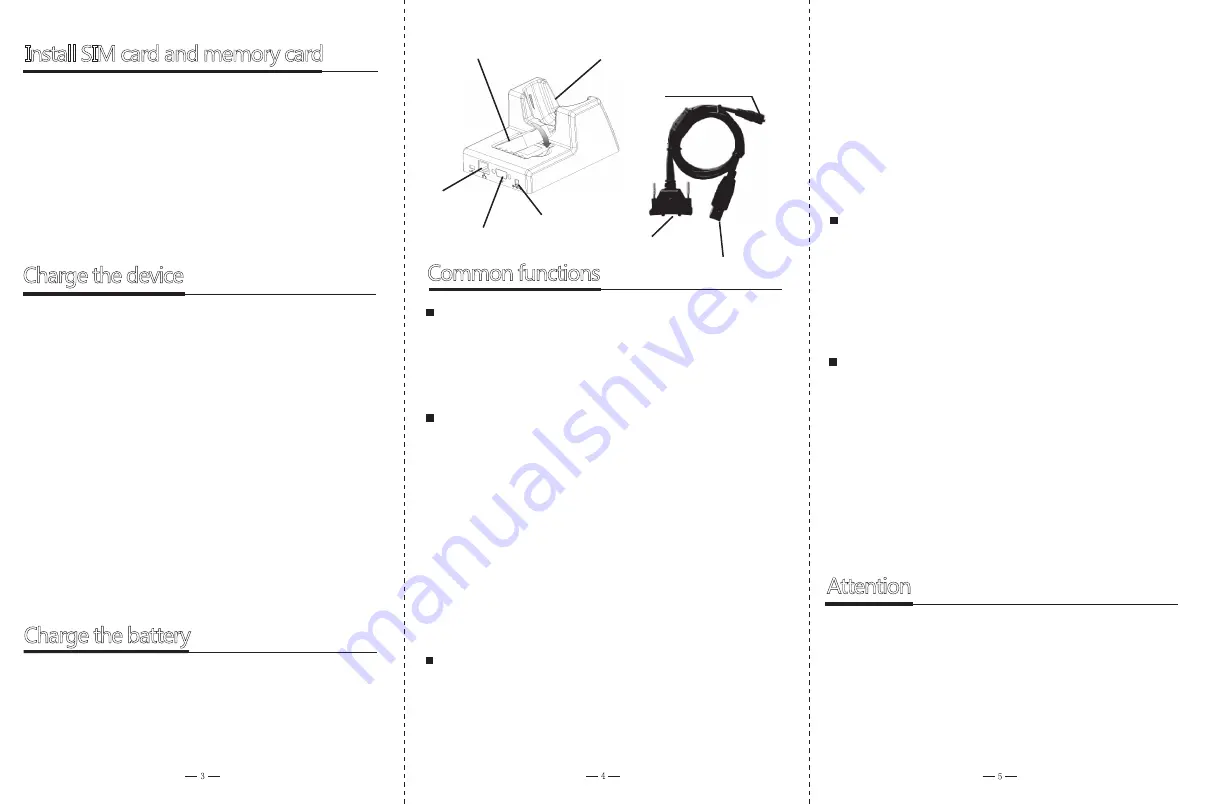
Device charging dock
USB
connection
port Serial
port
Charging
port
Battery charging port
Power supply port
End flap cap
USB connection port
Charge the device
The devices could be charged with the charging dock or
the end flap cable.
Charging dock : Place the device on the charging dock and
connect the dock to the power supply. Red indicator of
the charging dock means its under charging, green one
means it is being fully charged.
End flap cable: Connect the device with power supply by
the end flap cable, red indicator means under charging
while green means it’s been fully charged.
NOTE: The charging dock and the end flap cable should
for quite long time,please charge it at least once every two
months to avoid over discharging.
Charge the battery
Place the battery on the charging dock and connect the
charging dock to the power supply. Red indicator means
under harging while green means it has been fullly
charged.
Common functions
Connect with PC
The device can be connected with the PC with ActiveSync4.5
(or the updated versions) in Windows XP system, and the
the integrated mobile control center for Window 7 system.
APP Center
Users can use APP Center to manage the APP soperating
programs. The initial password is seuic.
The users can add their own Apps under a third party apps
management and customize it as “On desktop” and then
Automatically open when power on.
Notes: In order to start up the Apps automatically with the
device, please make sure both “Automatically open when
power on” options on the setting interface are checked.
Barcode scanning
SEUIC’ s can tool or customer’s scan tool are optional
to scan the barcodes.
Frequently Asked Questions:
1.There is no light when scanning.
WIFI connection
1. Please double-click “Wireless Manager” on the desktop.
Make sure the WIFI status is “Disabled“.
2. Click the taskbar WIFI connection icon.
3. Select AP, configure the user name and passwordto link
to the internet.
GPRS connection
1. Please double-click “Wireless Manager” on the desktop.
Make sure the GPRS status is “Disabled”.
2. Insert the SIM card correctly, and reset the device.
3. After the restarting is completed, select the taskbar GPRS
icon and double-click to dial-up the connection.
Frequently Asked Questions:
Problem shooting:
please make sure whether the scan engine is closed, if
closed, please go to the settings of scan tool to open it.
2. One scanning results in two barcodes.
Problem shooting: please confirm arethe built-in scan
program and downloaded third party application opened
simultaneously first. If yes, close the built-in scan tool and
cancel the “Automatically open when power on”.
“Carrier signal” error ---- please confirm whether the SIM card
is overdue.
1. Please keep the USB connecting cable and the PDA charging
accessories dry from water.
2. Please do not delete any windows root directory system files.
3. Do not use full ROM. otherwise there might be system
malfunction.
4. Please close 2D scan deviceif not necessary. Keeping it
open for a long time is not recommended.
not be used simultaneously. If the device to be kept idle


