8
9
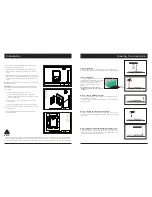
Installation
Refer to the included custom drawing package for specific dimensions
and instructions for your custom product.
1. Verify that the wall is prepared appropriately. If the product is an in-
wall, or “Recessed” configuration, verify the dimensions of the rough
opening.
2. Install mounting brackets according to the dimensions and instructions
shown on “Sheet 3” of the included drawing package. Ensure mounting
brackets are securely fastened using wood framing members where
possible.
NOTE:
Take care when moving the product. Always transport the product
with at least two people.
WARNING:
Always transport the product in a vertical position. Moving
the product in an unsupported horizontal position may result in product
flex or damage.
3. Connect power supplies and audio/video components.
• Testing all electrical and electronic devices to verify proper
integration and functionality before securely mounting it to the wall
is strongly recommended.
4. Position Television Mirror close to wall surface and securely engage
mounting brackets.
• Allow for a ¼" ventilation gap for proper air flow and heat transfer.
5. Check to ensure the Television Mirror is fully engaged and secure to the
mounting brackets.
6. Reference the appropriate electronics manual for Television Mirror
operating instructions.
NOTE:
All Séura drawing packages indicate generalized nominal residential wood framing construction, and are not indicative of any particular building
code. It is the installers responsibility that all electrical, audio/visual, and framing construction are code compliant to the municipality in which the
product is being installed. Modifications made to Séura recommendations are at the sole discretion of the installer and release Séura of all liability.
Connecting Video
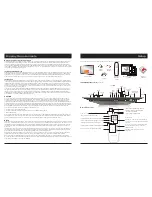
The Television Mirror features one Component, one Composite, one VGA, and two
HDMI inputs. We recommend using the HDMI inputs for best video and sound quality.
Connecting Audio
Two passive loudspeakers can be connected to the
speaker output socket with speaker cables. Observe
the polarity (+ and -) of the connections to avoid
phase errors (= incorrect stereo playback).
Switch the audio selector switch on the TV to
External.
Warning: When changing the audio from
internal to external speakers, power-off the unit
completely.
Connecting a USB Media Source
Connect an external USB media source to the USB socket to display photos, play
music or install a software update.
In order to have access to the USB port after installation we recommend installing a
USB extension cable.
Connecting a Home Automation System
With the RS-232 interface (9 pin d-subminiature connector female) you can connect
a serial cable for communication with a home automation system, PC, etc. The baud
rate is 115200.
Connecting an external IR-transmitter and Receiver
With the IR input interface, you can connect an external IR receiver to the Séura
Television Mirror. With the (4) IR output terminals, you can loop through the IR signal
from the remote control to an external device with a corresponding IR input or via an
IR emitter diode affixed in front of the IR receiver eye.
Making Connections
Speaker
Wire Input
-
-
-
-
+
+
+
+
R
R
L
L
Euroblock Connector
22" WALL OPENING
26"
WALL OPENING
24"
36"
71
2"
21
2"
1"
1"
5"
35
1 2
"
16" CENTERED
UNIT
OUTLINE
A/V & POWER
CONNECTIONS
WALL BRACKET INSTALLATION
Verify all on-site conditions.
•
Reference the dimensions from this
•
sheet to properly locate the
interlocking brackets on the
mounting surface.
Use the supplied hardware and
•
instructions to securely fasten the
loose interlocking brackets to the
mounting surface.
If applicable, connect all A/V and
•
power cords and confirm unit is
operating properly.
Hang unit onto mounting surface
•
and ensure the interlocking
brackets are securely engaged.
Note:
When possible, it is recommended
•
to secure the supplied hardware
into the framing members of the
mounting surface.
However, due to desired placement
•
of the unit, it may not be possible
to use the framing members for
mounting.
In this case, secure the supplied
•
toggle bolts to minimum ½-inch
thick drywall.
Directions for installing the toggle
•
bolts are included in the fastener
packet.
SHEET
3
PROPRIETARY AND CONFIDENTIAL
THE INFORMATION CONTAINED IN
THIS DOCUMENT IS THE SOLE
PROPERTY OF THE MANUFACTURER.
ANY REPRODUCTION IN PART, OR AS
A WHOLE, WITHOUT THE WRITTEN
PERMISSION OF MANUFACTURER, IS
PROHIBITED.
DIMENSIONS ARE IN INCHES
TOLERANCES
FRACTIONAL 1/8 [3mm]
ANGULAR: MACH 1.0
ANGULAR: BEND 1.0
TWO PLACE DECIMAL .03 [.8mm]
THREE PLACE DECIMAL .015 [.4mm]
Date Created
so0195R
Sales Order / Inv. Number
S-R-2436-19.5UB-E2-NI
Item
Revised Date
B
1
4" VENT GAP
MIRROR SURFACE
INTERFACE PLATE
MIRROR-POLISHED STAINLESS
STEEL GLASS-MOUNTING CLIPS
DETAIL B
SCALE 1:3
MOUNTING
SURFACE
INTERLOCKING
WALL BRACKETS
A/V & POWER
CONNECTIONS
19-inch High-Definition LCD
Screen Size (Diagonal): 19-inch
Format: 16:9
Brightness: 700 cd/m2
Viewing Angle: 170° Horizontal/Vertical
Contrast: 4000:1
Response Time: 6ms
Native Resolution: 1920 X 1080
Backlight: LED
Menu Languages: English, French, Spanish
Tuner:
ATV: NTSC
Digital: ATSC/QAM
Video:
75 Ohm Coaxial Antenna X 1
Composite Video, Audio L, Audio R (RCA plugs) X 1
Component YPbPr (RCA plugs) X 1
VGA 15-pin D-sub Female X 1
HDMI Type A X 2
USB Type A X 1
S-Video Mini 4-Pin DIN X 1
Audio:
Amplified Internal Speakers: 2 X 5W
Amplified Output for External Speakers: 2 X 5W
Amplified Output: Terminal Block
Constant Line Output: 3.5mm Jack X 2
Control:
RS232 9-pin DB9 Female X 1
IR IN: 3.5mm Jack X 1
IR OUT: 3.5mm Jack X 4
Power:
Input: 110-240 VAC, 50-60Hz, 1.5A
Type A NEMA Plug
Requires GFCI Protected Outlet
SHEET
2
PROPRIETARY AND CONFIDENTIAL
THE INFORMATION CONTAINED IN
THIS DOCUMENT IS THE SOLE
PROPERTY OF THE MANUFACTURER.
ANY REPRODUCTION IN PART, OR AS
A WHOLE, WITHOUT THE WRITTEN
PERMISSION OF MANUFACTURER, IS
PROHIBITED.
DIMENSIONS ARE IN INCHES
TOLERANCES
FRACTIONAL 1/8 [3mm]
ANGULAR: MACH 1.0
ANGULAR: BEND 1.0
TWO PLACE DECIMAL .03 [.8mm]
THREE PLACE DECIMAL .015 [.4mm]
Date Created
so0195R
Sales Order / Inv. Number
S-R-2436-19.5UB-E2-NI
Item
Revised Date
Steel Glass-Mounting Clip
Mirror-Polished Stainless
SCALE 1 : 2
MIRROR CLIP DETAIL
16
3
"
16
1
1"
"
36"
24"
10"
5"
4"
4"
16"
21"
19" LCD
VIEWABLE
SCREEN
1" LIFT-OFF CLEARANCE REQUIRED
1116"
34"
1716"
Sales Order / Inv. Number
Item and Description
Revised Date
Reseller
SHEET 1
SIGNATURE
AND DATE
REQUIRED
DATE:
SIGNATURE:
NOTE:
PLEASE SIGN AND DATE THIS PAGE BEFORE RETURNING TO SEURA. ONLY THIS PAGE NEEDS TO BE
RETURNED. BY RETURNING THIS SHEET, YOU ARE AGREEING TO ALL DIMENSIONS SHOWN ON ALL DRAWING
SHEETS. FOR CUSTOM UNITS, WE WILL NOT START THE BUILD PROCESS WITHOUT AN AUTHORIZED SIGNATURE.
FOR DRAWINGS THAT REQUIRE REVISIONS: SEND THE REVISIONS TO SEURA ON THE ORIGINAL DRAWINGS.
DO NOT SIGN UNTIL ALL REQUIRED DIMENSIONS ARE VERIFIED AND ACCEPTED.
AFTER THE DRAWINGS ARE UPDATED, A REVISED DRAWING PACKAGE WILL BE RE-SENT FOR SIGNATURE.
DIMENSIONS ARE IN INCHES
TOLERANCES
FRACTIONAL 1/8 [3mm]
ANGULAR: MACH 1.0
ANGULAR: BEND 1.0
TWO PLACE DECIMAL .03 [.8mm]
THREE PLACE DECIMAL .015 [.4mm]
PROPRIETARY AND CONFIDENTIAL
THE INFORMATION CONTAINED IN
THIS DOCUMENT IS THE SOLE
PROPERTY OF THE MANUFACTURER.
ANY REPRODUCTION IN PART, OR AS
A WHOLE, WITHOUT THE WRITTEN
PERMISSION OF MANUFACTURER, IS
PROHIBITED.
www.seura.com
1.800.95.SEURA
PH. 920.857.9069
FAX 920.857.9490
Date Created
so0195R
S-R-2436-19.5UB-E2-NI
24" (W) x 36" (H) Recessed TV Mirror with Ultra-Bright 19" TV and Enhanced Glass

