background image

4

Setup

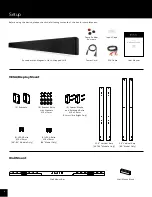
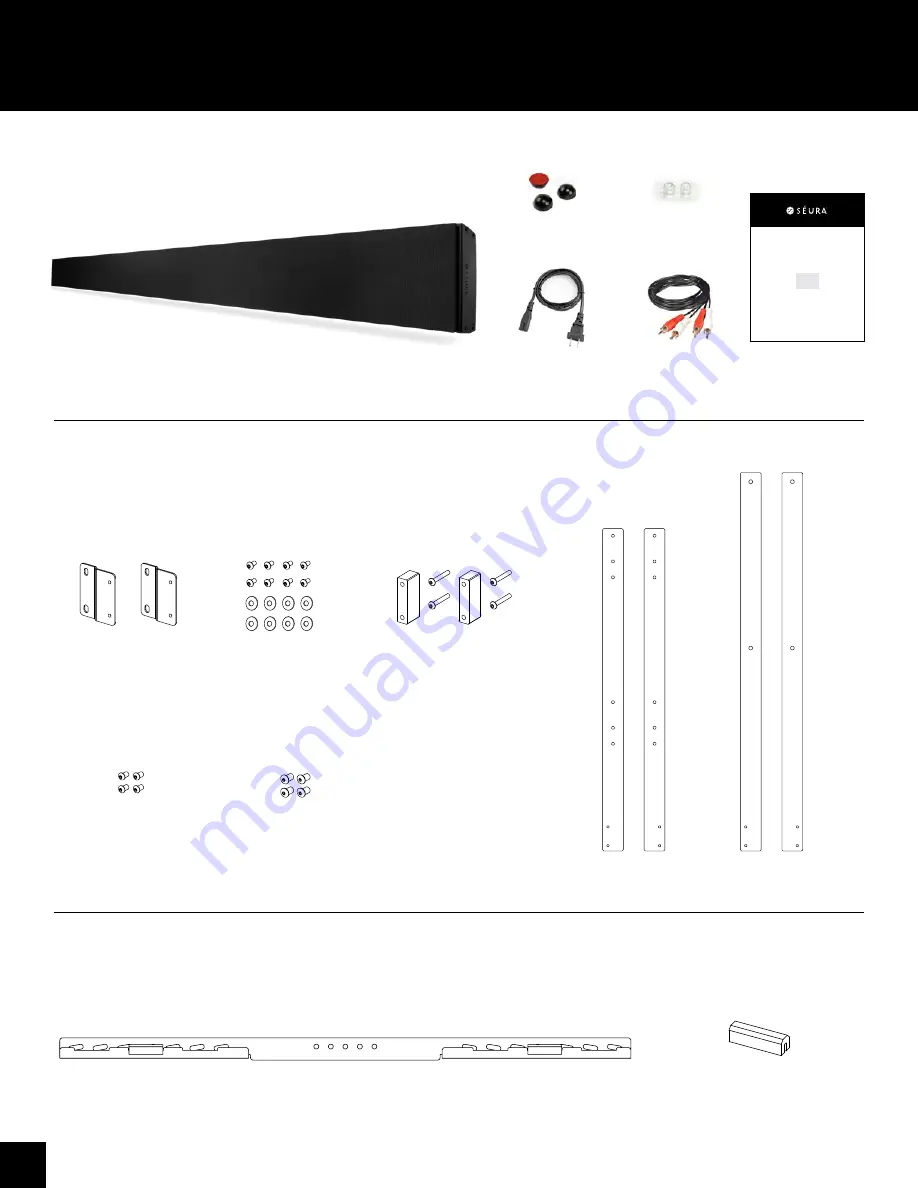
Before using the device, please check the following contents of the box for completeness:

Soundbar with Magnetic Cloth-Wrapped Grill

USER MANUAL

W W W.SEUR A .COM

FOR OUTDOOR DISPL AY SIZES 49-INCH, 55-INCH, 65-INCH, 86-INCH

Outdoor Soundbar

MODEL NUMBERS

SPK-49

SPK-55

SPK-65

SPK-86

User Manual

Power Cord

RCA Cable

Dome Rubber 

Bumpers

Input Caps

VESA/Display Mount

Wall Mount

Wall Mount Block

Wall Mount Bar

Wall Mount Block

Wall Mount Bar

Mounting Screw

(not included)

Wall Mount Block

Mounting Screw

Wall Mount Block

Wall Mount Block

Leveling Set Screw

“A”

“C”

“B”

CLEAT

C

C

SHIM

SHIM

Beveled

Edge

Below illustrations not applicable.

Mounting Screw

Storm Ultra Bright

Storm

Mounting Screw

(not included)

Wall Mount Block

Wall Mount Bar

Wall Mount Block

Wall Mount Bar

Mounting Screw

(not included)

Wall Mount Block

Mounting Screw

Wall Mount Block

Wall Mount Block

Leveling Set Screw

“A”

“C”

“B”

CLEAT

C

C

SHIM

SHIM

Beveled

Edge

Below illustrations not applicable.

Mounting Screw

Storm Ultra Bright

Storm

Mounting Screw

(not included)

Wall Mount Bar

Wall Mount Block

36” Vertical Bars
(86” Model Only)

30.5” Vertical Bars

(49”-65” Models Only)

 (2) Brackets

(4) Spacer Blocks


and Extended Bolts

M5 x 35mm

(Storm Ultra Bright Only)

(4) VESA Bolts

M6 x 16mm

(49”-65” Models Only)

(4) VESA Bolts

M8 x 16mm

(86” Model Only)

(8) Bracket Bolts


with Washers


M5 x 10mm

Summary of Contents for SPK-49

Page 1: ...USER MANUAL WWW SEURA COM FOR OUTDOOR DISPLAY SIZES 49 INCH 55 INCH 65 INCH 86 INCH Outdoor Soundbar MODEL NUMBERS SPK 49 SPK 55 SPK 65 SPK 86 ...

Page 2: ...de sources de chaleur telles que des radiateurs registres de chaleur poêles ou autres appareils y compris les amplificateurs qui produisent de la chaleur 9 Ne pas contourner le dispositif de sécurité de la fiche polarisée ou mise à la terre Une fiche polarisée possède deux lames dont une plus large que l autre Une prise de terre a deux lames et une troisième broche de mise à la terre La lame large...

Page 3: ...ndividual components can be destroyed if the polarity is reversed or an incorrect connection is used A goodwill replacement is not possible in such cases since each device is submitted to meticulous quality inspections prior to shipping The connecting plugs must be attached in such a way that the connector is held firmly Have trained technical personnel install the electrical facilities necessary ...

Page 4: ...tions not applicable Mounting Screw Storm Ultra Bright Storm Wall Mount Block Wall Mount Bar strations not applicable Mounting Screw Storm Ultra Bright Storm Mounting Screw not included Beveled Edge s not applicable Mounting Screw Storm ations not applicable Mounting Screw Storm Ultra Bright Storm Mounting Screw Below illustration Storm Below illustration Storm s not applicable Mounting Screw Stor...

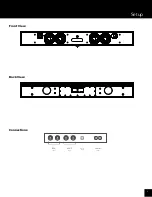
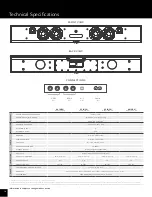
Page 5: ...5 Setup Connections Front View Back View Power Input Service Only RCA 2 Input RCA 1 Input Storm Ultra Bright ...

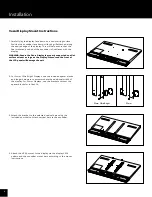
Page 6: ...the Display Pressure on the front of the LCD panel will damage the unit 2 For Storm Ultra Bright Displays use the included spacer blocks and longer hardware to accommodate the additional width of the display For Storm Displays use the brackets without the spacer blocks for a flush fit 3 Attach the bracket to the selected vertical bars using the included short bolts Attach vertical bars to the soun...

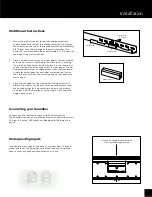
Page 7: ... Place one wall mount block on either side of the bar making sure the set screw is centered in the block prior to placing it on the bar Each block should be placed in the recess just to the outside of the mounting screw for that side of the bar The soundbar will rest on these blocks when installed and a wider placement gives the soundbar more stability Placing the blocks too far from the mounting ...

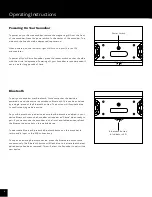
Page 8: ...tooth button on the soundbar to return audio input to the RCA connections To unpair an existing Bluetooth device press the Bluetooth button twice consecutively The Bluetooth button will flash blue to indicate that the last paired device has been removed This will allow the Soundbar to pair with a new device Bluetooth Button Indicator LED Power Switch To power on your Séura soundbar remove the magn...

Page 9: ...h is enabled and paired on your Bluetooth source device in device settings Verify that your Bluetooth device is not muted and volume control is set to an audible level Unable to pair soundbar via Bluetooth Verify that Bluetooth is enabled on both the Soundbar and Bluetooth device If Séura is not listed as an available Bluetooth device enable Bluetooth on the Soundbar by pressing the Bluetooth butt...

Page 10: ...nd Aluminum PRODUCT DIMENSIONS 44 6 w x 6 1 h 50 0 w x 6 1 h 58 6 w x 6 1 h 77 0 w x 6 1 h PRODUCT DEPTH 2 3 2 3 2 3 2 3 PRODUCT WEIGHT 18 7 lbs 19 5 lbs 20 7 lbs 24 2 lbs OTHER CERTIFICATIONS AND COMPLIANCE cTUVus ID FCC DoC WARRANTY Séura warrants Outdoor Soundbars with respect to labor and parts for one 1 year ACCESSORIES VESA Display Mount and Wall Mount Included Installation in sunlight reduc...

Page 11: ...ir the Product with new or refurbished parts onsite or at Séura s factory including Séura s labor if applicable or b replace the Product with a new or refurbished Product or c refund of the lesser of a pro rata share of the current MSRP as determined by the remainder of the warranty period if replacement of the Product is not commercially feasible The remedy chosen will be in good faith and at the...

Page 12: ... harmful interference to radio communications However there is no guarantee that interference will not occur in a particular installation If this equipment does cause harmful interference to radio or television reception which can be determined by turning the equipment off and on the user is encouraged to try to correct the interference by one of the following measures Reorient or relocate the rec...

Reviews: