104 x 142 mm
15
Operation
∙ Insert the plug into the wall socket.
∙ After adjusting the browning control,
insert the bread into the toast slot and
press the operating lever down.
∙ The indicator light on the eject button
comes on.
∙ Once the desired degree of browning
is reached, the toaster switches off
automatically and the slices are ejected.
The indicator light goes out.
∙ To achieve even browning when toasting
several slices, allow around 30 seconds
between toasting cycles.
Bagel function
∙ The bagel function is useful for
toasting the sliced bagel’s cut-open area
while the other side is heated.
∙ Place the sliced bagels with the open
area facing outwards in the toaster. Start
the normal toasting action and then
activate the bagel function in addition.
This function is shown by the indicator
light.
Defrost function
∙ The defrost function may be used
in addition to the normal action when
toasting deep-frozen bread. This will
extend the toasting process.
∙ Simply press the defrost button after
activating the regular toasting function.
This function is shown by the indicator
lamp.
Warm-up function
∙ The warm-up function is suitable
for re-heating bread which has already
been toasted. Caution: Do not warm up
buttered bread.
∙ After activating the toasting function,
press the warm-up button in addition.
This function is shown by the indicator
lamp.
Interrupting the toasting cycle
∙ If you want to interrupt the toasting
cycle, press the eject button .
∙ The toaster will switch off and the slices
are ejected. The indicator light goes out.
Warming up rolls, buns etc.
∙ To warm up buns, rolls or other bakery
items, push the slide control operating
lever for the warming top all the way
down to raise the warming top.
∙ Place the items to be warmed up on
the top, adjust the browning control to a
medium setting and then push down the
operating lever to switch on the toaster.
∙ Once the browning cycle is complete
and the appliance has automatically
switched off, turn the roll or bread over
and repeat the cycle.
∙ After use, return the warming top to its
rest position by pushing the slide control
back up.
∙ Do not place the items directly on the
toast slot.
Summary of Contents for AT 2510
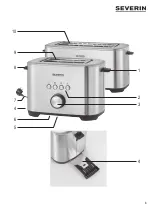
Page 3: ...3 1 2 4 3 7 10 9 8 4 6 5...
Page 76: ...76 1 2 3 4 5 6 7 8 9 2 2510 10 4 2512 GR...
Page 77: ...77 email 8...
Page 78: ...78 8 8...
Page 79: ...79...
Page 80: ...80 25 mm 4 2512...
Page 81: ...81 30...
Page 82: ...82...
Page 83: ...83...
Page 84: ...84...


